教程:使用 ChatModel 自定义 GenAI 模型
从 MLflow 3.0.0 开始,我们推荐使用 ResponsesAgent 而非 ChatModel。更多详情请参阅 ResponsesAgent 简介。
飞速发展的生成式人工智能(GenAI)领域带来了令人兴奋的机遇和集成挑战。为了有效地利用最新的 GenAI 进展,开发者需要一个能够平衡灵活性和标准化性的框架。MLflow 通过在 2.11.0 版本中引入的 mlflow.pyfunc.ChatModel 类来满足这一需求,它为 GenAI 应用程序提供了一个一致的接口,同时简化了部署和测试。
在 ChatModel 和 PythonModel 之间进行选择
在 MLflow 中构建 GenAI 应用程序时,选择正确的模型抽象至关重要,它需要在易用性和所需的自定义级别之间取得平衡。MLflow 提供两个主要的类来实现此目的:mlflow.pyfunc.ChatModel 和 mlflow.pyfunc.PythonModel。每个类都有其优点和权衡,因此了解哪一个最适合您的用例至关重要。
| ChatModel | PythonModel | |
|---|---|---|
| 何时使用 | 当您想开发和部署一个与 OpenAI 规范兼容的**标准**聊天模式的对话模型时使用。 | 当您希望对模型的接口拥有完全控制权,或自定义模型行为的每一个方面时使用。 |
| 接口 | 固定为 OpenAI 的聊天模式。 | 完全控制模型的输入和输出模式。 |
| 设置 | 快速。开箱即用,适用于对话式应用程序,具有预定义的模型签名和输入示例。 | **自定义**。您需要自己定义模型签名或输入示例。 |
| 复杂性 | **低**。标准化接口简化了模型部署和集成。 | 高。部署和集成自定义 PythonModel 可能不那么直接。例如,模型需要处理 Pandas DataFrame,因为 MLflow 在将输入数据传递给 PythonModel 之前会将其转换为 DataFrame。 |
本教程的目的
本教程将指导您完成使用 MLflow 的 mlflow.pyfunc.ChatModel 类创建自定义聊天代理的过程。
在本教程结束时,您将
- 将 MLflow Tracing 集成到自定义的
mlflow.pyfunc.ChatModel实例中。 - 在
mlflow.pyfunc.log_model()中使用model_config参数来自定义您的模型。 - 利用标准化的签名接口简化部署。
- 识别并避免扩展
mlflow.pyfunc.ChatModel类时常见的陷阱。
先决条件
- 熟悉 MLflow 日志记录 API 和 GenAI 概念。
- 已安装 MLflow 版本 2.11.0 或更高版本,以便使用
mlflow.pyfunc.ChatModel。 - 已安装 MLflow 版本 2.14.0 或更高版本,以便使用 MLflow Tracing。
本教程使用 Databricks Foundation Model APIs 仅作为与外部服务交互的示例。您可以轻松地将提供商示例替换为任何托管的 LLM 托管服务(例如 Amazon Bedrock、Azure AI Studio、OpenAI、Anthropic 等)。
核心概念
- 追踪
- 自定义
- 标准化
- 陷阱
GenAI 的跟踪自定义
MLflow Tracing 允许您监视和记录模型方法的执行情况,在调试和性能优化期间提供宝贵的见解。
在我们的示例 BasicAgent 实现中,我们使用两种独立的 API 来启动跟踪跨度:装饰器 API 和流式 API。
装饰器 API
@mlflow.trace
def _get_system_message(self, role: str) -> Dict:
    if role not in self.models:
        raise ValueError(f"Unknown role: {role}")

    instruction = self.models[role]["instruction"]
    return ChatMessage(role="system", content=instruction).to_dict()
使用 @mlflow.trace 跟踪装饰器是将跟踪功能添加到函数和方法的最简单方法。默认情况下,由此装饰器应用的 span 将使用函数的名称作为 span 的名称。可以通过以下方式覆盖此命名以及与 span 相关的其他参数:
@mlflow.trace(name="custom_span_name", attributes={"key": "value"}, span_type="func")
def _get_system_message(self, role: str) -> Dict:
    if role not in self.models:
        raise ValueError(f"Unknown role: {role}")

    instruction = self.models[role]["instruction"]
    return ChatMessage(role="system", content=instruction).to_dict()
始终建议为生成的任何 span 设置人类可读的名称,特别是当您要检测私有或通用名称的函数或方法时。MLflow Trace UI 默认会显示函数或方法的名称,如果您的函数和方法命名模糊,可能会导致难以理解。
流式 API
用于启动 span 的 流式 API 上下文管理器实现,当您需要完全控制 span 数据的每个方面的日志记录时非常有用。
下面是我们应用程序中确保捕获通过 load_context 方法加载模型时设置的参数的示例。我们从实例属性 self.models_config 和 self.models 中提取信息来设置 span 的属性。
with mlflow.start_span("Audit Agent") as root_span:
    root_span.set_inputs(messages)
    attributes = {**params.to_dict(), **self.models_config, **self.models}
    root_span.set_attributes(attributes)
    # More span manipulation...
MLflow UI 中的跟踪
在运行包含这些组合的跟踪 span 生成和检测使用模式的示例之后,
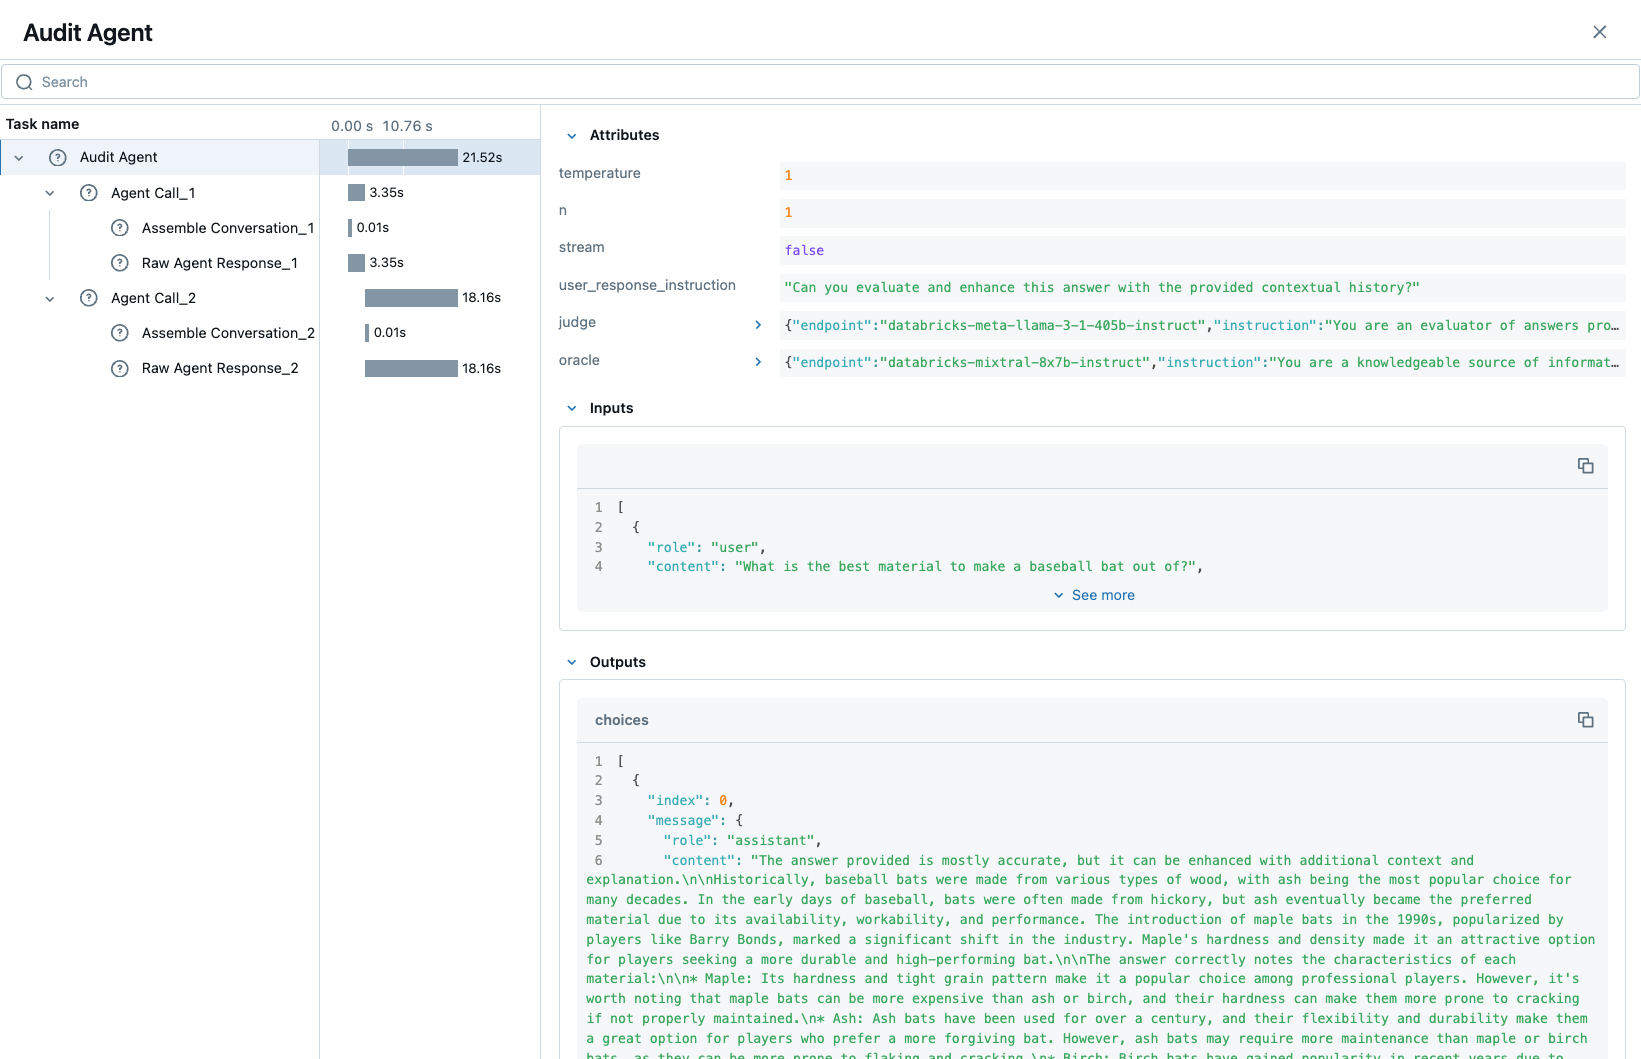
GenAI 的模型自定义
为了控制我们 BasicAgent 模型的行为,而无需将配置值硬编码到模型逻辑中,在记录模型时使用 model_config 参数指定配置可以为我们的模型定义带来一定的灵活性和通用性。
此功能允许我们
- 快速测试不同的配置,而无需更改源代码
- 在 MLflow UI 中查看记录不同迭代时使用的配置
- 简化模型代码,将配置与实现分离
在我们的示例模型中,我们设置了一组标准的配置,用于控制 BasicAgent 的行为。代码期望的配置结构是一个包含以下组件的字典:
models:定义每个代理的配置。(model_name):代表代理的角色。此部分包含:endpoint:代理使用的特定模型类型。instruction:提供给模型的提示,描述其角色和职责。temperature:控制响应可变性的温度设置。max_tokens:生成响应的最大 token 限制。
configuration:包含代理应用程序的杂项设置。user_response_instruction:通过模拟第一个代理的输出作为用户响应来为第二个代理提供上下文。
此配置结构定义将
- 在记录模型时定义,并结构化以支持模型行为的需求
- 由 load_context 方法使用,并在加载模型时应用
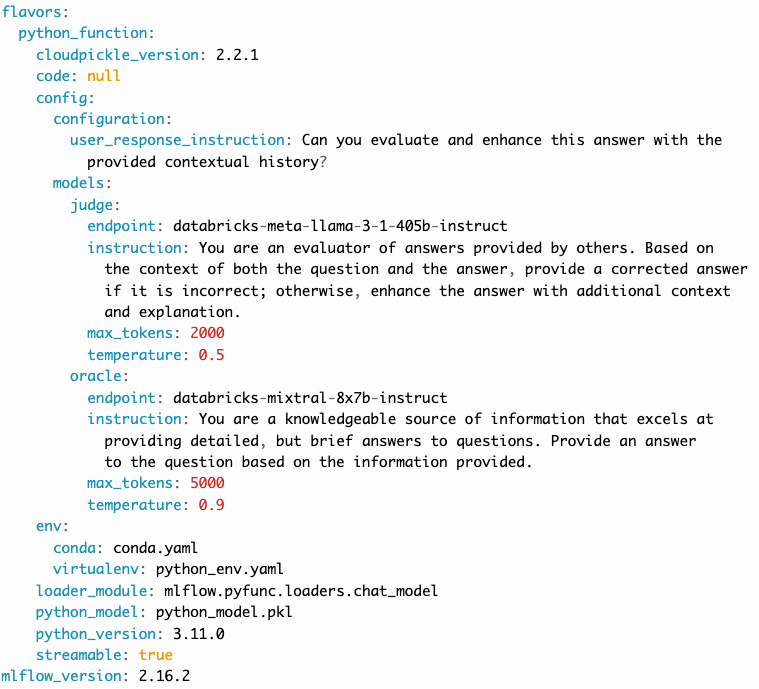
- 记录在 MLmodel 文件中,并且将在 MLflow UI 的 artifact 查看器中可见
在本教程的 BasicAgent 示例中提交的 model_config 值可以在记录模型的 MLmodel 文件中看到。
GenAI 模型的标准化
在使用 MLflow 部署 GenAI 应用程序时,最复杂的任务之一是构建基于 mlflow.pyfunc.PythonModel 抽象的自定义实现。
虽然 PythonModel 推荐用于自定义深度学习和传统机器学习模型(如 sklearn 或 torch 模型,它们需要除了基础模型之外的其他处理逻辑),但在服务这些模型时,数据内部的操纵会引入不必要的复杂性,这对于 GenAI 应用程序来说尤其如此。
由于深度学习和传统机器学习模型主要依赖于结构化数据,当通过 REST 接口传递输入数据进行模型服务时,PythonModel 实现会将 JSON 数据转换为 pandas.DataFrame 或 numpy 对象。当使用 GenAI 模型时,这种转换会产生一个令人困惑且难以调试的场景。GenAI 实现通常仅处理与 JSON 兼容的数据结构,并且没有直观的有意义的表格表示,从而需要一个令人沮丧且复杂的转换接口才能使应用程序部署正常工作。
为了简化这个问题,mlflow.pyfunc.ChatModel 类被创建,以便为处理输入和输出到自定义 Python 模型上 predict() 方法的调用提供一个更简单的接口,用于服务 GenAI 用例。
在下面的示例教程代码中,我们继承了 ChatModel,以便利用这种简化的接口及其不可变的输入和输出格式。由于这种不可变性,我们无需考虑模型签名,而是可以直接使用 GenAI 行业广泛接受的 API 标准。
为了说明为什么首选使用 ChatModel 作为 MLflow 中自定义 GenAI 实现的超类,以下是截至 2024 年 9 月需要定义并提供给模型的签名,以符合 OpenAI API 规范:
输入模式(dict 类型)
[
    {
        "type": "array",
        "items": {
            "type": "object",
            "properties": {
                "content": {"type": "string", "required": True},
                "name": {"type": "string", "required": False},
                "role": {"type": "string", "required": True},
            },
        },
        "name": "messages",
        "required": True,
    },
    {"type": "double", "name": "temperature", "required": False},
    {"type": "long", "name": "max_tokens", "required": False},
    {"type": "array", "items": {"type": "string"}, "name": "stop", "required": False},
    {"type": "long", "name": "n", "required": False},
    {"type": "boolean", "name": "stream", "required": False},
    {"type": "double", "name": "top_p", "required": False},
    {"type": "long", "name": "top_k", "required": False},
    {"type": "double", "name": "frequency_penalty", "required": False},
    {"type": "double", "name": "presence_penalty", "required": False},
]
基于代理(工具调用)的模式比上面显示的简单聊天接口示例复杂得多。随着 GenAI 框架和服务不断发展出越来越复杂的功能,这些接口的复杂性也将随之增长,使得手动定义模式成为一项艰巨且耗时的任务。MLflow mlflow.pyfunc.ChatModel 接口提供的结构化输入验证消除了手动定义和管理这些复杂签名的负担。通过利用这些预定义模式,您可以获得强大的输入类型安全性和验证,确保您的已部署应用程序能够一致且正确地处理输入,而无需额外的工作。这种方法不仅降低了出错的风险,还简化了开发过程,让您可以专注于构建有影响力的 GenAI 解决方案,而无需处理复杂的输入规范的管理。
通过使用 mlflow.pyfunc.ChatModel 作为自定义实现的基础,我们无需考虑这个复杂的签名。它已经为我们提供了。
在与 ChatModel 的静态签名交互时,需要注意的两个方面是:
- 如果您的自定义实现正在交互的服务不符合
OpenAI规范,您需要从mlflow.types.llm.ChatMessage和mlflow.types.llm.ChatParams的标准结构中提取数据,并确保它符合您的服务所期望的。 predict返回的响应应符合ChatModel输出签名中定义的输出结构:mlflow.types.llm.ChatCompletionResponse。
MLflow 中 GenAI 的常见陷阱
构建 GenAI 用例的自定义实现存在许多可能令人沮丧或不直观的方式。以下是我们从用户那里听到的一些最常见的陷阱:
未使用支持的格式
如果您正在使用 MLflow 中原生支持的库,利用内置的日志记录和加载支持将比实现自定义模型更容易。建议查看支持的 GenAI 格式,看看是否有现成的解决方案可以满足您的用例需求,其中有许多可用的集成。
误解 load_context 的作用
虽然继承自定义模型的基类类型时,类定义可能看起来像“所见即所得”的标准 Python 类。然而,在加载自定义模型实例时,load_context 方法实际上是由另一个加载器对象调用的。
由于这种实现方式,您不能在 load_context 中直接分配未定义的实例属性。
例如,这样做不起作用:
from mlflow.pyfunc import ChatModel


class MyModel(ChatModel):
    def __init__(self):
        self.state = []

    def load_context(self, context):
        # This will fail on load as the instance attribute self.my_model_config is not defined
        self.my_model_config = context.get("my_model_config")
相反,请确保 load_context 方法设置的任何实例属性都在类构造函数中定义了占位符值。
from mlflow.pyfunc import ChatModel


class MyModel(ChatModel):
    def __init__(self):
        self.state = []
        self.my_model_config = None  # Define the attribute here

    def load_context(self, context):
        self.my_model_config = context.get("my_model_config")
未能安全处理 Secret
为了简化模型的部署,在配置中指定身份验证 Secret 可能会很诱人。然而,在 model_config 参数中定义的任何配置数据都直接在 MLflow UI 中可见,并且不安全存储。
处理敏感配置数据(如 API 密钥或访问令牌)的推荐方法是使用 Secret Manager。可以配置要从您的 Secret 管理系统中获取什么,存储在 model_config 定义中,并且您的部署环境可以使用安全的方式访问您的 Secret 管理服务的密钥引用。
处理 Secret 分配的有效位置(通常设置为环境变量或作为请求标头的一部分传递)是在 load_context 中处理获取和每个会话的设置。如果您有轮换令牌,则值得将 Secret 的获取以及在令牌过期时重新获取它们作为 predict 调用堆栈中的重试机制的一部分。
未能使用 input_example
虽然在 MLflow 中记录模型时提供 input_example 似乎纯粹是为了在 MLflow UI 的 artifact 视图显示中的美观目的,但它还有其他功能使提供这些数据非常有用,尤其是在 GenAI 用例中。
当提供 input_example 时,MLflow 将使用示例数据调用模型的 predict 方法,以验证输入与您正在记录的模型对象兼容。如果发生任何失败,您将收到一条错误消息,详细说明输入语法的问题。这对于确保在记录点,您可以确保预期的输入接口结构是被允许的,从而为您节省部署解决方案时数小时的调试和故障排除时间,这是非常有益的。
强烈建议在记录时提供此示例。
未能处理命中速率限制的重试
几乎所有的 GenAI 提供商服务都施加了速率限制和基于 token 的使用限制,以防止服务中断或帮助用户免受意外账单的影响。当达到限制时,重要的是您的预测逻辑能够稳健地处理这些失败,以确保您的已部署应用程序的用户了解其请求为何不成功。
对于某些错误(尤其是涉及暂时性连接问题或每单位时间请求限制的错误),引入重试逻辑可能是有益的。
部署前未验证
部署 GenAI 应用程序的过程可能需要大量时间。当实现最终准备好提交到服务环境时,您最不想处理的就是一个模型,由于传递到模型 predict() 方法的解码 JSON payload 的某个问题而无法服务。
MLflow 提供了 mlflow.models.validate_serving_input() API,通过模拟已部署模型发生的数据处理来确保您记录的模型能够进行交互。
要使用此 API,只需在 MLflow UI 的 artifact 查看器中导航到您记录的模型。artifact 查看器右侧的模型显示窗格包含代码片段,您可以在交互式环境中执行该代码片段,以确保您的模型已准备好部署。
对于本教程中的示例,这是从 artifact 查看器显示中复制生成的代码:
from mlflow.models import validate_serving_input

model_uri = "runs:/8935b7aff5a84f559b5fcc2af3e2ea31/model"

# The model is logged with an input example. MLflow converts
# it into the serving payload format for the deployed model endpoint,
# and saves it to 'serving_input_payload.json'
serving_payload = """{
"messages": [
    {
    "role": "user",
    "content": "What is a good recipe for baking scones that doesn't require a lot of skill?"
    }
],
"temperature": 1.0,
"n": 1,
"stream": false
}"""

# Validate the serving payload works on the model
validate_serving_input(model_uri, serving_payload)
我们示例中的关键类和方法
BasicAgent:扩展ChatModel的自定义聊天代理类。_get_system_message:检索特定角色的系统消息配置。get_agent_response:向端点发送消息并检索响应。_call_agent:管理代理角色之间的对话流程。prepare_message_list:准备要发送的消息列表。load_context:初始化模型上下文和配置。predict:处理聊天模型的预测逻辑。
在上面列出的这些方法中,load_context 和 predict 方法覆盖了 ChatModel 的基本抽象实现。为了定义 ChatModel 的子类,您必须(至少)实现 predict 方法。load_context 方法仅在您实现(如下文所示)自定义加载逻辑时使用,其中需要加载静态配置才能使模型对象工作,或者需要执行其他依赖逻辑才能使对象实例化正常运行。
自定义 ChatModel 示例
在下面的完整示例中,我们通过继承 mlflow.pyfunc.ChatModel 来创建一个自定义聊天代理。这个名为 BasicAgent 的代理利用了几个重要功能,有助于简化 GenAI 应用程序的开发、部署和跟踪。通过继承 ChatModel,我们确保了处理对话代理的一致接口,同时避免了更通用模型相关的常见陷阱。
下面的实现强调了以下关键方面:
- 跟踪:我们利用 MLflow 的跟踪功能,通过装饰器和流式 API 上下文管理器方法来跟踪和记录关键操作。
- 装饰器 API:用于轻松跟踪 _get_agent_response 和 _call_agent 等方法,以实现自动 span 创建。
- 流式 API:为 span 创建提供细粒度控制,如 predict 方法所示,用于在代理交互期间审计关键输入和输出。
- 提示:我们确保 span 名称具有人类可读性,以便在 MLflow Trace UI 中以及通过客户端 API 获取日志记录的跟踪时更容易进行调试。
- 自定义配置:
- 模型配置:通过在模型记录期间传递自定义配置(使用 model_config 参数),我们将模型行为与硬编码值分离。这允许快速测试不同的代理配置,而无需修改源代码。
- load_context 方法:确保在运行时加载配置,并使用必要的设置初始化代理,防止由于缺少配置而导致的运行时失败。
- 提示:我们避免在 load_context 中直接设置未定义的实例属性。相反,所有属性都在类构造函数中用默认值初始化,以确保我们的模型正确加载。
- 对话管理:
- 我们使用 _get_system_message、_get_agent_response 和 _call_agent 等方法来实现多步代理交互模式。这些方法管理多个代理之间的通信流程,例如“预言家”和“裁判”角色,每个角色都配置有特定的指令和参数。
- 静态输入/输出结构:通过遵循
ChatModel所需的输入(List[ChatMessage])和输出(ChatCompletionResponse)格式,我们消除了与转换 JSON 或表格数据相关的复杂性,而这些在PythonModel等更通用的模型中很常见。
- 避免了常见的陷阱:
- 通过输入示例进行模型验证:我们在模型记录期间提供一个输入示例,允许 MLflow 使用该示例验证输入接口并在早期捕获任何问题,从而减少部署期间的调试时间。
- 从代码生成模型:
- MLflow 建议在编写 GenAI 代理或应用程序时使用从代码生成模型,以实现对代理(包含任意 Python 代码)的稳健日志记录和直接部署。
import mlflow
from mlflow.types.llm import ChatCompletionResponse, ChatMessage, ChatParams, ChatChoice
from mlflow.pyfunc import ChatModel
from mlflow import deployments
from typing import List, Optional, Dict


class BasicAgent(ChatModel):
    def __init__(self):
        """Initialize the BasicAgent with placeholder values."""
        self.deploy_client = None
        self.models = {}
        self.models_config = {}
        self.conversation_history = []

    def load_context(self, context):
        """Initialize the connectors and model configurations."""
        self.deploy_client = deployments.get_deploy_client("databricks")
        self.models = context.model_config.get("models", {})
        self.models_config = context.model_config.get("configuration", {})

    def _get_system_message(self, role: str) -> Dict:
        """
        Get the system message configuration for the specified role.

        Args:
            role (str): The role of the agent (e.g., "oracle" or "judge").

        Returns:
            dict: The system message for the given role.
        """
        if role not in self.models:
            raise ValueError(f"Unknown role: {role}")

        instruction = self.models[role]["instruction"]
        return ChatMessage(role="system", content=instruction).to_dict()

    @mlflow.trace(name="Raw Agent Response")
    def _get_agent_response(
        self, message_list: List[Dict], endpoint: str, params: Optional[dict] = None
    ) -> Dict:
        """
        Call the agent endpoint to get a response.

        Args:
            message_list (List[Dict]): List of messages for the agent.
            endpoint (str): The agent's endpoint.
            params (Optional[dict]): Additional parameters for the call.

        Returns:
            dict: The response from the agent.
        """
        response = self.deploy_client.predict(
            endpoint=endpoint, inputs={"messages": message_list, **(params or {})}
        )
        return response["choices"][0]["message"]

    @mlflow.trace(name="Agent Call")
    def _call_agent(
        self, message: ChatMessage, role: str, params: Optional[dict] = None
    ) -> Dict:
        """
        Prepares and sends the request to a specific agent based on the role.

        Args:
            message (ChatMessage): The message to be processed.
            role (str): The role of the agent (e.g., "oracle" or "judge").
            params (Optional[dict]): Additional parameters for the call.

        Returns:
            dict: The response from the agent.
        """
        system_message = self._get_system_message(role)
        message_list = self._prepare_message_list(system_message, message)

        # Fetch agent response
        agent_config = self.models[role]
        response = self._get_agent_response(
            message_list, agent_config["endpoint"], params
        )

        # Update conversation history
        self.conversation_history.extend([message.to_dict(), response])
        return response

    @mlflow.trace(name="Assemble Conversation")
    def _prepare_message_list(
        self, system_message: Dict, user_message: ChatMessage
    ) -> List[Dict]:
        """
        Prepare the list of messages to send to the agent.

        Args:
            system_message (dict): The system message dictionary.
            user_message (ChatMessage): The user message.

        Returns:
            List[dict]: The complete list of messages to send.
        """
        user_prompt = {
            "role": "user",
            "content": self.models_config.get(
                "user_response_instruction", "Can you make the answer better?"
            ),
        }
        if self.conversation_history:
            return [system_message, *self.conversation_history, user_prompt]
        else:
            return [system_message, user_message.to_dict()]

    def predict(
        self, context, messages: List[ChatMessage], params: Optional[ChatParams] = None
    ) -> ChatCompletionResponse:
        """
        Predict method to handle agent conversation.

        Args:
            context: The MLflow context.
            messages (List[ChatMessage]): List of messages to process.
            params (Optional[ChatParams]): Additional parameters for the conversation.

        Returns:
            ChatCompletionResponse: The structured response object.
        """
        # Use the fluent API context handler to have added control over what is included in the span
        with mlflow.start_span(name="Audit Agent") as root_span:
            # Add the user input to the root span
            root_span.set_inputs(messages)

            # Add attributes to the root span
            attributes = {**params.to_dict(), **self.models_config, **self.models}
            root_span.set_attributes(attributes)

            # Initiate the conversation with the oracle
            oracle_params = self._get_model_params("oracle")
            oracle_response = self._call_agent(messages[0], "oracle", oracle_params)

            # Process the response with the judge
            judge_params = self._get_model_params("judge")
            judge_response = self._call_agent(
                ChatMessage(**oracle_response), "judge", judge_params
            )

            # Reset the conversation history and return the final response
            self.conversation_history = []

            output = ChatCompletionResponse(
                choices=[ChatChoice(index=0, message=ChatMessage(**judge_response))],
                usage={},
                model=judge_params.get("endpoint", "unknown"),
            )

            root_span.set_outputs(output)

        return output

    def _get_model_params(self, role: str) -> dict:
        """
        Retrieves model parameters for a given role.

        Args:
            role (str): The role of the agent (e.g., "oracle" or "judge").

        Returns:
            dict: A dictionary of parameters for the agent.
        """
        role_config = self.models.get(role, {})

        return {
            "temperature": role_config.get("temperature", 0.5),
            "max_tokens": role_config.get("max_tokens", 500),
        }


# IMPORTANT: specifies the Python ChatModel instance to use for inference requests when
# the model is loaded back
agent = BasicAgent()
mlflow.models.set_model(agent)
上面的代码片段将我们的代理定义为 ChatModel 的子类。使用从代码生成模型的方法,我们调用
mlflow.models.set_model,传入 BasicAgent 的实例,以指示加载代理时使用哪个模型对象进行推理。
将代理代码保存在一个 Python 文件中,例如 basic_agent.py。这是从代码生成模型的一个关键部分——它允许记录包含模型代码的文件,而不是序列化的模型对象,从而避免序列化问题。
在模型定义于代码文件后,在可以记录它之前只剩下一个步骤:我们需要定义用于初始化模型的配置。这是通过定义我们的 model_config 配置来完成的。
设置我们的 model_config 值
在记录模型之前,我们需要定义控制我们模型代理行为的配置。这种将配置与模型核心逻辑分离的做法使我们能够轻松地测试和比较不同的代理行为,而无需修改模型实现。通过使用灵活的配置系统,我们可以高效地试验不同的设置,从而更容易地迭代和微调我们的模型。
为什么要分离配置?
在生成式人工智能 (GenAI) 的背景下,代理的行为可能因给每个代理的指令集和参数(如 temperature 或 max_tokens)而异。如果我们直接将这些配置硬编码到我们的模型逻辑中,每个新测试都需要更改模型的源代码,从而导致:
- 效率低下:为每次测试更改源代码会减慢实验过程。
- 增加出错风险:不断修改源代码会增加引入 bug 或意外副作用的可能性。
- 缺乏可重现性:如果没有代码和配置之间的清晰分离,跟踪和重现特定结果所使用的确切配置将变得困难。
通过通过 model_config 参数在外部设置这些值,我们使模型灵活且能够适应不同的测试场景。这种方法还与 MLflow 的评估工具(如 mlflow.genai.evaluate())无缝集成,它允许您系统地比较不同配置下的模型输出。
定义模型配置
配置包含两个主要部分:
-
Models:此部分定义特定于代理的配置,例如此示例中的
judge和oracle角色。每个代理都有:- 一个endpoint:指定此代理使用的模型类型或服务。
- 一个instruction:定义代理的角色和职责(例如,回答问题、评估响应)。
- Temperature 和 Max Tokens:控制响应的可变性(
temperature)和 token 限制。
-
General Configuration:模型整体行为的其他设置,例如如何为后续代理构建用户响应。
有两种可用选项可用于设置模型配置:直接在日志代码中(如下所示),或者将配置写入本地位置的 yaml 格式的配置文件,其路径可以在日志记录期间定义 model_config 参数时指定。要了解更多关于 model_config 参数如何使用,请参阅 model_config 使用指南。
这是我们为代理设置配置的方式:
model_config = {
    "models": {
        "judge": {
            "endpoint": "databricks-meta-llama-3-1-405b-instruct",
            "instruction": (
                "You are an evaluator of answers provided by others. Based on the context of both the question and the answer, "
                "provide a corrected answer if it is incorrect; otherwise, enhance the answer with additional context and explanation."
            ),
            "temperature": 0.5,
            "max_tokens": 2000,
        },
        "oracle": {
            "endpoint": "databricks-mixtral-8x7b-instruct",
            "instruction": (
                "You are a knowledgeable source of information that excels at providing detailed, but brief answers to questions. "
                "Provide an answer to the question based on the information provided."
            ),
            "temperature": 0.9,
            "max_tokens": 5000,
        },
    },
    "configuration": {
        "user_response_instruction": "Can you evaluate and enhance this answer with the provided contextual history?"
    },
}
外部配置的好处
- 灵活性:解耦的配置允许我们轻松地切换或调整模型行为,而无需修改核心逻辑。例如,我们可以更改模型的指令或调整
temperature来测试不同级别的响应创造力。 - 可扩展性:随着系统中代理的增加或新角色的引入,我们可以扩展此配置而不会使模型代码混乱。这种分离保持了代码库的清洁和可维护性。
- 可重现性和比较:通过将配置保存在外部,我们可以使用 MLflow 记录每次运行所使用的具体设置。这使得重现结果和比较不同实验变得更加容易,从而确保一个稳健的评估和仲裁过程来选择性能最佳的配置。
配置到位后,我们就可以记录模型并使用这些设置运行实验了。通过利用 MLflow 强大的跟踪和日志记录功能,我们将能够有效地管理实验并从代理的响应中提取有价值的见解。
定义输入示例
在记录模型之前,提供一个 input_example 来演示如何与模型交互非常重要。此示例有几个关键目的:
- 记录时的验证:包含
input_example允许 MLflow 在记录过程中使用该示例执行predict方法。这有助于验证您的模型是否可以处理预期的输入格式,并在早期捕获任何问题。 - UI 表示:
input_example显示在 MLflow UI 的模型 artifact 下。这为用户提供了一个方便的参考,以便在与已部署模型交互时理解预期的输入结构。
通过提供输入示例,您可以确保您的模型使用真实数据进行测试,从而增加其在部署后按预期行为运行的信心。
在使用 mlflow.pyfunc.ChatModel 定义您的 GenAI 应用程序时,如果未提供输入示例,系统将使用默认的占位符输入示例。如果您在 MLflow UI 的 artifact 查看器中看到不熟悉或通用的输入示例,那很可能是系统分配的默认占位符。为避免这种情况,请确保在保存模型时指定自定义输入示例。
这是我们将使用的输入示例
input_example = {
    "messages": [
        {
            "role": "user",
            "content": "What is a good recipe for baking scones that doesn't require a lot of skill?",
        }
    ]
}
此示例代表用户请求一个简单的烤饼食谱。它与我们 BasicAgent 模型期望的输入结构一致,该模型处理消息列表,其中每条消息都包含 role 和 content。
提供输入示例的好处
- 执行和验证:MLflow 将在日志记录期间将此
input_example传递给模型的predict方法,以确保它能够处理输入而不会出错。在此阶段,输入处理中的任何问题,例如数据类型不正确或缺少字段,都将被捕获,从而节省您以后调试的时间。 - 用户界面显示:
input_example将在 MLflow UI 的模型 artifact 查看部分中可见。这有助于用户了解模型期望的输入数据格式,从而在模型部署后更轻松地与之交互。 - 部署信心:通过预先使用示例输入验证模型,您可以获得额外的保证,即模型在生产环境中将正常工作,从而降低部署后出现意外行为的风险。
包含 input_example 是一个简单但强大的步骤,可以验证您的模型已准备好部署,并且在接收用户输入时将按预期运行。
记录和加载我们的自定义 Agent
要使用 MLflow 记录和加载模型,请使用
with mlflow.start_run():
    model_info = mlflow.pyfunc.log_model(
        name="model",
        # If needed, update `python_model` to the Python file containing your agent code
        python_model="basic_agent.py",
        model_config=model_config,
        input_example=input_example,
    )

loaded = mlflow.pyfunc.load_model(model_info.model_uri)

response = loaded.predict(
    {
        "messages": [
            {
                "role": "user",
                "content": "What is the best material to make a baseball bat out of?",
            }
        ]
    }
)
结论
在本教程中,您已探索了使用 MLflow 的 mlflow.pyfunc.ChatModel 类创建自定义 GenAI 聊天 Agent 的过程。我们演示了如何实现一种灵活、可扩展且标准化的方法来管理 GenAI 应用程序的部署,使您能够利用最新的 AI 进展,即使对于尚未在 MLflow 中拥有命名 flavor 的库和框架也是如此。
通过使用 ChatModel 而不是更通用的 PythonModel,您可以避免部署 GenAI 时遇到的许多常见陷阱,从而利用不可变的签名接口的优势,这些接口在您所有已部署的 GenAI 接口中保持一致,通过提供一致的体验来简化所有解决方案的使用。
本教程的关键要点包括
- 跟踪和监控:通过将跟踪直接集成到模型中,您可以深入了解应用程序的内部工作原理,从而使调试和优化更加直接。装饰器和流式 API 方法都提供了管理关键操作跟踪的通用方法。
- 灵活的配置管理:将配置与模型代码分离可确保您无需修改源代码即可快速进行测试和迭代。这种方法不仅简化了实验,而且随着应用程序的演进,还提高了可重复性和可扩展性。
- 标准化的输入和输出结构:利用
ChatModel的静态签名可以简化部署和提供 GenAI 模型的复杂性。通过遵循既定标准,您可以减少通常与集成和验证输入/输出格式相关的摩擦。 - 避免常见陷阱:在整个实现过程中,我们强调了最佳实践,以避免常见问题,例如正确处理机密、验证输入示例以及理解加载上下文的细微差别。遵循这些实践可确保您的模型在生产环境中保持安全、健壮和可靠。
- 验证和部署就绪性:在部署前验证模型的重要性不容夸大。通过使用
mlflow.models.validate_serving_input()等工具,您可以及早发现并解决潜在的部署问题,从而在生产部署过程中节省时间和精力。
随着生成式 AI 的格局不断发展,构建适应性强且标准化的模型对于利用未来几个月和几年中将解锁的令人兴奋且强大的功能至关重要。本教程涵盖的方法为您提供了一个强大的框架,用于在 MLflow 中集成和管理 GenAI 技术,使您能够轻松地开发、跟踪和部署复杂的 AI 解决方案。
我们鼓励您根据您的具体需求扩展和定制这个基础示例,并探索进一步的增强。通过利用 MLflow 不断增长的功能,您可以继续优化您的 GenAI 模型,确保它们在任何应用程序中都能提供有影响力和可靠的结果。