DSPy 快速入门
DSPy 通过将手动提示工程替换为结构化的“文本转换图”,简化了语言模型 (LM) 管道的构建。这些图使用灵活的学习模块,可以自动优化 LM 任务,例如推理、检索和回答复杂问题。
它是如何工作的?
总的来说,DSPy 会优化提示,选择最佳语言模型,甚至可以使用训练数据来微调模型。
该过程遵循这三个步骤,这是大多数 DSPy 优化器的共同点
- 候选生成:DSPy 查找程序中的所有
Predict模块,并生成指令和演示(例如,提示的示例)的变体。此步骤会为下一阶段创建一组可能的候选。 - 参数优化:DSPy 然后使用随机搜索、TPE 或 Optuna 等方法来选择最佳候选。在此阶段也可以对模型进行微调。
此演示
下面我们将创建一个简单的程序来演示 DSPy 的强大功能。我们将利用 OpenAI 构建一个文本分类器。在本教程结束时,我们将...
- 定义一个 dspy.Signature 和 dspy.Module 来执行文本分类。
- 利用 dspy.SIMBA 来编译我们的模块,使其在文本分类方面表现更好。
- 使用 MLflow Tracing 分析内部步骤。
- 使用 MLflow 记录编译后的模型。
- 加载记录的模型并执行推理。
%pip install -U datasets openai "dspy>=3.0.3" "mlflow>=3.4.0"
设置
设置 LLM
安装相关依赖项后,让我们设置对 OpenAI LLM 的访问。在这里,我们将利用 OpenAI 的 gpt-4o-mini 模型。
# Set OpenAI API Key to the environment variable. You can also pass the token to dspy.LM()
import getpass
import os

os.environ["OPENAI_API_KEY"] = getpass.getpass("Enter your OpenAI Key:")
import dspy

# Define your model. We will use OpenAI for simplicity
model_name = "gpt-4o-mini"

# Note that an OPENAI_API_KEY environment must be present. You can also pass the token to dspy.LM()
lm = dspy.LM(
  model=f"openai/{model_name}",
  max_tokens=500,
  temperature=0.1,
)
dspy.settings.configure(lm=lm)
创建 MLflow 实验
创建一个新的 MLflow 实验,以便在一个地方跟踪您的 DSPy 模型、指标、参数和跟踪。尽管您的工作区中已经创建了一个“默认”实验,但强烈建议为不同的任务创建实验,以组织实验的工件。
import mlflow

mlflow.set_experiment("DSPy Quickstart")
启用 MLflow 自动跟踪
MLflow Tracing 是一个强大的可观测性工具,用于监控和调试 DSPy 模块内部发生的情况,帮助您快速识别潜在的瓶颈或问题。要启用 DSPy 跟踪,您只需调用 mlflow.dspy.autolog 即可!
mlflow.dspy.autolog()
设置数据
接下来,我们将从 Huggingface 下载 Reuters 21578 数据集。我们还编写了一个实用程序,以确保我们的训练/测试集具有相同的标签。
import numpy as np
import pandas as pd
from datasets import load_dataset
from dspy.datasets.dataset import Dataset


def read_data_and_subset_to_categories() -> tuple[pd.DataFrame]:
  """
  Read the reuters-21578 dataset. Docs can be found in the url below:
  https://hugging-face.cn/datasets/yangwang825/reuters-21578
  """

  # Read train/test split
  dataset = load_dataset("yangwang825/reuters-21578")
  train = pd.DataFrame(dataset["train"])
  test = pd.DataFrame(dataset["test"])

  # Clean the labels
  label_map = {
      0: "acq",
      1: "crude",
      2: "earn",
      3: "grain",
      4: "interest",
      5: "money-fx",
      6: "ship",
      7: "trade",
  }

  train["label"] = train["label"].map(label_map)
  test["label"] = test["label"].map(label_map)

  return train, test


class CSVDataset(Dataset):
  def __init__(
      self, n_train_per_label: int = 20, n_test_per_label: int = 10, *args, **kwargs
  ) -> None:
      super().__init__(*args, **kwargs)
      self.n_train_per_label = n_train_per_label
      self.n_test_per_label = n_test_per_label

      self._create_train_test_split_and_ensure_labels()

  def _create_train_test_split_and_ensure_labels(self) -> None:
      """Perform a train/test split that ensure labels in `dev` are also in `train`."""
      # Read the data
      train_df, test_df = read_data_and_subset_to_categories()

      # Sample for each label
      train_samples_df = pd.concat(
          [group.sample(n=self.n_train_per_label) for _, group in train_df.groupby("label")]
      )
      test_samples_df = pd.concat(
          [group.sample(n=self.n_test_per_label) for _, group in test_df.groupby("label")]
      )

      # Set DSPy class variables
      self._train = train_samples_df.to_dict(orient="records")
      self._dev = test_samples_df.to_dict(orient="records")


# Limit to a small dataset to showcase the value of bootstrapping
dataset = CSVDataset(n_train_per_label=3, n_test_per_label=1)

# Create train and test sets containing DSPy
# Note that we must specify the expected input value name
train_dataset = [example.with_inputs("text") for example in dataset.train]
test_dataset = [example.with_inputs("text") for example in dataset.dev]
unique_train_labels = {example.label for example in dataset.train}

print(len(train_dataset), len(test_dataset))
print(f"Train labels: {unique_train_labels}")
print(train_dataset[0])
24 8
Train labels: {'interest', 'earn', 'money-fx', 'trade', 'ship', 'grain', 'acq', 'crude'}
Example({'text': 'bankamerica bacp raises prime rate to pct bankamerica corp following moves by other major banks said it has raised its prime rate to pct from pct effective today reuter', 'label': 'interest'}) (input_keys={'text'})
设置 DSPy Signature 和 Module
最后,我们将定义我们的任务:文本分类。
有多种方法可以为 DSPy 签名行为提供指导。目前,DSPy 允许用户指定
- 通过类 docstring 实现的高级别目标。
- 一组输入字段,带有可选的元数据。
- 一组输出字段,带有可选的元数据。
DSPy 将利用这些信息来指导优化。
在下面的示例中,请注意我们仅在 TextClassificationSignature 类的 output 字段中提供了预期的标签。从这个初始状态开始,我们将利用 DSPy 来学习提高我们的分类器准确性。
class TextClassificationSignature(dspy.Signature):
  text = dspy.InputField()
  label = dspy.OutputField(
      desc=f"Label of predicted class. Possible labels are {unique_train_labels}"
  )


class TextClassifier(dspy.Module):
  def __init__(self):
      super().__init__()
      self.generate_classification = dspy.Predict(TextClassificationSignature)

  def forward(self, text: str):
      return self.generate_classification(text=text)
运行它!
Hello World
让我们演示通过 DSPy 模块和关联的签名进行预测。程序已从签名 desc 字段正确学习了我们的标签,并生成了合理的预测。
# Initilize our impact_improvement class
text_classifier = TextClassifier()

message = "I am interested in space"
print(text_classifier(text=message))

message = "I enjoy ice skating"
print(text_classifier(text=message))
Prediction(
  label='interest'
)
Prediction(
  label='interest'
)
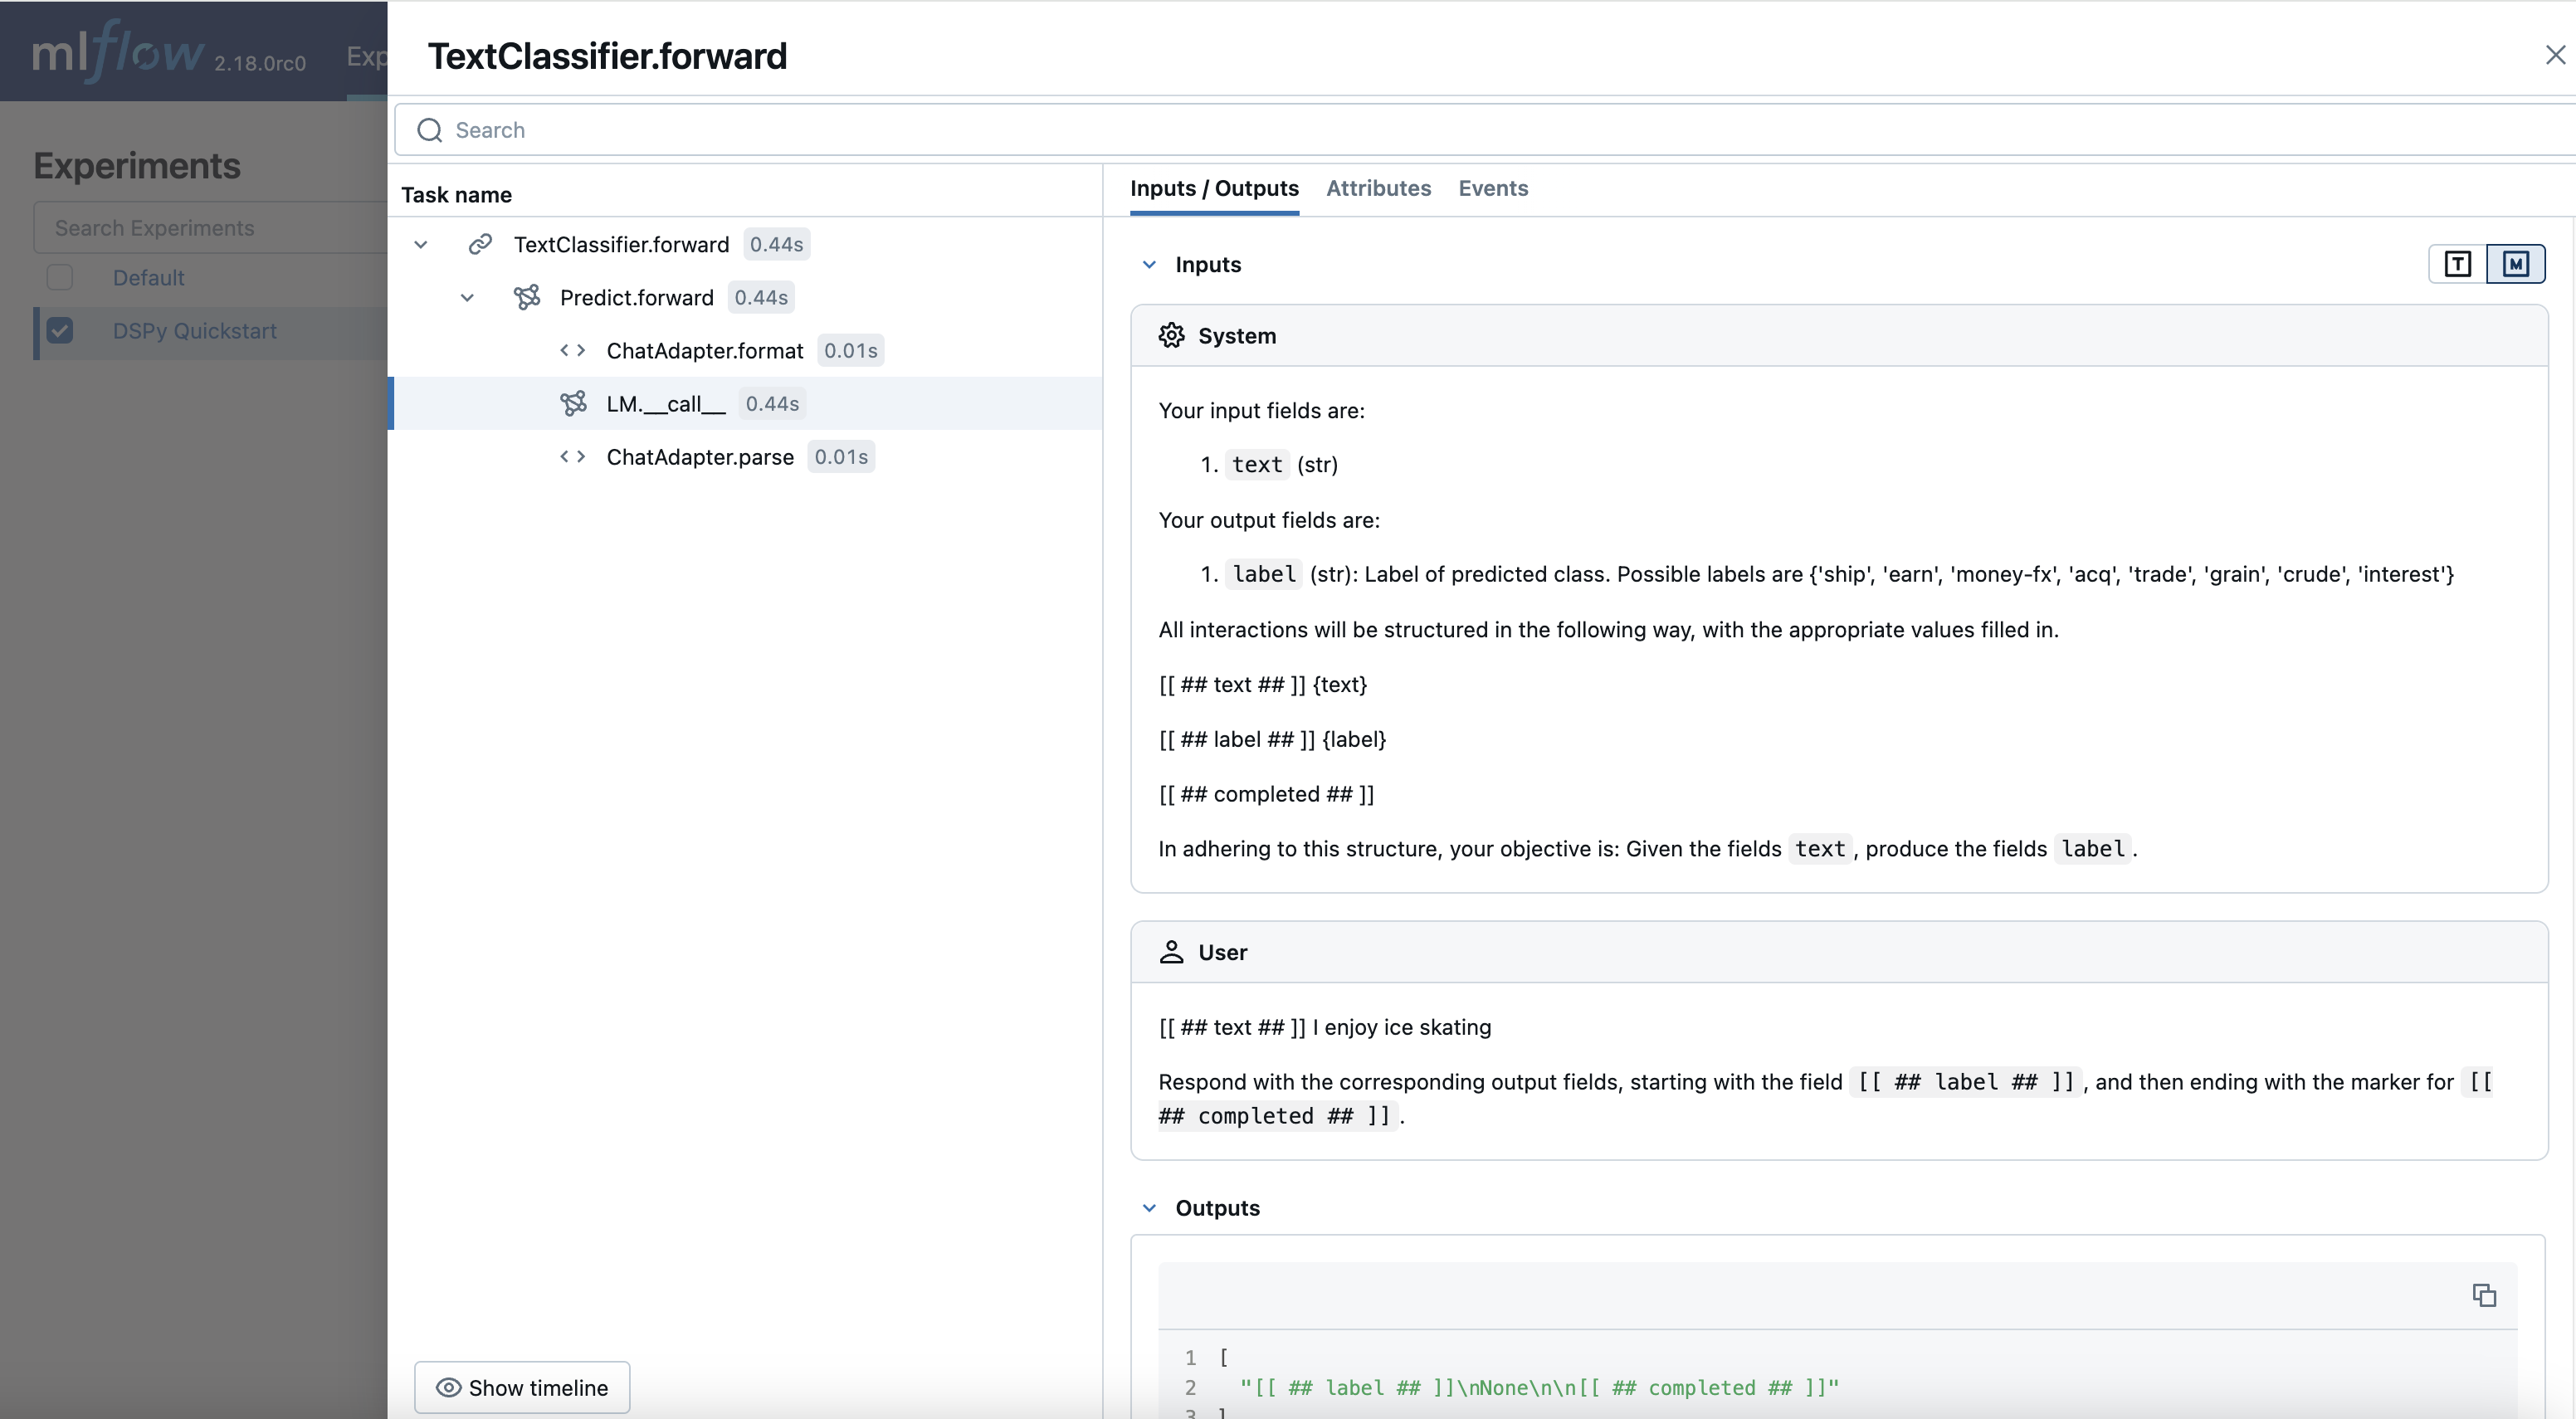
查看跟踪
- 打开 MLflow UI 并选择
“DSPy Quickstart”实验。 - 转到
“Traces”选项卡以查看生成的跟踪。
现在,您可以观察 DSPy 如何翻译您的查询并与 LLM 进行交互。此功能对于调试、迭代地优化系统内的组件以及监控生产中的模型非常有价值。虽然本教程中的模块相对简单,但随着模型的复杂性不断增加,跟踪功能会变得更加强大。
编译
训练
为了训练,我们将利用 SIMBA,这是一个优化器,它将从我们的训练集中提取引导样本,并利用随机搜索策略来优化我们的预测准确性。
请注意,在下面的示例中,我们利用了简单的精确匹配指标定义,如 validate_classification 中定义的,但是 dspy.Metrics 可以包含复杂且基于 LM 的逻辑来正确评估我们的准确性。
from dspy import SIMBA


def validate_classification(example, prediction, trace=None) -> bool:
  return example.label == prediction.label


optimizer = SIMBA(
  metric=validate_classification,
  max_demos=2,
  bsize=12,
  num_threads=1,
)

compiled_pe = optimizer.compile(TextClassifier(), trainset=train_dataset)
比较编译前/后准确性
最后,让我们探索一下我们训练好的模型在未见过的数据上进行预测的效果。
def check_accuracy(classifier, test_data: pd.DataFrame = test_dataset) -> float:
  residuals = []
  predictions = []
  for example in test_data:
      prediction = classifier(text=example["text"])
      residuals.append(int(validate_classification(example, prediction)))
      predictions.append(prediction)
  return residuals, predictions


uncompiled_residuals, uncompiled_predictions = check_accuracy(TextClassifier())
print(f"Uncompiled accuracy: {np.mean(uncompiled_residuals)}")

compiled_residuals, compiled_predictions = check_accuracy(compiled_pe)
print(f"Compiled accuracy: {np.mean(compiled_residuals)}")
Uncompiled accuracy: 0.875
Compiled accuracy: 1.0
如上所示,我们的编译准确性非零 - 我们的基础 LLM 仅通过初始提示就推断出了分类标签的含义。然而,通过 DSPy 训练,提示、演示以及输入/输出签名已得到更新,使我们的模型在未见过的数据上达到 100% 的准确性。这提高了 12 个百分点!
让我们看一下测试集中的每个预测。
for uncompiled_residual, uncompiled_prediction in zip(uncompiled_residuals, uncompiled_predictions):
  is_correct = "Correct" if bool(uncompiled_residual) else "Incorrect"
  prediction = uncompiled_prediction.label
  print(f"{is_correct} prediction: {' ' * (12 - len(is_correct))}{prediction}")
Incorrect prediction:    money-fx
Correct prediction:      crude
Correct prediction:      money-fx
Correct prediction:      earn
Incorrect prediction:    interest
Correct prediction:      grain
Correct prediction:      trade
Incorrect prediction:    trade
for compiled_residual, compiled_prediction in zip(compiled_residuals, compiled_predictions):
  is_correct = "Correct" if bool(compiled_residual) else "Incorrect"
  prediction = compiled_prediction.label
  print(f"{is_correct} prediction: {' ' * (12 - len(is_correct))}{prediction}")
Correct prediction:      interest
Correct prediction:      crude
Correct prediction:      money-fx
Correct prediction:      earn
Correct prediction:      acq
Correct prediction:      grain
Correct prediction:      trade
Correct prediction:      ship
使用 MLflow 记录和加载模型
现在我们有了一个分类准确率更高的编译模型,让我们利用 MLflow 记录该模型并加载它以进行推理。
import mlflow

with mlflow.start_run():
  model_info = mlflow.dspy.log_model(
      compiled_pe,
      name="model",
      input_example="what is 2 + 2?",
  )
Downloading artifacts: 0%| | 0/7 [00:00<?, ?it/s]
再次打开 MLflow UI,并检查编译后的模型是否已记录到新的 MLflow Run 中。现在,您可以使用 mlflow.dspy.load_model 或 mlflow.pyfunc.load_model 加载模型以进行推理。
💡 MLflow 将记住存储在 dspy.settings 中的环境配置,例如实验期间使用的语言模型 (LM)。这确保了您的实验具有出色的可重现性。
# Define input text
print("
==============Input Text============")
text = test_dataset[0]["text"]
print(f"Text: {text}")

# Inference with original DSPy object
print("
--------------Original DSPy Prediction------------")
print(compiled_pe(text=text).label)

# Inference with loaded DSPy object
print("
--------------Loaded DSPy Prediction------------")
loaded_model_dspy = mlflow.dspy.load_model(model_info.model_uri)
print(loaded_model_dspy(text=text).label)

# Inference with MLflow PyFunc API
loaded_model_pyfunc = mlflow.pyfunc.load_model(model_info.model_uri)
print("
--------------PyFunc Prediction------------")
print(loaded_model_pyfunc.predict(text)["label"])
==============Input Text============
Text: top discount rate at u k bill tender rises to pct

--------------Original DSPy Prediction------------
interest

--------------Loaded DSPy Prediction------------
interest

--------------PyFunc Prediction------------
interest
后续步骤
本示例演示了 DSPy 的工作原理。以下是改进此项目的一些潜在扩展,包括 DSPy 和 MLflow。
DSPy
MLflow
- 使用 MLflow 服务部署模型。
- 使用 MLflow 尝试各种优化策略。
- 使用 DSPy Optimizer Autologging 跟踪您的 DSPy 实验。
祝您编码愉快!