使用 LlamaIndex Workflow 和 MLflow 构建工具调用代理
欢迎来到本互动教程,旨在介绍 LlamaIndex Workflow 及其与 MLflow 的集成。本教程以笔记本的形式进行,通过 LlamaIndex 的新方法 Workflow(用于设计 LLM 应用程序)和 MLflow 的管理开发流程,提供实践性的学习体验。

您将学到什么
在本教程结束时,您将能够
- 在 LlamaIndex Workflow 中创建具有工具调用功能的 MVP 代理应用程序。
- 通过 MLflow Tracing 观察代理操作。
- 将该工作流记录到 MLflow Experiment。
- 加载模型并执行推理。
- 探索 MLflow UI 以了解记录的工件。
安装
MLflow 与 LlamaIndex 的 Workflow API 的集成可在 MLflow >= 2.17.0 和 LlamaIndex (core) >= 0.11.16 中使用。安装软件包后,您可能需要重新启动 Python 内核以正确加载模块。
%pip install mlflow>=2.17.0 llama-index>=0.11.16 -qqqU
# Workflow util is required for rendering Workflow as HTML
%pip install llama-index-utils-workflow -qqqU
选择您最喜欢的 LLM
默认情况下,LlamaIndex 使用 OpenAI 作为 LLMs 和嵌入模型的来源。如果您注册的是不同的 LLM 提供商或使用本地模型,请使用 Settings 对象进行配置。
选项 1:OpenAI(默认)
LlamaIndex 默认使用 OpenAI API 作为 LLMs 和嵌入模型。要在此设置下继续,您只需在环境变量中设置 API 密钥即可。
import os

os.environ["OPENAI_API_KEY"] = "<YOUR_OPENAI_API_KEY>"
选项 2:其他托管 LLM
如果您想使用其他托管 LLM,请
- 下载您选择的模型提供商的集成包。
- 按照集成文档中的说明设置所需的Other_LLMs。
- 实例化 LLM 实例并将其设置为全局
Settings对象。
以下单元格展示了使用 Databricks 托管 LLM(Llama3.1 70B instruct)的示例。
%pip install llama-index-llms-databricks
import os

os.environ["DATABRICKS_TOKEN"] = "<YOUR_DATABRICKS_API_TOKEN>"
os.environ["DATABRICKS_SERVING_ENDPOINT"] = "https://YOUR_DATABRICKS_HOST/serving-endpoints/"
from llama_index.core import Settings
from llama_index.llms.databricks import Databricks

llm = Databricks(model="databricks-meta-llama-3-1-70b-instruct")
Settings.llm = llm
选项 3:本地 LLM
LlamaIndex 也支持本地托管的 LLM。请参阅 入门教程(本地模型)了解如何设置它们。
创建 MLflow Experiment
如果您在本教程是在 Databricks Notebook 上运行,请跳过此步骤。创建任何 Notebook 时都会自动设置 MLflow Experiment。
import mlflow

mlflow.set_experiment("MLflow LlamaIndex Workflow Tutorial")
定义工具
代理通过 tool 对象访问各种函数和资源。在此示例中,我们根据 Python 函数定义了最简单的数学工具 add 和 multiply。对于实际应用,您可以创建任意工具,例如向量检索、网络搜索,甚至调用另一个代理作为工具。有关更多详细信息,请参阅 工具文档。
请忽略某些单元格开头的 ### [USE IN MODEL] 注释,如下所示。这将在本教程的后续步骤中使用!
# [USE IN MODEL]
from llama_index.core.tools import FunctionTool


def add(x: int, y: int) -> int:
  """Useful function to add two numbers."""
  return x + y


def multiply(x: int, y: int) -> int:
  """Useful function to multiply two numbers."""
  return x * y


tools = [
  FunctionTool.from_defaults(add),
  FunctionTool.from_defaults(multiply),
]
定义 Workflow
Workflow 简介
LlamaIndex Workflow 是一个事件驱动的编排框架。其核心是一个工作流由两个基本组件组成:Steps(步骤)和 Events(事件)。
- Steps(步骤):工作流中的执行单元。步骤定义为在实现
Workflow基类的类中使用@step装饰器标记的方法。 - Events(事件):触发步骤的自定义对象。
StartEvent和EndEvent这两个特殊事件保留用于在工作流开始和结束时进行分派。
每个步骤通过其函数签名指定其输入和输出事件。
@step
async def my_step(self, event: StartEvent) -> FooEvent:
    # This method triggers when a StartEvent is emitted at the workflow's start,
    # and then dispatches a FooEvent.
根据每个步骤的签名和定义的事件,LlamaIndex 会自动构建工作流的执行流程。
您可能会注意到 my_step 函数被定义为异步函数。LlamaIndex Workflow 将异步操作作为一流功能,从而能够轻松实现并行执行和可扩展的工作流。
工作流的另一个重要组成部分是 Context(上下文)对象。这个全局注册表可以从任何步骤访问,它允许在无需通过多个事件传递的情况下定义共享信息。
将 ReAct Agent 定义为 Workflow
以下 Workflow 定义模拟了一个使用我们定义的简单数学工具的 ReAct Agent。
# [USE IN MODEL]

# Event definitions
from llama_index.core.llms import ChatMessage, ChatResponse
from llama_index.core.tools import ToolOutput, ToolSelection
from llama_index.core.workflow import Event


class PrepEvent(Event):
  """An event to handle new messages and prepare the chat history"""


class LLMInputEvent(Event):
  """An event to prmopt the LLM with the react prompt (chat history)"""

  input: list[ChatMessage]


class LLMOutputEvent(Event):
  """An event represents LLM generation"""

  response: ChatResponse


class ToolCallEvent(Event):
  """An event to trigger tool calls, if any"""

  tool_calls: list[ToolSelection]


class ToolOutputEvent(Event):
  """An event to handle the results of tool calls, if any"""

  output: ToolOutput
# [USE IN MODEL]

# Workflow definition
from llama_index.core import Settings
from llama_index.core.agent.react import ReActChatFormatter, ReActOutputParser
from llama_index.core.agent.react.types import ActionReasoningStep, ObservationReasoningStep
from llama_index.core.memory import ChatMemoryBuffer
from llama_index.core.workflow import (
  Context,
  StartEvent,
  StopEvent,
  Workflow,
  step,
)


class ReActAgent(Workflow):
  def __init__(self, *args, **kwargs):
      super().__init__(*args, **kwargs)
      self.tools = tools
      # Store the chat history in memory so the agent can handle multiple interactions with users.
      self.memory = ChatMemoryBuffer.from_defaults(llm=Settings.llm)

  @step
  async def new_user_msg(self, ctx: Context, ev: StartEvent) -> PrepEvent:
      """Start workflow with the new user messsage"""
      # StartEvent carries whatever keys passed to the workflow's run() method as attributes.
      user_input = ev.input
      user_msg = ChatMessage(role="user", content=user_input)
      self.memory.put(user_msg)

      # We store the executed reasoning steps in the context. Clear it at the start.
      await ctx.set("steps", [])

      return PrepEvent()

  @step
  async def prepare_llm_prompt(self, ctx: Context, ev: PrepEvent) -> LLMInputEvent:
      """Prepares the react prompt, using the chat history, tools, and current reasoning (if any)"""
      steps = await ctx.get("steps", default=[])
      chat_history = self.memory.get()

      # Construct an LLM from the chat history, tools, and current reasoning, using the
      # built-in prompt template.
      llm_input = ReActChatFormatter().format(self.tools, chat_history, current_reasoning=steps)
      return LLMInputEvent(input=llm_input)

  @step
  async def invoke_llm(self, ev: LLMInputEvent) -> LLMOutputEvent:
      """Call the LLM with the react prompt"""
      response = await Settings.llm.achat(ev.input)
      return LLMOutputEvent(response=response)

  @step
  async def handle_llm_response(
      self, ctx: Context, ev: LLMOutputEvent
  ) -> ToolCallEvent | PrepEvent | StopEvent:
      """
      Parse the LLM response to extract any tool calls requested.
      If theere is no tool call, we can stop and emit a StopEvent. Otherwise, we emit a ToolCallEvent to handle tool calls.
      """
      try:
          step = ReActOutputParser().parse(ev.response.message.content)
          (await ctx.get("steps", default=[])).append(step)

          if step.is_done:
              # No additional tool call is required. Ending the workflow by emitting StopEvent.
              return StopEvent(result=step.response)
          elif isinstance(step, ActionReasoningStep):
              # Tool calls are returned from LLM, trigger the tool call event.
              return ToolCallEvent(
                  tool_calls=[
                      ToolSelection(
                          tool_id="fake",
                          tool_name=step.action,
                          tool_kwargs=step.action_input,
                      )
                  ]
              )
      except Exception as e:
          error_step = ObservationReasoningStep(
              observation=f"There was an error in parsing my reasoning: {e}"
          )
          (await ctx.get("steps", default=[])).append(error_step)

      # if no tool calls or final response, iterate again
      return PrepEvent()

  @step
  async def handle_tool_calls(self, ctx: Context, ev: ToolCallEvent) -> PrepEvent:
      """
      Safely calls tools with error handling, adding the tool outputs to the current reasoning. Then, by emitting a PrepEvent, we loop around for another round of ReAct prompting and parsing.
      """
      tool_calls = ev.tool_calls
      tools_by_name = {tool.metadata.get_name(): tool for tool in self.tools}

      # call tools -- safely!
      for tool_call in tool_calls:
          if tool := tools_by_name.get(tool_call.tool_name):
              try:
                  tool_output = tool(**tool_call.tool_kwargs)
                  step = ObservationReasoningStep(observation=tool_output.content)
              except Exception as e:
                  step = ObservationReasoningStep(
                      observation=f"Error calling tool {tool.metadata.get_name()}: {e}"
                  )
          else:
              step = ObservationReasoningStep(
                  observation=f"Tool {tool_call.tool_name} does not exist"
              )
          (await ctx.get("steps", default=[])).append(step)

      # prep the next iteration
      return PrepEvent()
直观检查 Workflow
在实例化代理对象之前,让我们暂停一下,验证工作流是否按预期构建。
为了检查这一点,我们可以使用 draw_all_possible_flows 实用函数来渲染工作流的图形表示。
(注意:如果渲染的 HTML 为空白,可能是由于 Jupyter 中的安全功能。在这种情况下,您可以信任该笔记本,通过 !jupyter trust llama_index_workflow_tutorial.ipynb。有关更多详细信息,请参阅 Jupyter 文档。)
from IPython.display import HTML
from llama_index.utils.workflow import draw_all_possible_flows

draw_all_possible_flows(ReActAgent, filename="workflow.html")

with open("workflow.html") as file:
  html_content = file.read()
HTML(html_content)
# [USE IN MODEL]
agent = ReActAgent(timeout=180)
运行 Workflow(带 Trace)
现在您的工作流已准备就绪!但在运行之前,别忘了启用 MLflow Tracing,以便您在代理运行的每个步骤中都能进行观察,并记录下来以供以后审查。
Mlflow 支持 LlamaIndex Workflow 的自动跟踪。要启用它,您只需调用 mlflow.llama_index.autolog() 函数。
import mlflow

mlflow.llama_index.autolog()
# Run the workflow
await agent.run(input="What is (123 + 456) * 789?")
'The result of (123 + 456) * 789 is 579,027.'
查看 Trace
生成的 Trace 会自动记录到您的 MLflow Experiment 中。
- 打开一个终端,在当前目录下运行
mlflow server --port 5000(并保持运行)。 - 在浏览器中导航到
http://127.0.0.1:5000。 - 打开名为 "MLflow LlamaIndex Workflow Tutorial" 的 Experiment。
- 在实验名称标题下方导航到 "Trace" 选项卡。
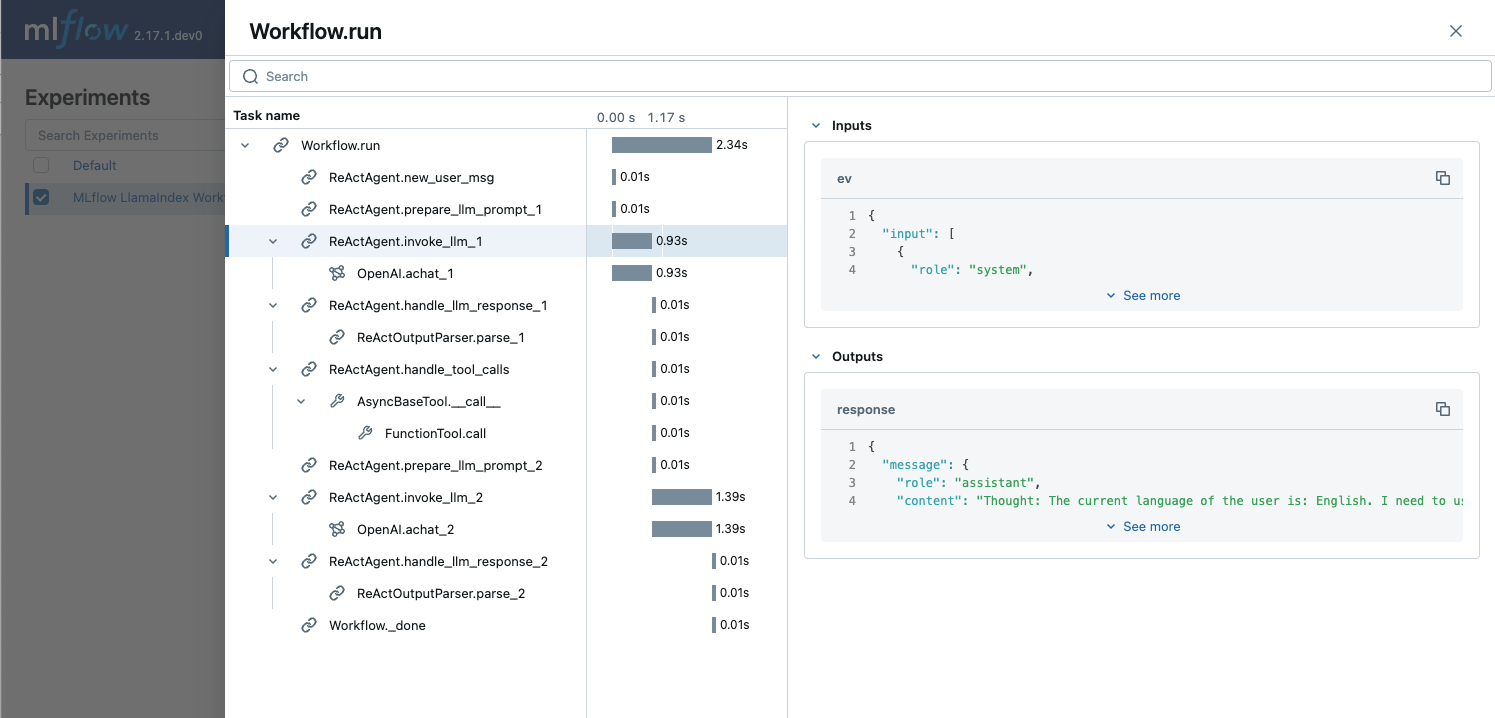
Trace 记录了工作流执行中的各个步骤及其输入、输出和附加元数据(如延迟)。让我们快速练习一下,在 Trace UI 中查找以下信息。
1. 首次 LLM 调用使用的 Token 数量
您可以在 LLM 调用跨度的 Attributes(属性)部分,在 usage 字段中找到 Token 数量。
2. "add" 工具调用的输入数字。
您可以在名为 FunctionTool.call 的跨度的 Inputs 字段中找到输入数字 x=123 和 y=456。该跨度位于 ReActAgent.handle_tool_calls 步骤跨度下。
将 Workflow 记录到 MLflow Experiment
现在您已经使用 LlamaIndex Workflow 构建了第一个 ReAct Agent,迭代改进和优化以提高性能至关重要。MLflow Experiment 是记录和管理这些改进的理想场所。
准备模型脚本
MLflow 支持使用 **Models from Code** 方法记录 LlamaIndex 工作流,允许直接从独立的 Python 脚本定义和记录模型。这种方法避免了使用 pickle 等风险高且不稳定的序列化方法,将代码作为模型定义的单一事实来源。结合 MLflow 的环境冻结功能,这提供了一种可靠的持久化模型的方法。
有关更多详细信息,请参阅 MLflow 文档。
您可以手动创建一个单独的 Python 文件,方法是将此笔记本中的代码复制过来。但是,为了方便起见,我们定义了一个实用函数,可以从该笔记本的内容中自动生成一个模型脚本,一步完成。运行下面的单元格将在当前目录中创建此脚本,为 MLflow 记录做好准备。
def generate_model_script(output_path, notebook_path="llama_index_workflow_tutorial.ipynb"):
  """
  A utility function to generate a ready-to-log .py script that
  contains necessary library imports and model definitions.

  Args:
     output_path: The path to write the .py file to.
     notebook_path: The path to the tutorial notebook.
  """
  import nbformat

  with open(notebook_path, encoding="utf-8") as f:
      notebook = nbformat.read(f, as_version=4)

  # Filter cells that are code cells and contain the specified marker
  merged_code = (
      "

".join(
          [
              cell.source
              for cell in notebook.cells
              if cell.cell_type == "code" and cell.source.startswith("# [USE IN MODEL]")
          ]
      )
      + "

import mlflow

mlflow.models.set_model(agent)"
  )

  # Write to the output .py file
  with open(output_path, "w", encoding="utf-8") as f:
      f.write(merged_code)

  print(f"Model code saved to {output_path}")


# Pass `notebook_path` argument if you changed the notebook name
generate_model_script(output_path="react_agent.py")
Model code saved to react_agent.py
记录模型
import mlflow

with mlflow.start_run(run_name="react-agent-workflow"):
  model_info = mlflow.llama_index.log_model(
      "react_agent.py",
      name="model",
      # Logging with an input example help MLflow to record dependency and signature information accurately.
      input_example={"input": "What is (123 + 456) * 789?"},
  )
探索 MLflow UI
让我们再次打开 MLflow UI,看看 Experiment 中正在跟踪哪些信息。
- 像之前查看 Trace 一样访问 MLflow UI。
- 打开名为 "MLflow LlamaIndex Workflow Tutorial" 的 Experiment。
- Experiment 中的
Runs选项卡应包含一个名为 "react-agent-workflow" 的运行。打开它。 - 在运行页面上,导航到
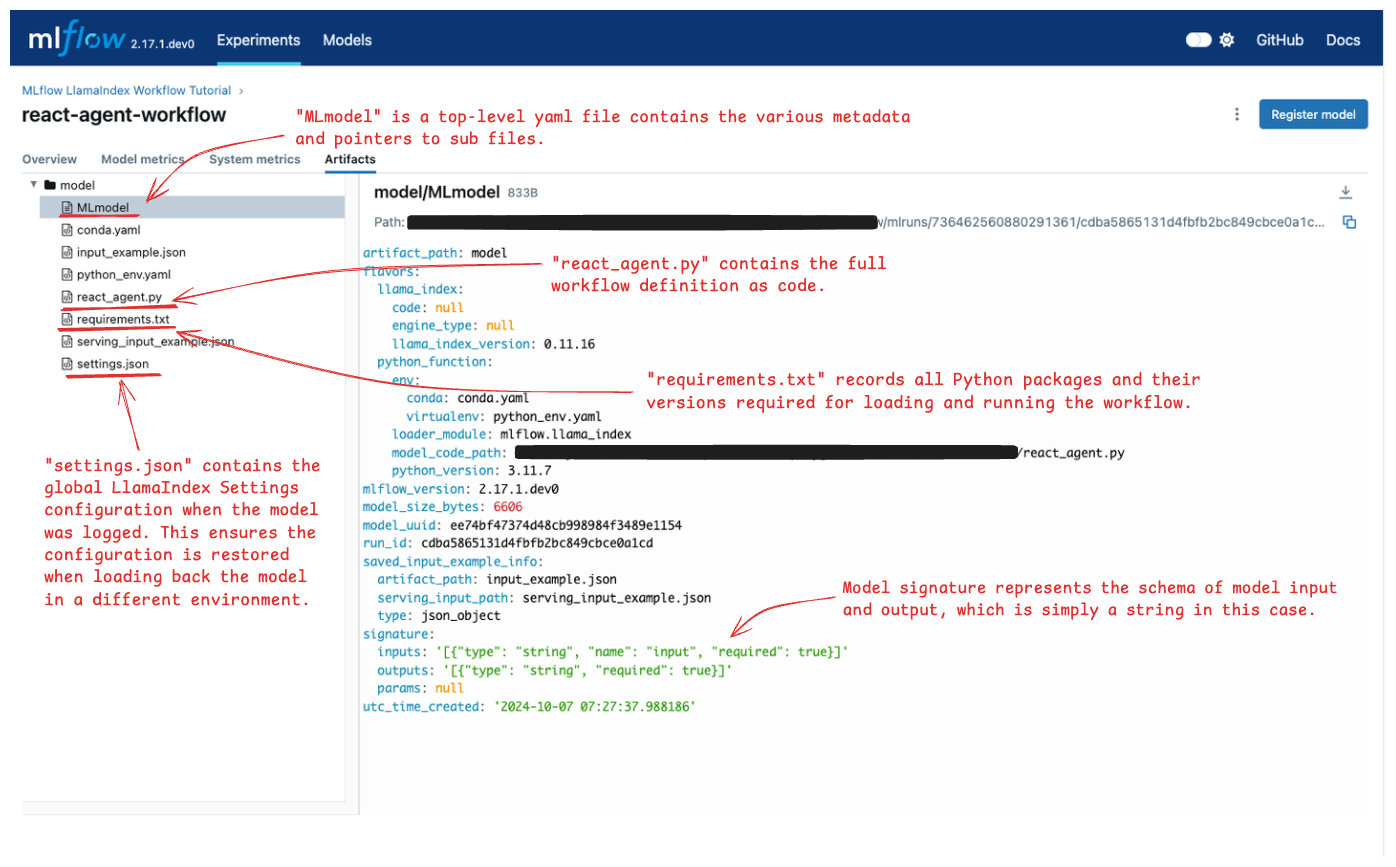
"Artifacts"选项卡。
Artifacts 选项卡显示 MLflow 在 Run 中保存的各种文件。查看下图并打开标注的文件,以检查每个文件中存储了哪些信息。
加载模型以进行推理
所有必要的元数据都已记录到 MLflow 中,您可以在另一个笔记本中加载模型或将其部署进行推理,而无需担心环境不一致。让我们快速练习一下,演示这如何有助于重现实验结果。
为了模拟不同的环境,我们将从全局 Settings 对象中移除 llm 配置。
from llama_index.core.llms import MockLLM

Settings.llm = MockLLM(max_tokens=1)

await agent.run(input="What is (123 + 456) * 789?")
'text'
由于配置了 dummy LLM,工作流无法生成正确输出,只能返回 "text"。
现在尝试通过调用 mlflow.llama_index.load_model() API 从 MLflow Experiment 中加载模型,然后再次运行工作流。
loaded_model = mlflow.llama_index.load_model("runs:/f8e0a0d2dd5546d5ac93ce126358c444/model")
await loaded_model.run(input="What is (123 + 456) * 789?")
Downloading artifacts: 0%| | 0/12 [00:00<?, ?it/s]
'(123 + 456) * 789 = 456831'
这次,输出被正确计算,因为 MLflow 在记录时自动恢复了原始 LLM 设置。
了解更多
恭喜!🎉 您已成功学习了如何使用 LlamaIndex Workflow 和 MLflow 构建工具调用代理。
继续您的旅程,并利用这些高级资源
- 改进 Workflow 质量:通过 MLflow LLM Evaluation 评估您的工作流以提高性能。
- 部署您的模型:使用 MLflow Deployment 将您的 MLflow 模型部署到服务终结点。
- 探索更多示例:在 官方文档中查找 LlamaIndex Workflow 的其他示例。