Prompt Engineering UI (实验性功能)
从 MLflow 2.7 开始,MLflow Tracking UI 提供了业界领先的提示工程体验。无需编写任何代码,您就可以尝试来自 MLflow AI Gateway 的多个 LLM、参数配置和提示,以构建各种用于问答、文档摘要等的模型。使用嵌入式评估 UI,您还可以对一组输入评估多个模型,并比较响应以选择最佳模型。使用提示工程 UI 创建的每个模型都以 MLflow Model 格式存储,并可用于批量或实时推理的部署。所有配置(提示模板、LLM 选择、参数等)都作为 MLflow Runs 进行跟踪。
快速入门
以下指南将帮助您开始使用 MLflow 的提示工程 UI。
步骤 1:创建 MLflow AI Gateway Completions 或 Chat 端点
要使用提示工程 UI,您需要创建一个或多个 MLflow AI Gateway completions 或 chat 端点。请按照 MLflow AI Gateway 快速入门指南 在五分钟内轻松创建一个端点。如果您已拥有类型为 llm/v1/completions 或 llm/v1/chat 的 MLflow AI Gateway 端点访问权限,则可以跳过此步骤。
mlflow gateway start --config-path config.yaml --port 7000
步骤 2:将 MLflow AI Gateway 连接到您的 MLflow Tracking Server
提示工程 UI 还要求 MLflow AI Gateway 与 MLflow Tracking Server 之间建立连接。要将 MLflow AI Gateway 与 MLflow Tracking Server 连接,只需在服务器运行的环境中设置 MLFLOW_DEPLOYMENTS_TARGET 环境变量,然后重新启动服务器。例如,如果 MLflow AI Gateway 正在 https://:7000 上运行,您可以在本地机器上的 shell 中启动 MLflow Tracking Server,并使用 mlflow server 命令将其连接到 MLflow AI Gateway,如下所示:
export MLFLOW_DEPLOYMENTS_TARGET="http://127.0.0.1:7000"
mlflow server --port 5000
步骤 3:创建或查找 MLflow Experiment
接下来,在 MLflow UI 中打开现有的 MLflow Experiment,或创建一个新的 Experiment。
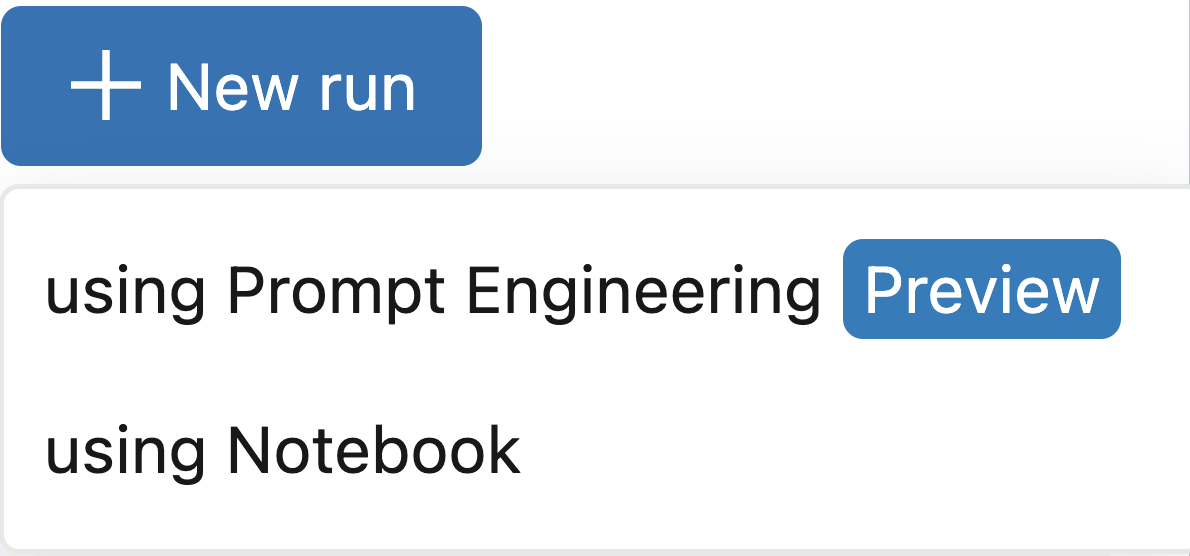
步骤 4:创建使用提示工程的 run
打开 Experiment 后,点击 New Run 按钮并选择 using Prompt Engineering。这将打开提示工程 playground,您可以在其中尝试不同的 LLM、参数和提示。

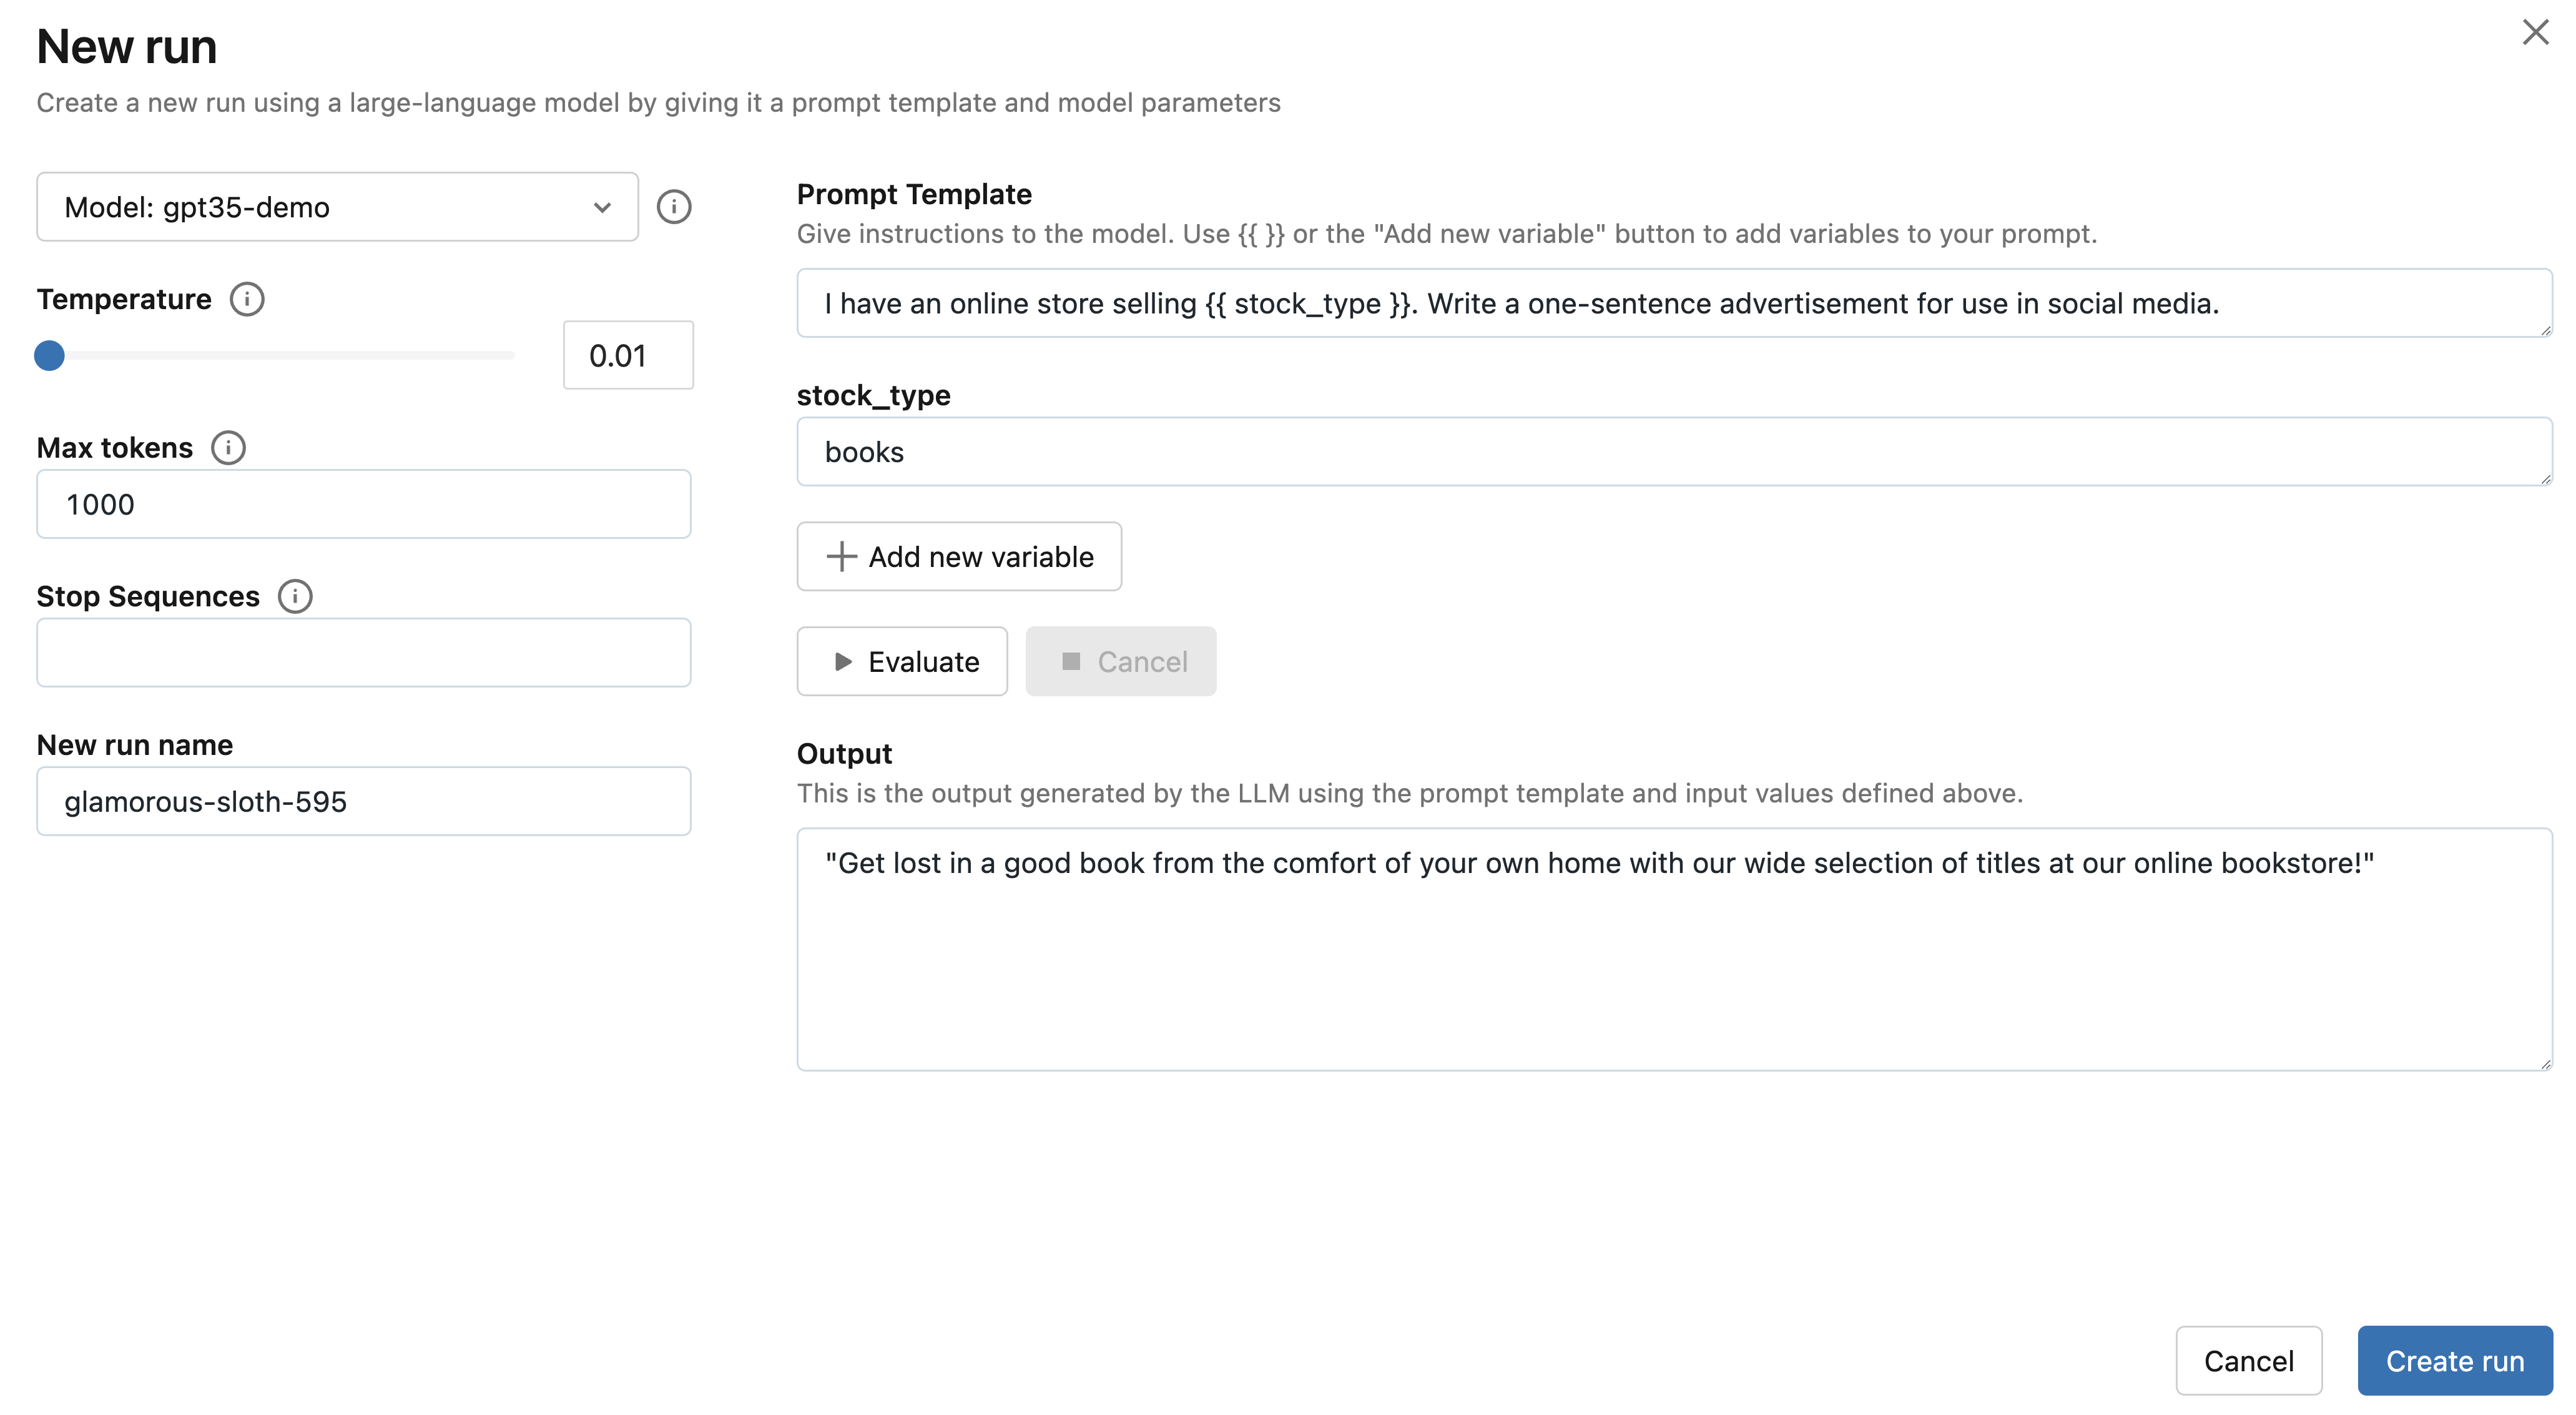
步骤 5:选择您的端点并评估示例提示
接下来,点击 Select endpoint 下拉菜单,然后选择您在步骤 1 中创建的 MLflow AI Gateway completions 端点。然后,点击 Evaluate 按钮来测试一个生成产品广告的示例提示工程用例。
MLflow 将把指定的 stock_type 输入变量值("books")嵌入到指定的 prompt template 中,并将其发送到与 MLflow AI Gateway 端点相关联的 LLM,同时使用配置的 temperature(当前为 0.01)和 max_tokens(当前为 1000)。LLM 响应将出现在 Output 部分。
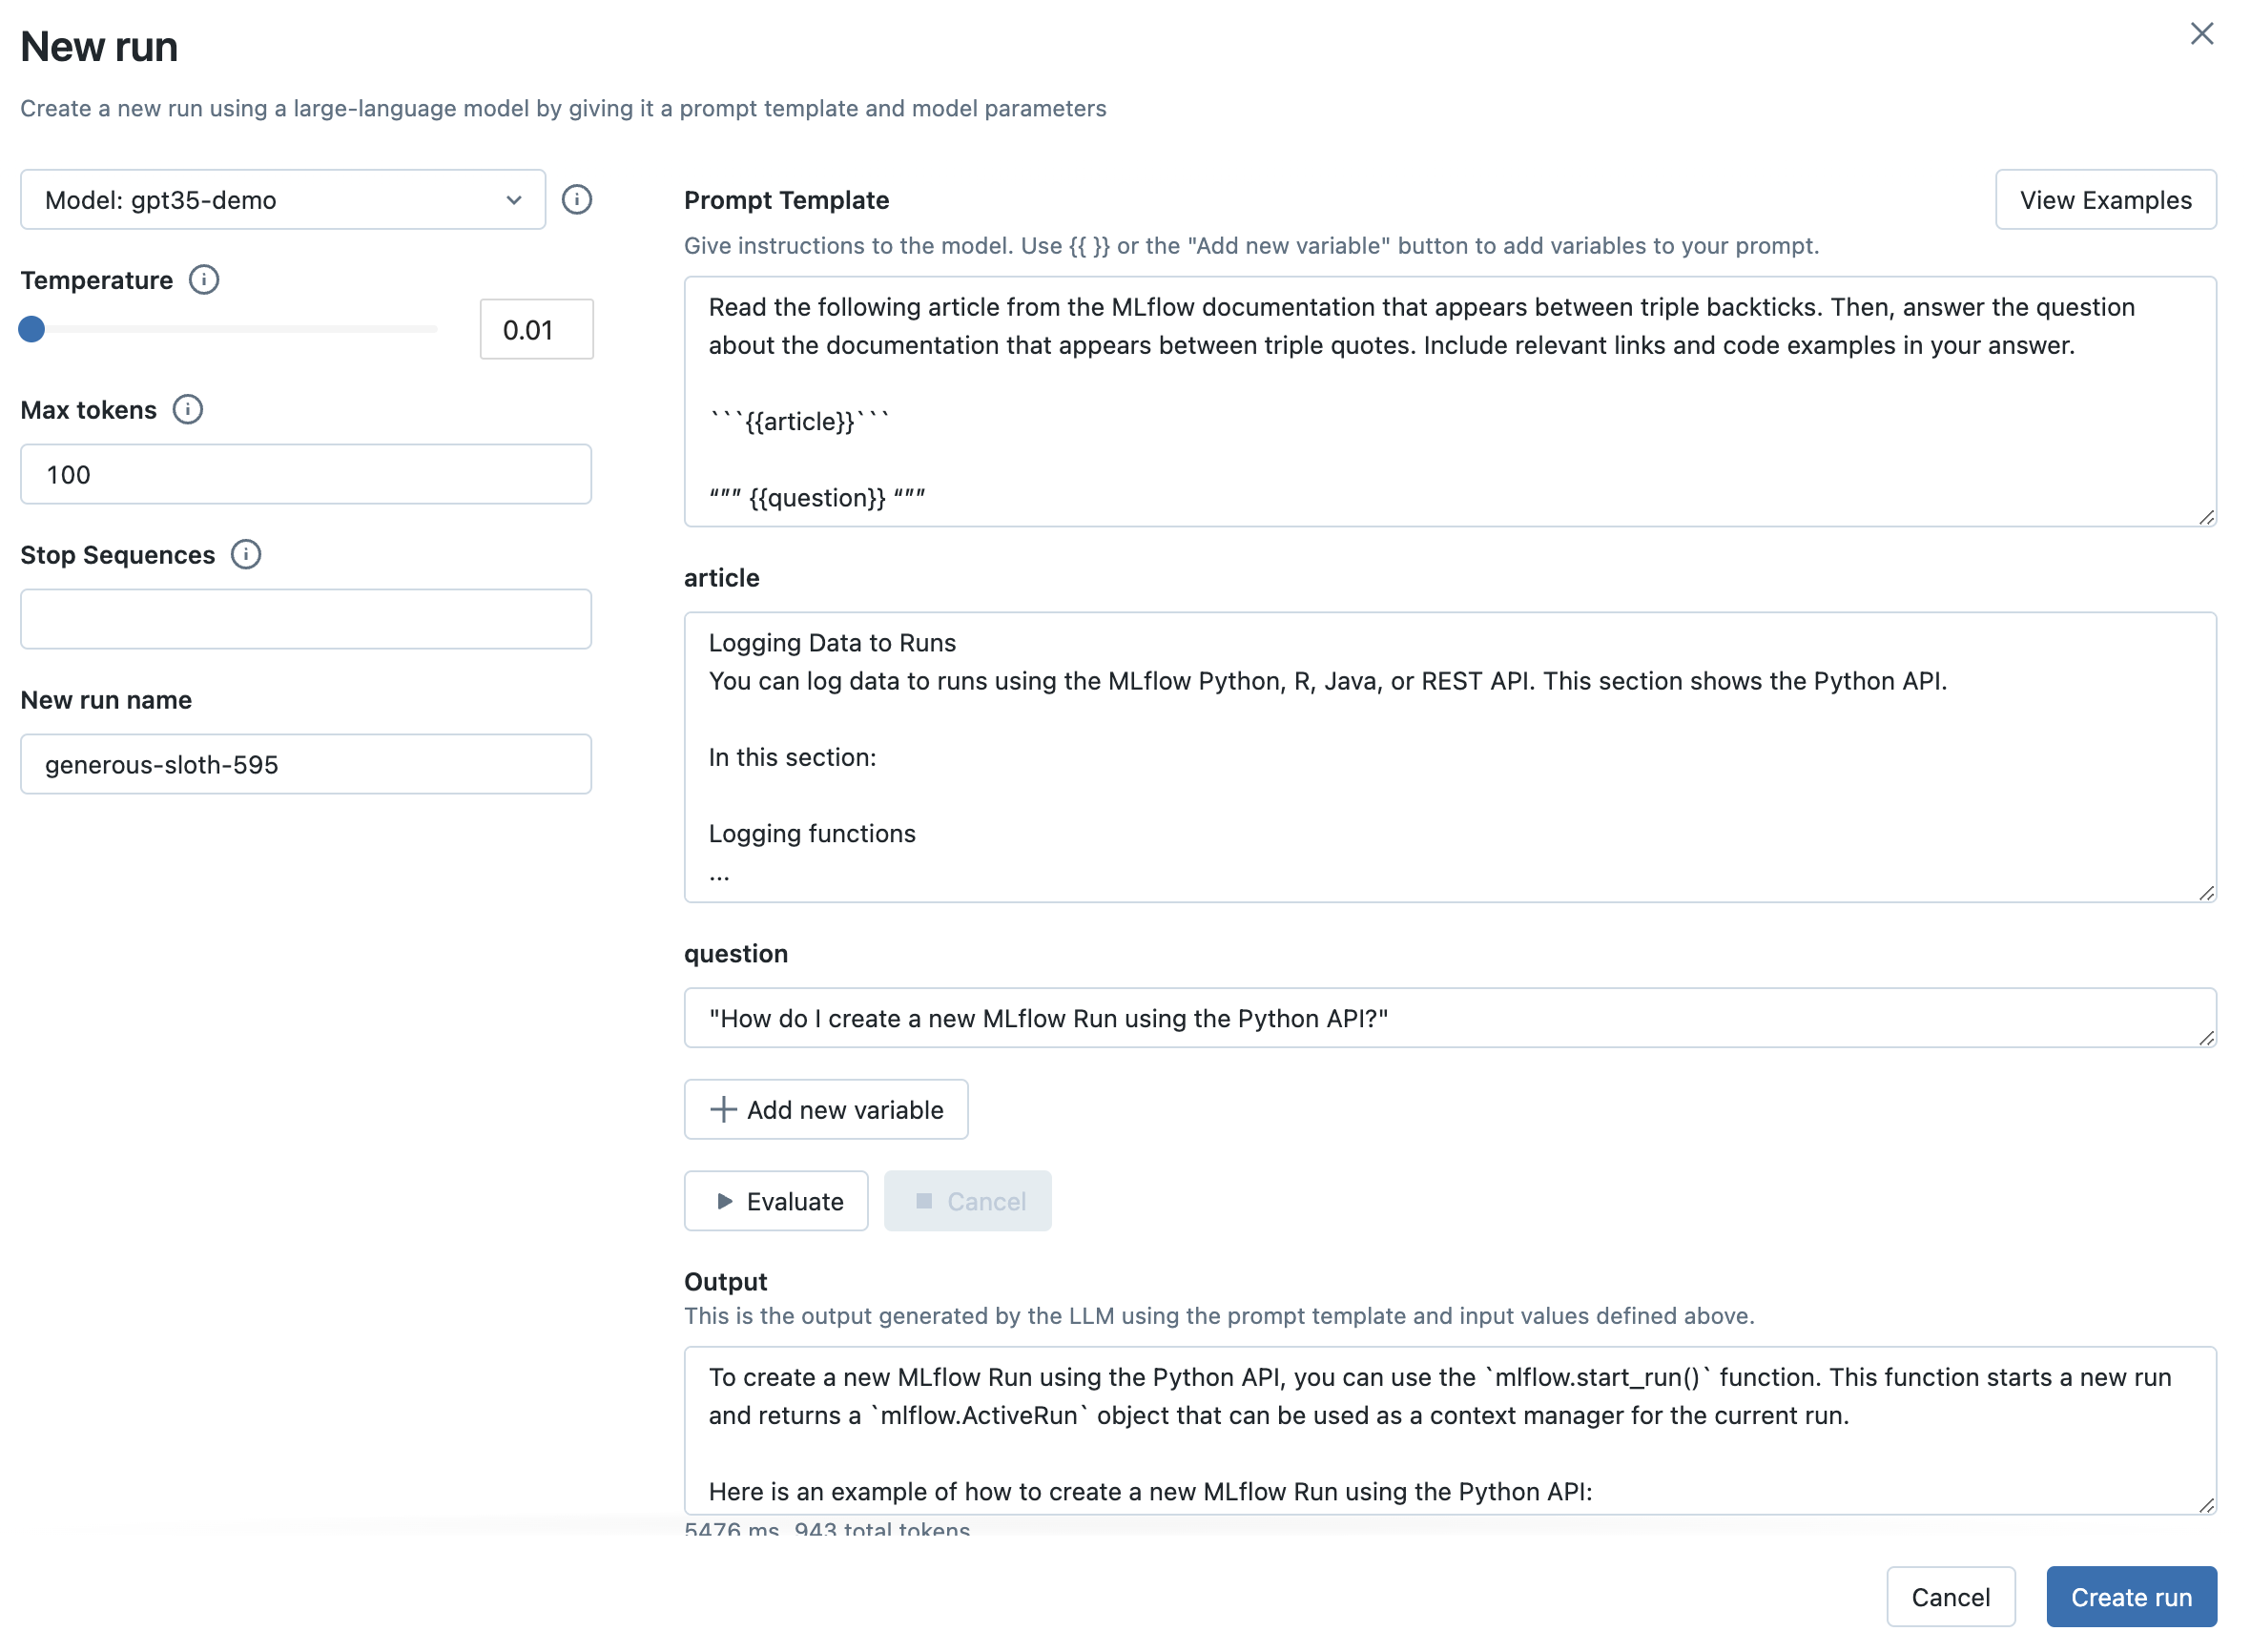
步骤 6:尝试您选择的提示
将上一步的提示模板替换为您选择的提示模板。提示可以定义多个变量。例如,您可以使用以下提示模板指示 LLM 回答有关 MLflow 文档的问题:
Read the following article from the MLflow documentation that appears between triple
backticks. Then, answer the question about the documentation that appears between triple quotes.
Include relevant links and code examples in your answer.

```{{article}}```

"""
{{question}}
"""
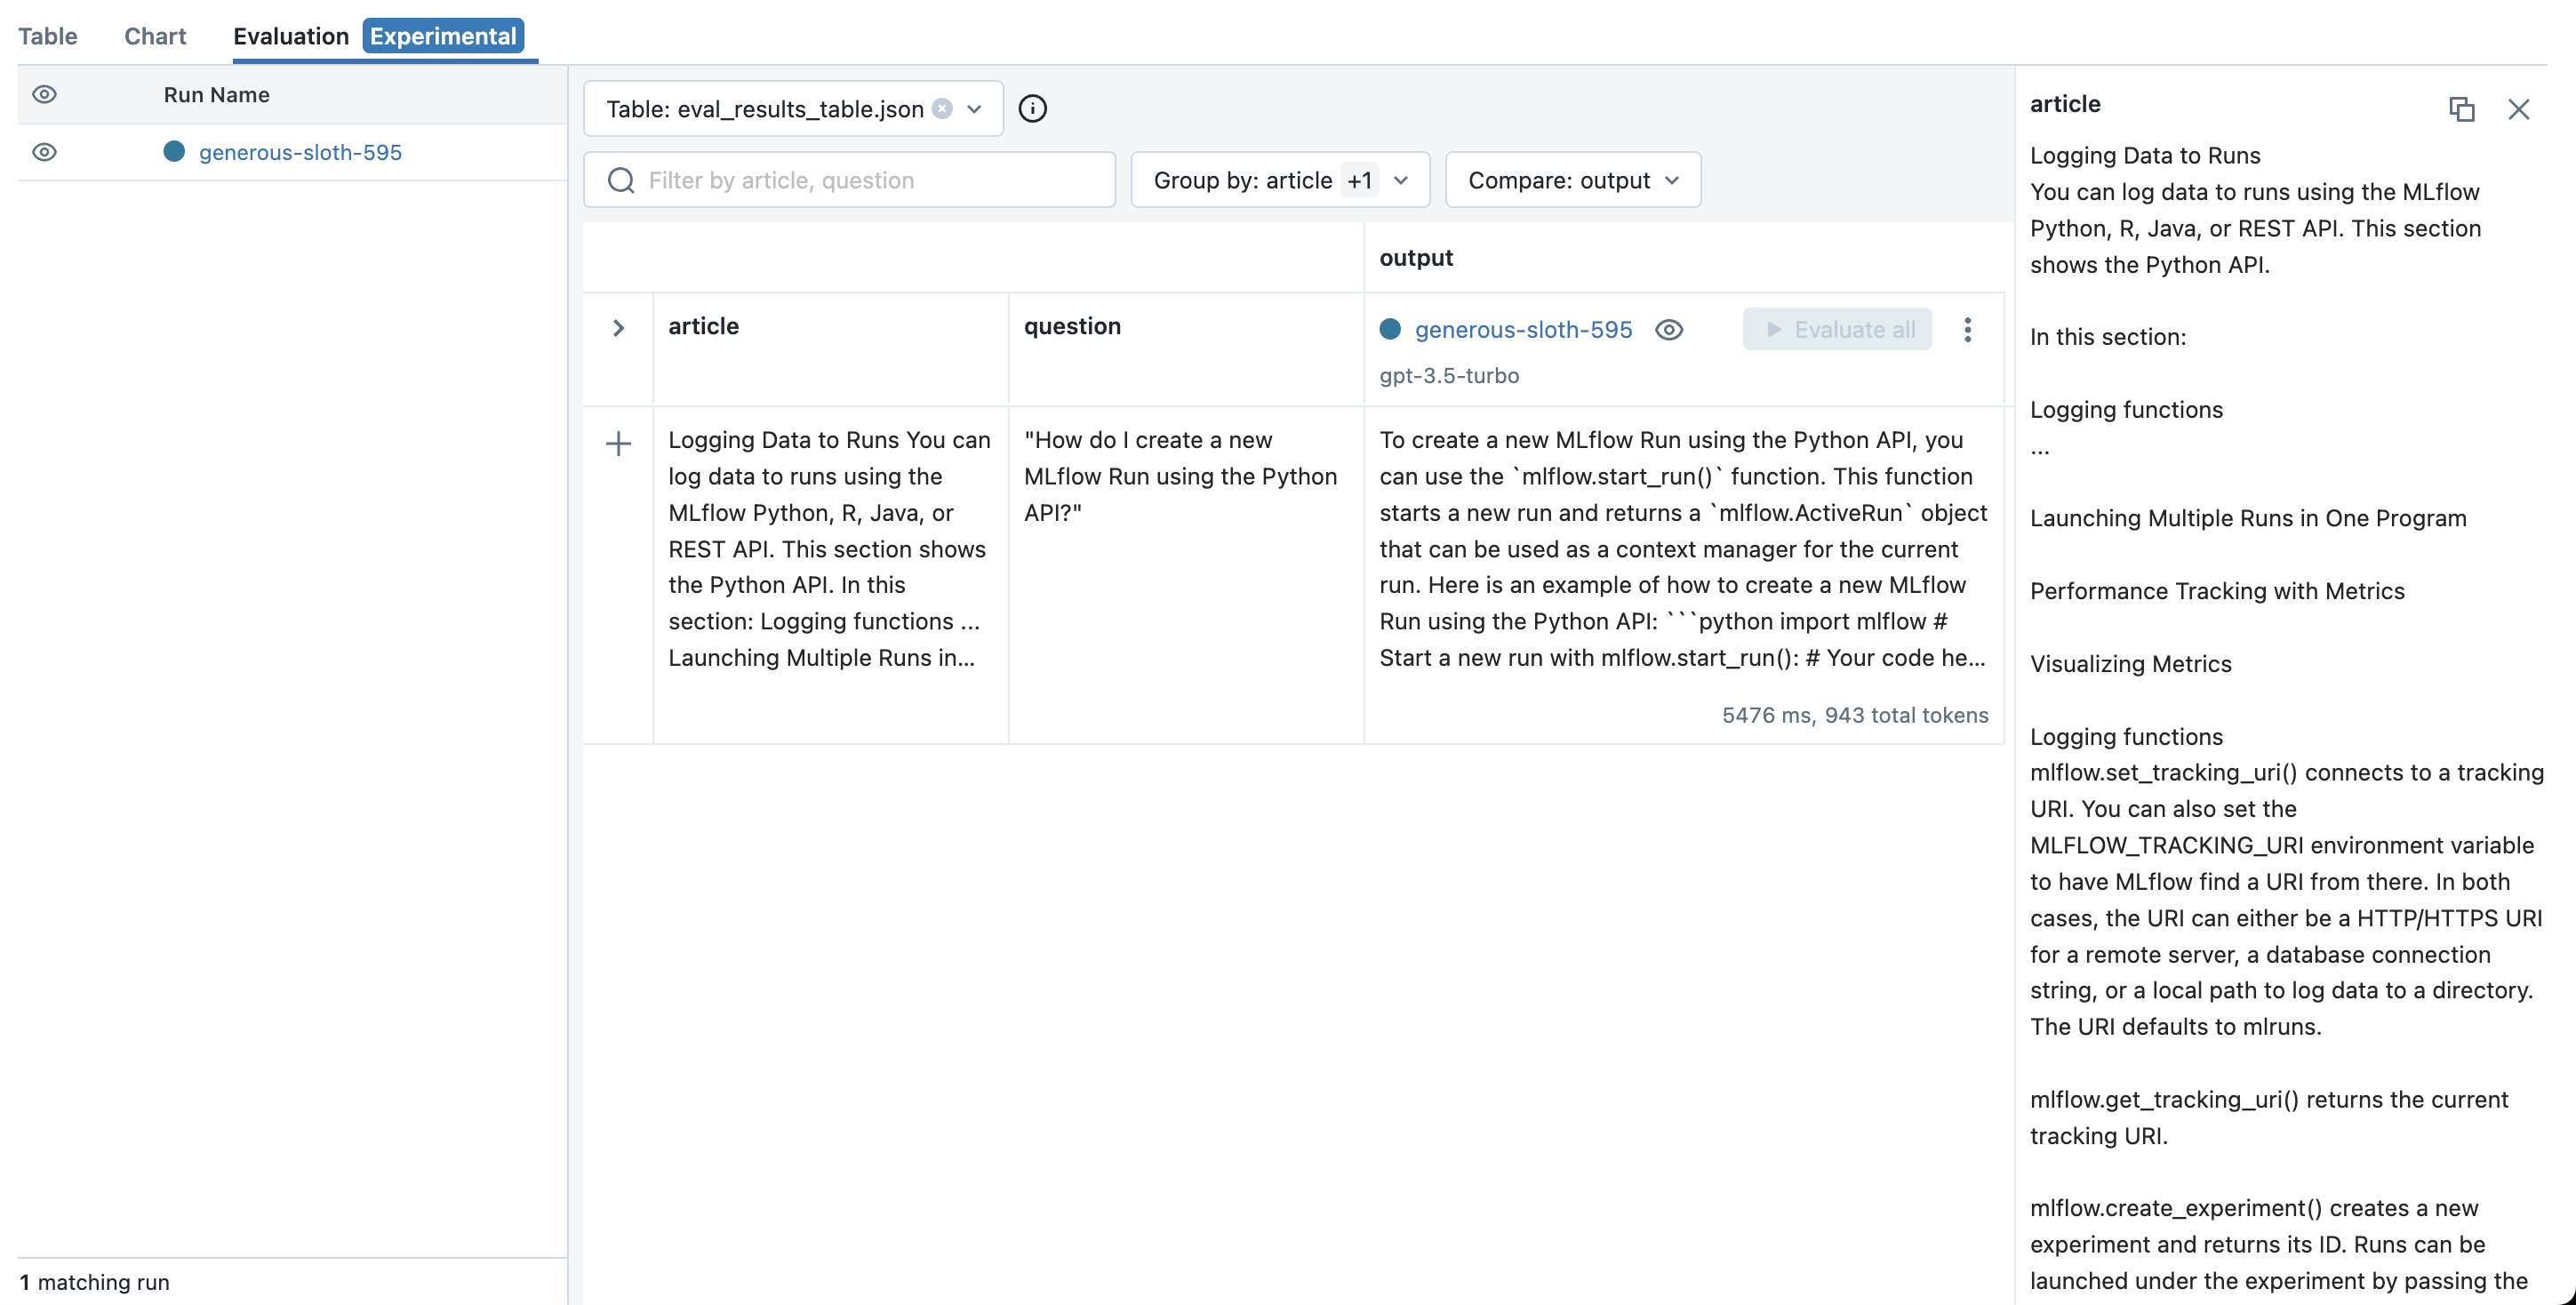
然后,填写输入变量。例如,在 MLflow 文档用例中,可以将 article 输入变量设置为 https://mlflow.org.cn/docs/latest/tracking.html#logging-data-to-runs 的内容,并将 question 输入变量设置为 "How do I create a new MLflow Run using the Python API?"。
最后,点击 Evaluate 按钮查看新输出。您也可以尝试选择一个更大的 temperature 值,以观察 LLM 输出的变化。
步骤 7:将您选择的 LLM、提示模板和参数捕获为 MLflow Run
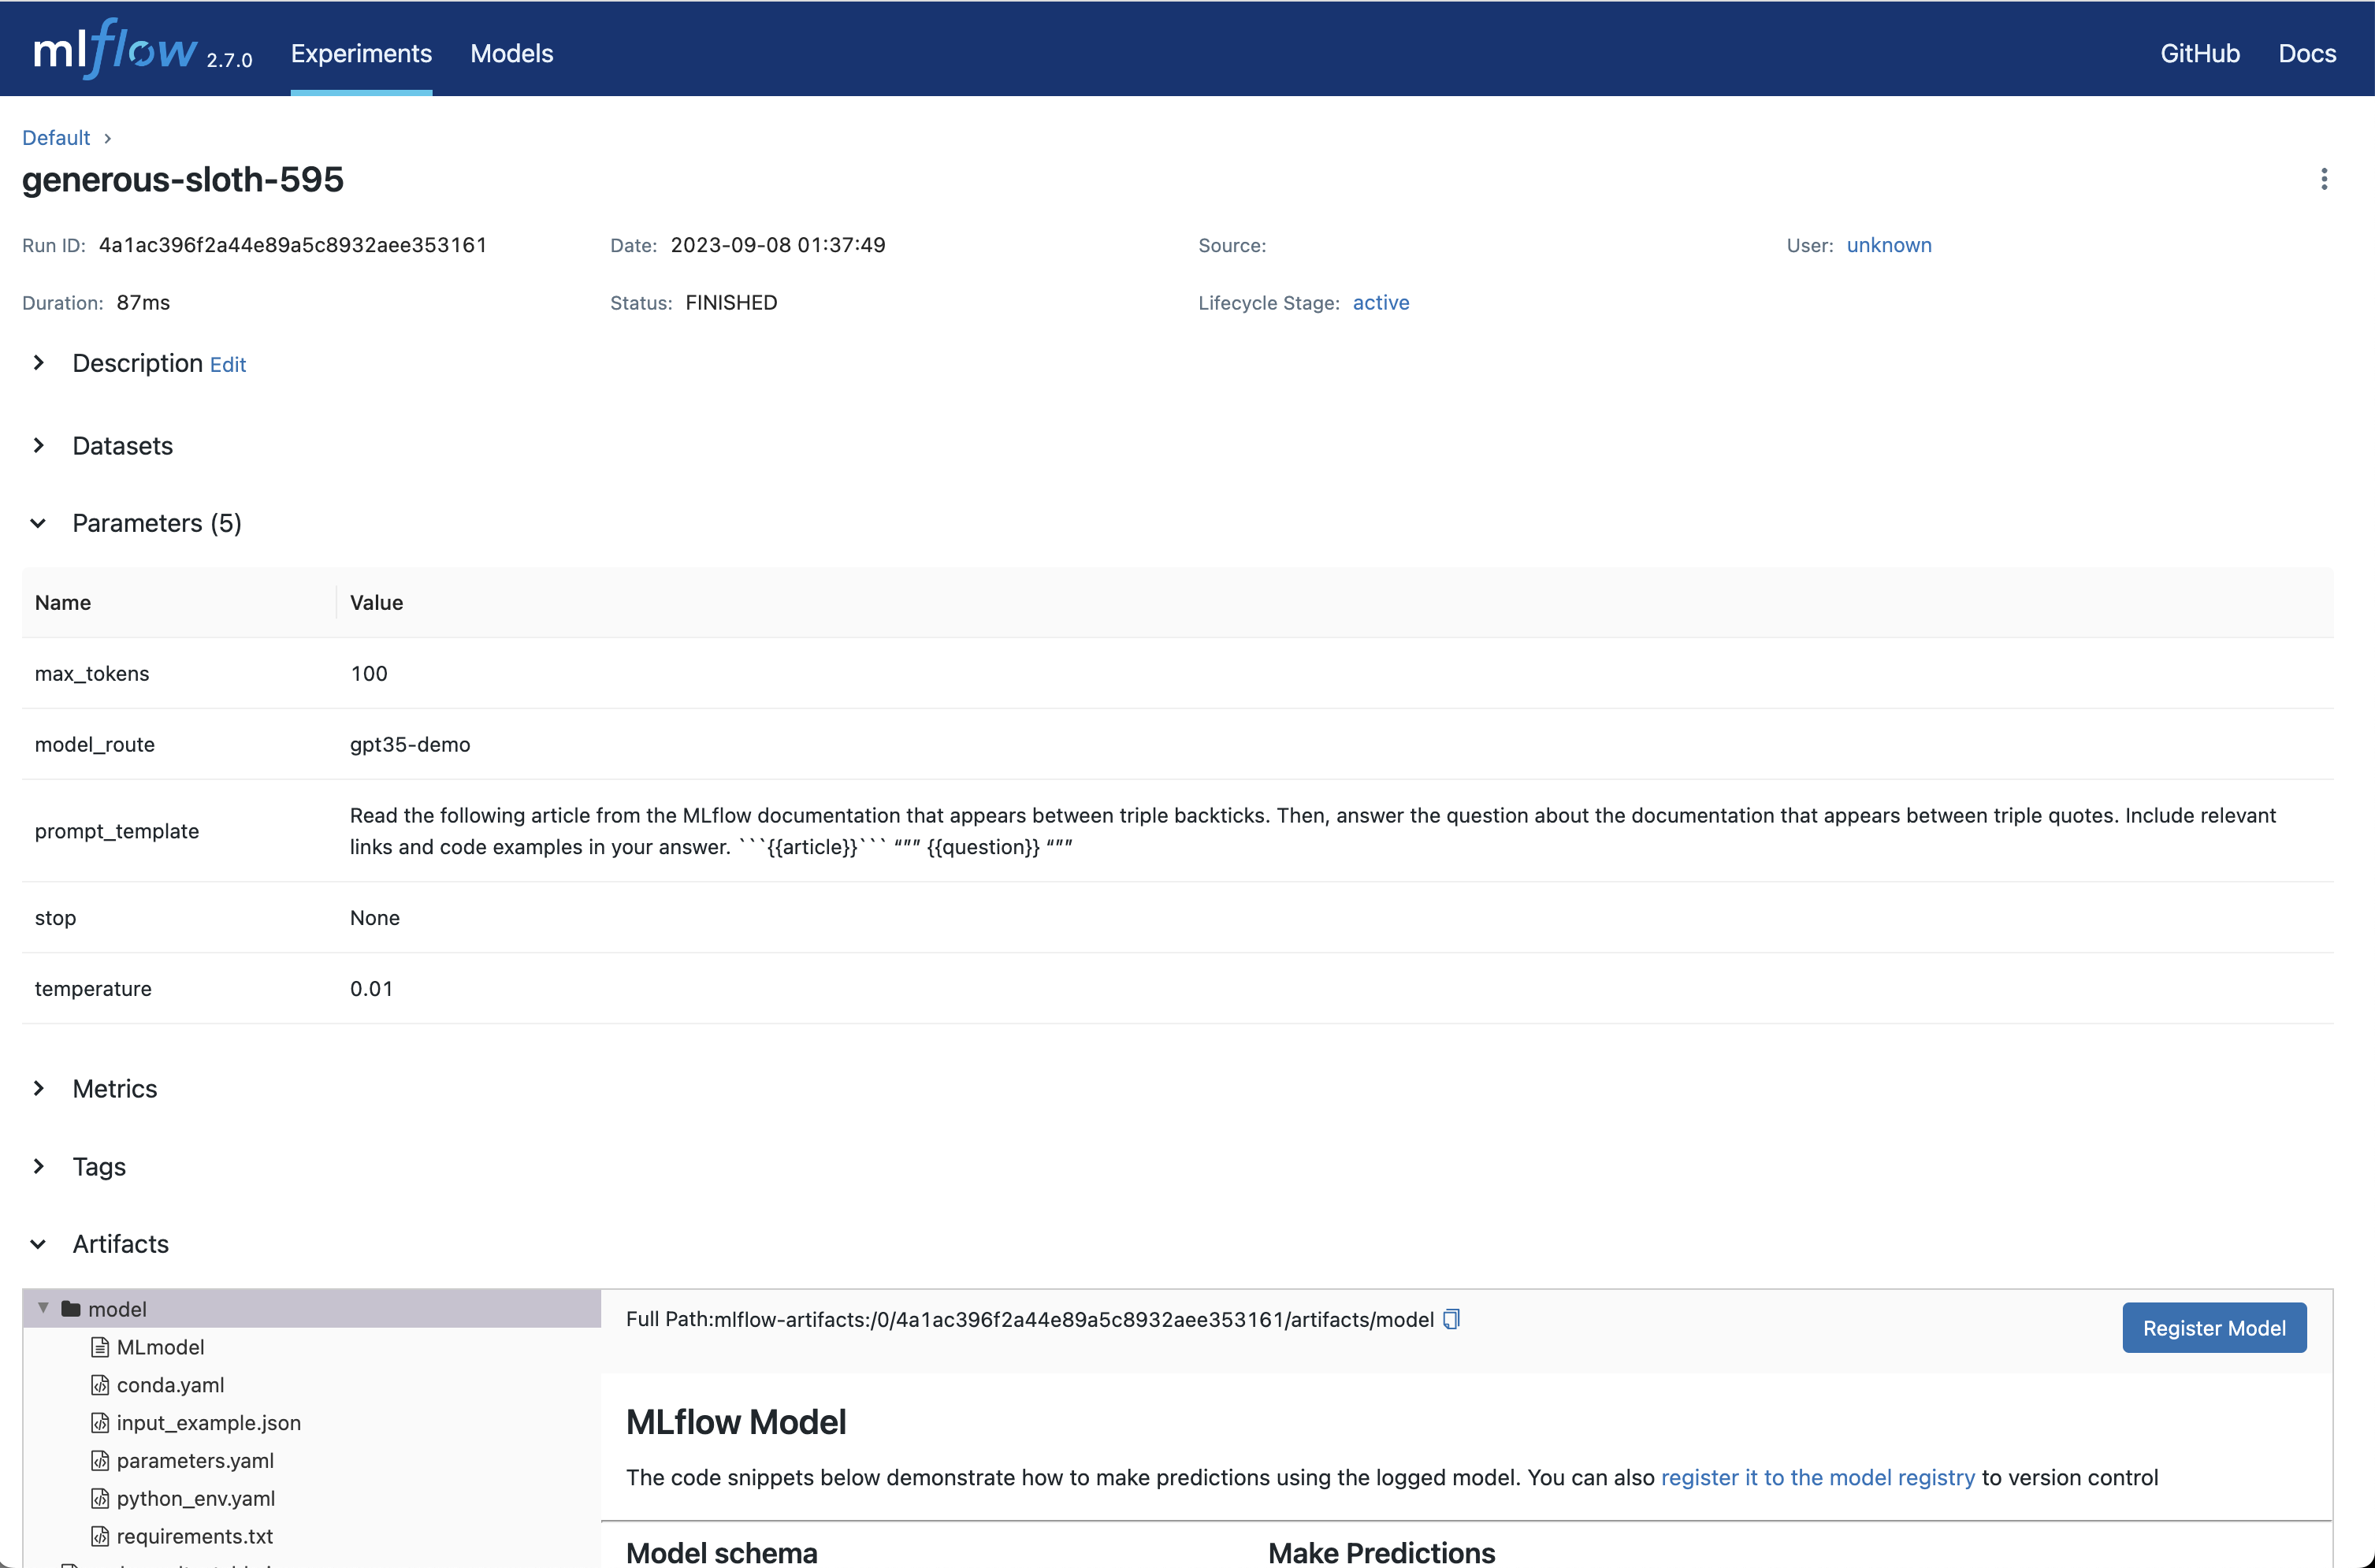
一旦您对选择的提示模板和参数满意,请点击 Create Run 按钮,将此信息以及您选择的 LLM 存储为 MLflow Run。这将创建一个新的 Run,其中提示模板、参数和 LLM 选择将作为 Run 参数存储。它还将自动创建一个 MLflow Model,其中包含此信息,可用于批量或实时推理。
-
要查看此信息,请点击 Run 名称以打开 Run 页面。
-
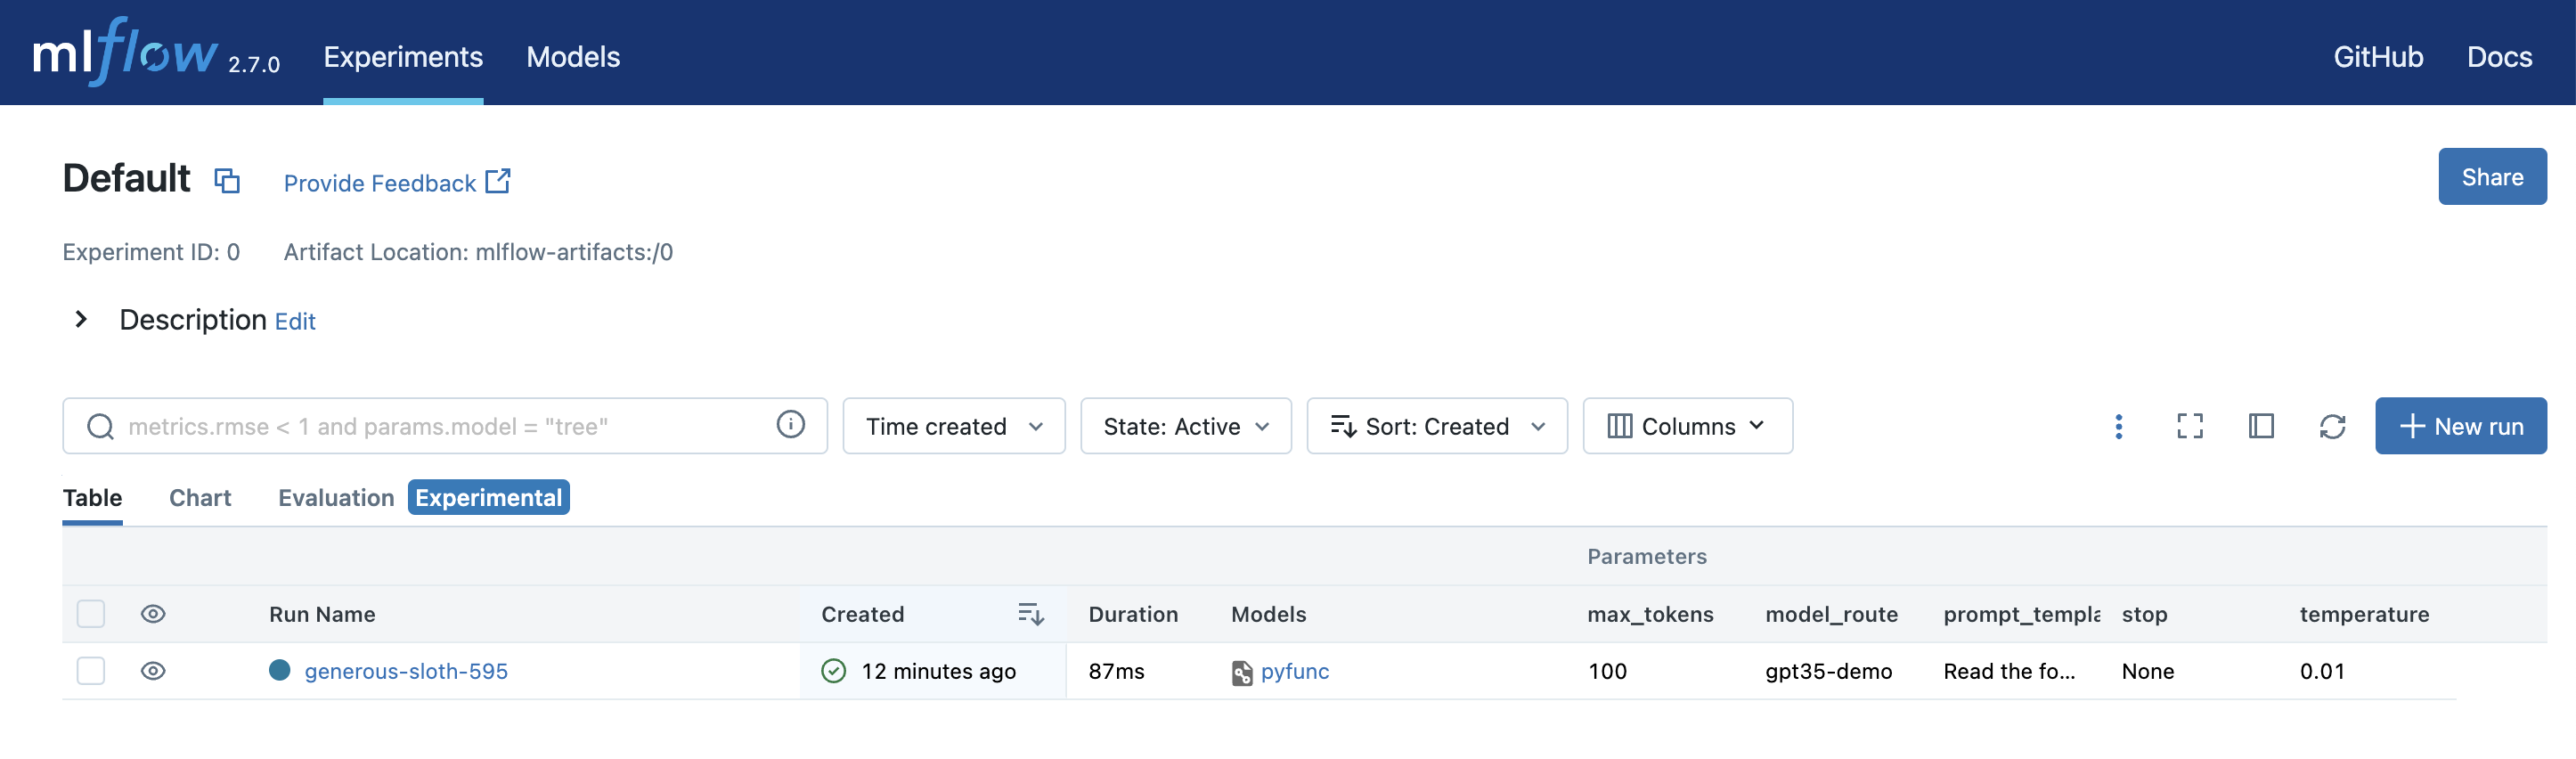
您还可以通过打开 Table 视图选项卡来查看参数并与其他配置进行比较。
-
Run 创建后,MLflow 将打开 Evaluation 选项卡,您可以在其中查看最新的 playground 输入和输出,并尝试其他输入。
步骤 8:尝试新输入
要测试您选择的 LLM、提示模板和参数在新的输入上的行为。
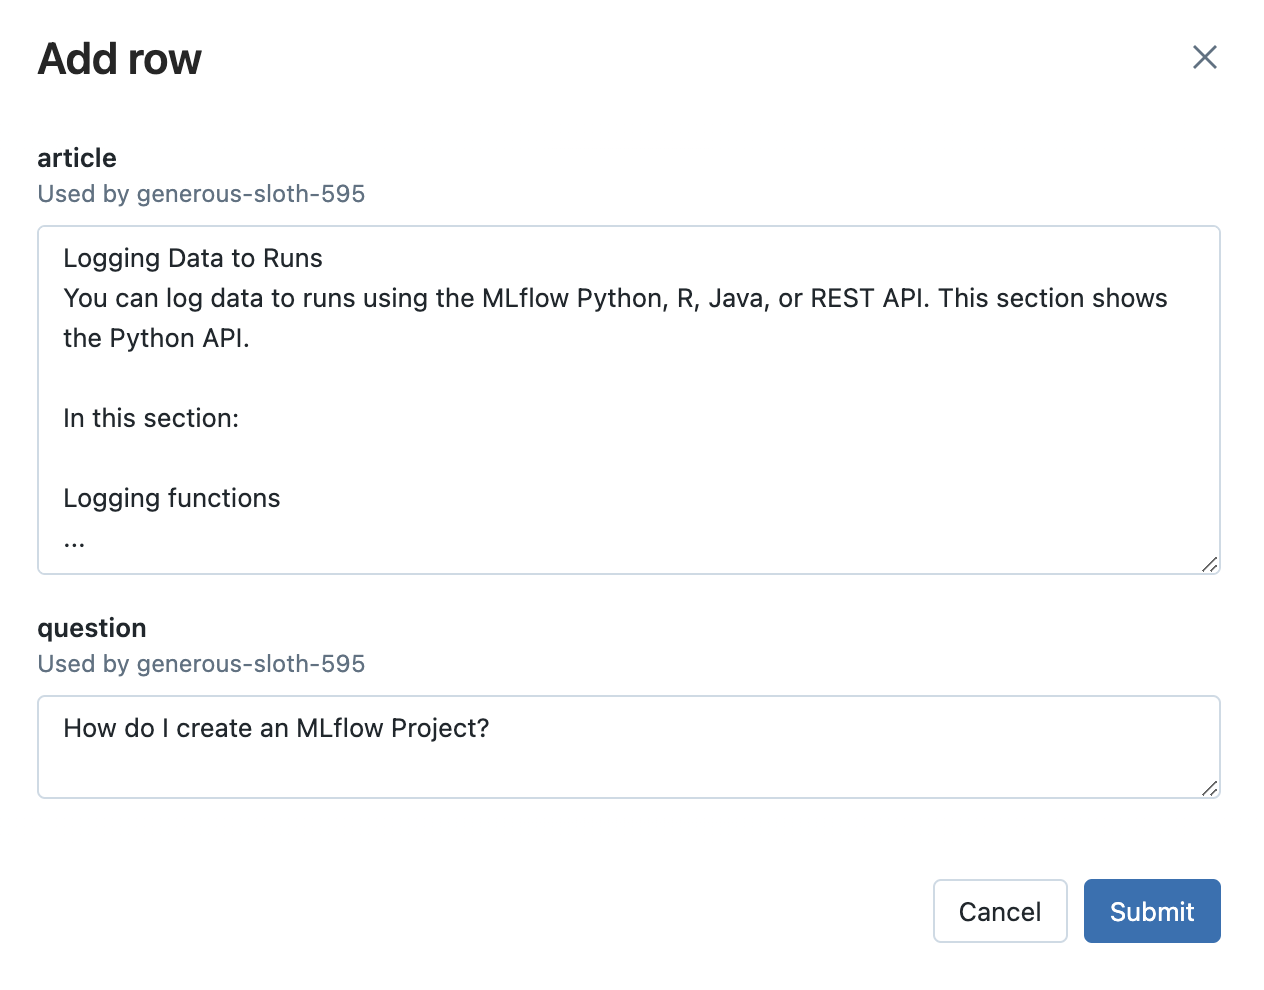
- 点击 Add Row 按钮并填写提示模板输入变量的值。例如,在 MLflow 文档用例中,您可以尝试提出与 MLflow 无关的问题,看看 LLM 的反应。这对于确保应用程序对不相关输入具有鲁棒性非常重要。

-
然后,点击 Evaluate 按钮查看输出。
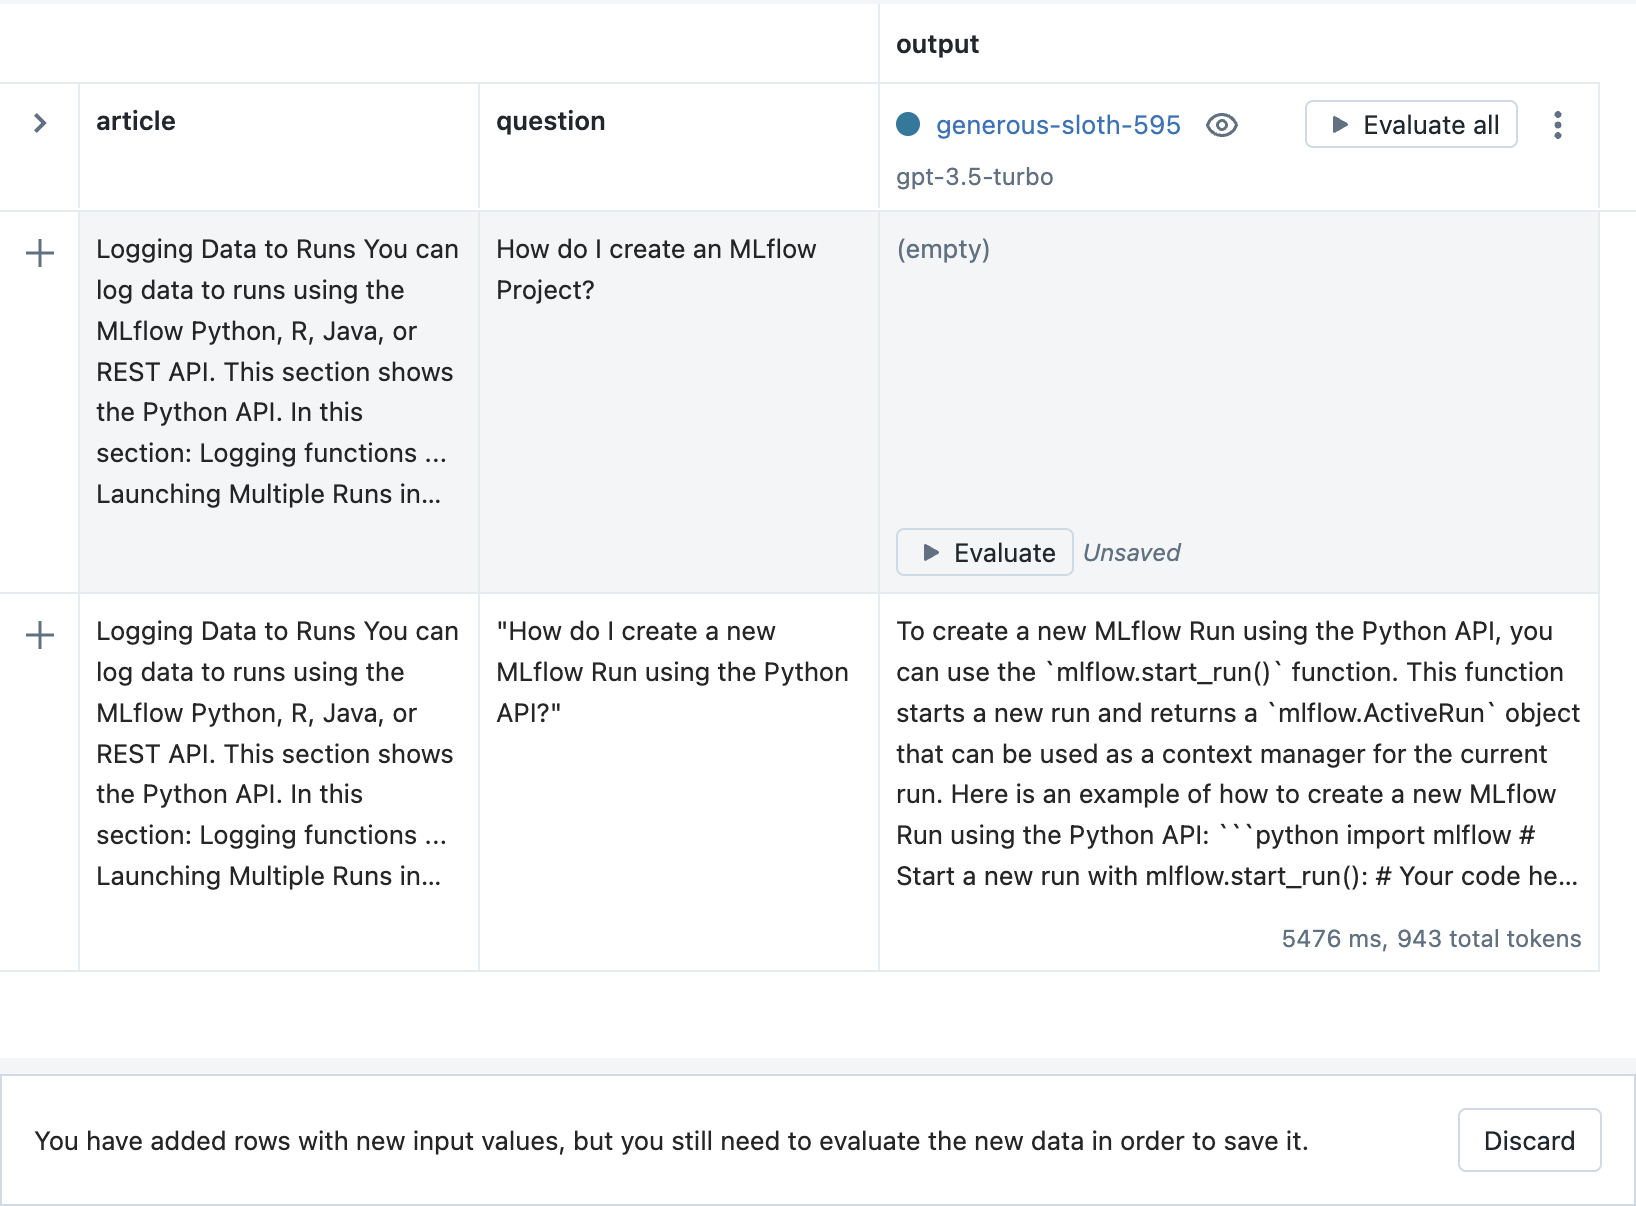
-
最后,点击 Save 按钮以存储新的输入和输出。
步骤 9:调整您的提示模板并创建新的 Run
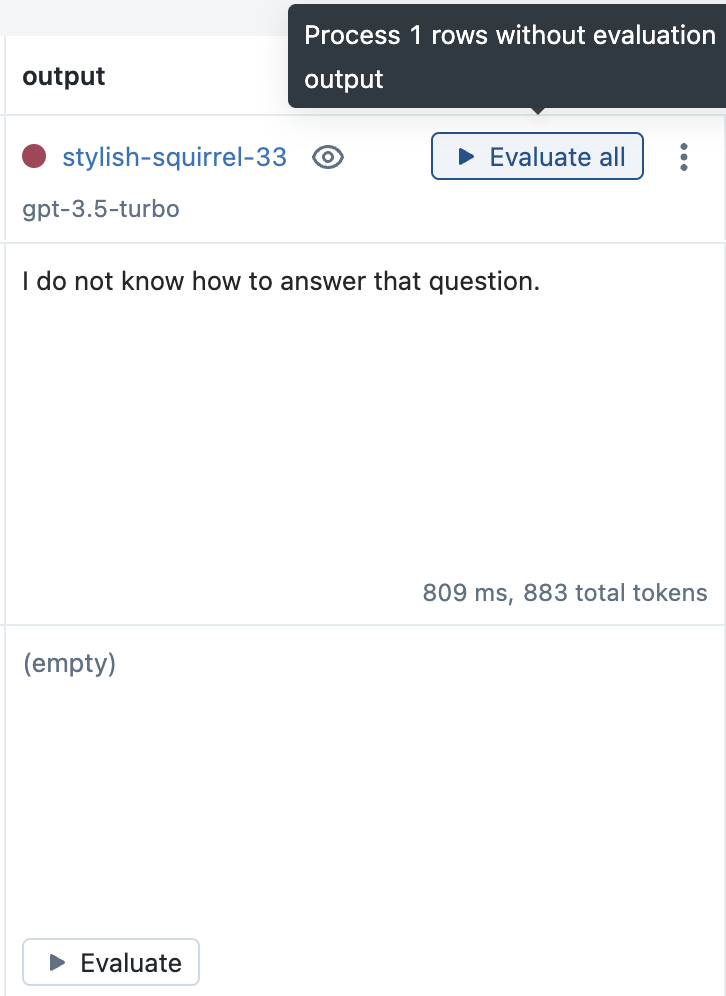
在尝试其他输入时,您可能会发现您选择的 LLM、提示模板和参数在某些场景下表现不佳。例如,在 MLflow 文档用例中,即使答案未出现在指定的文章中,LLM 仍然会尝试回答有关 MLflow Projects 的不相关问题。
-
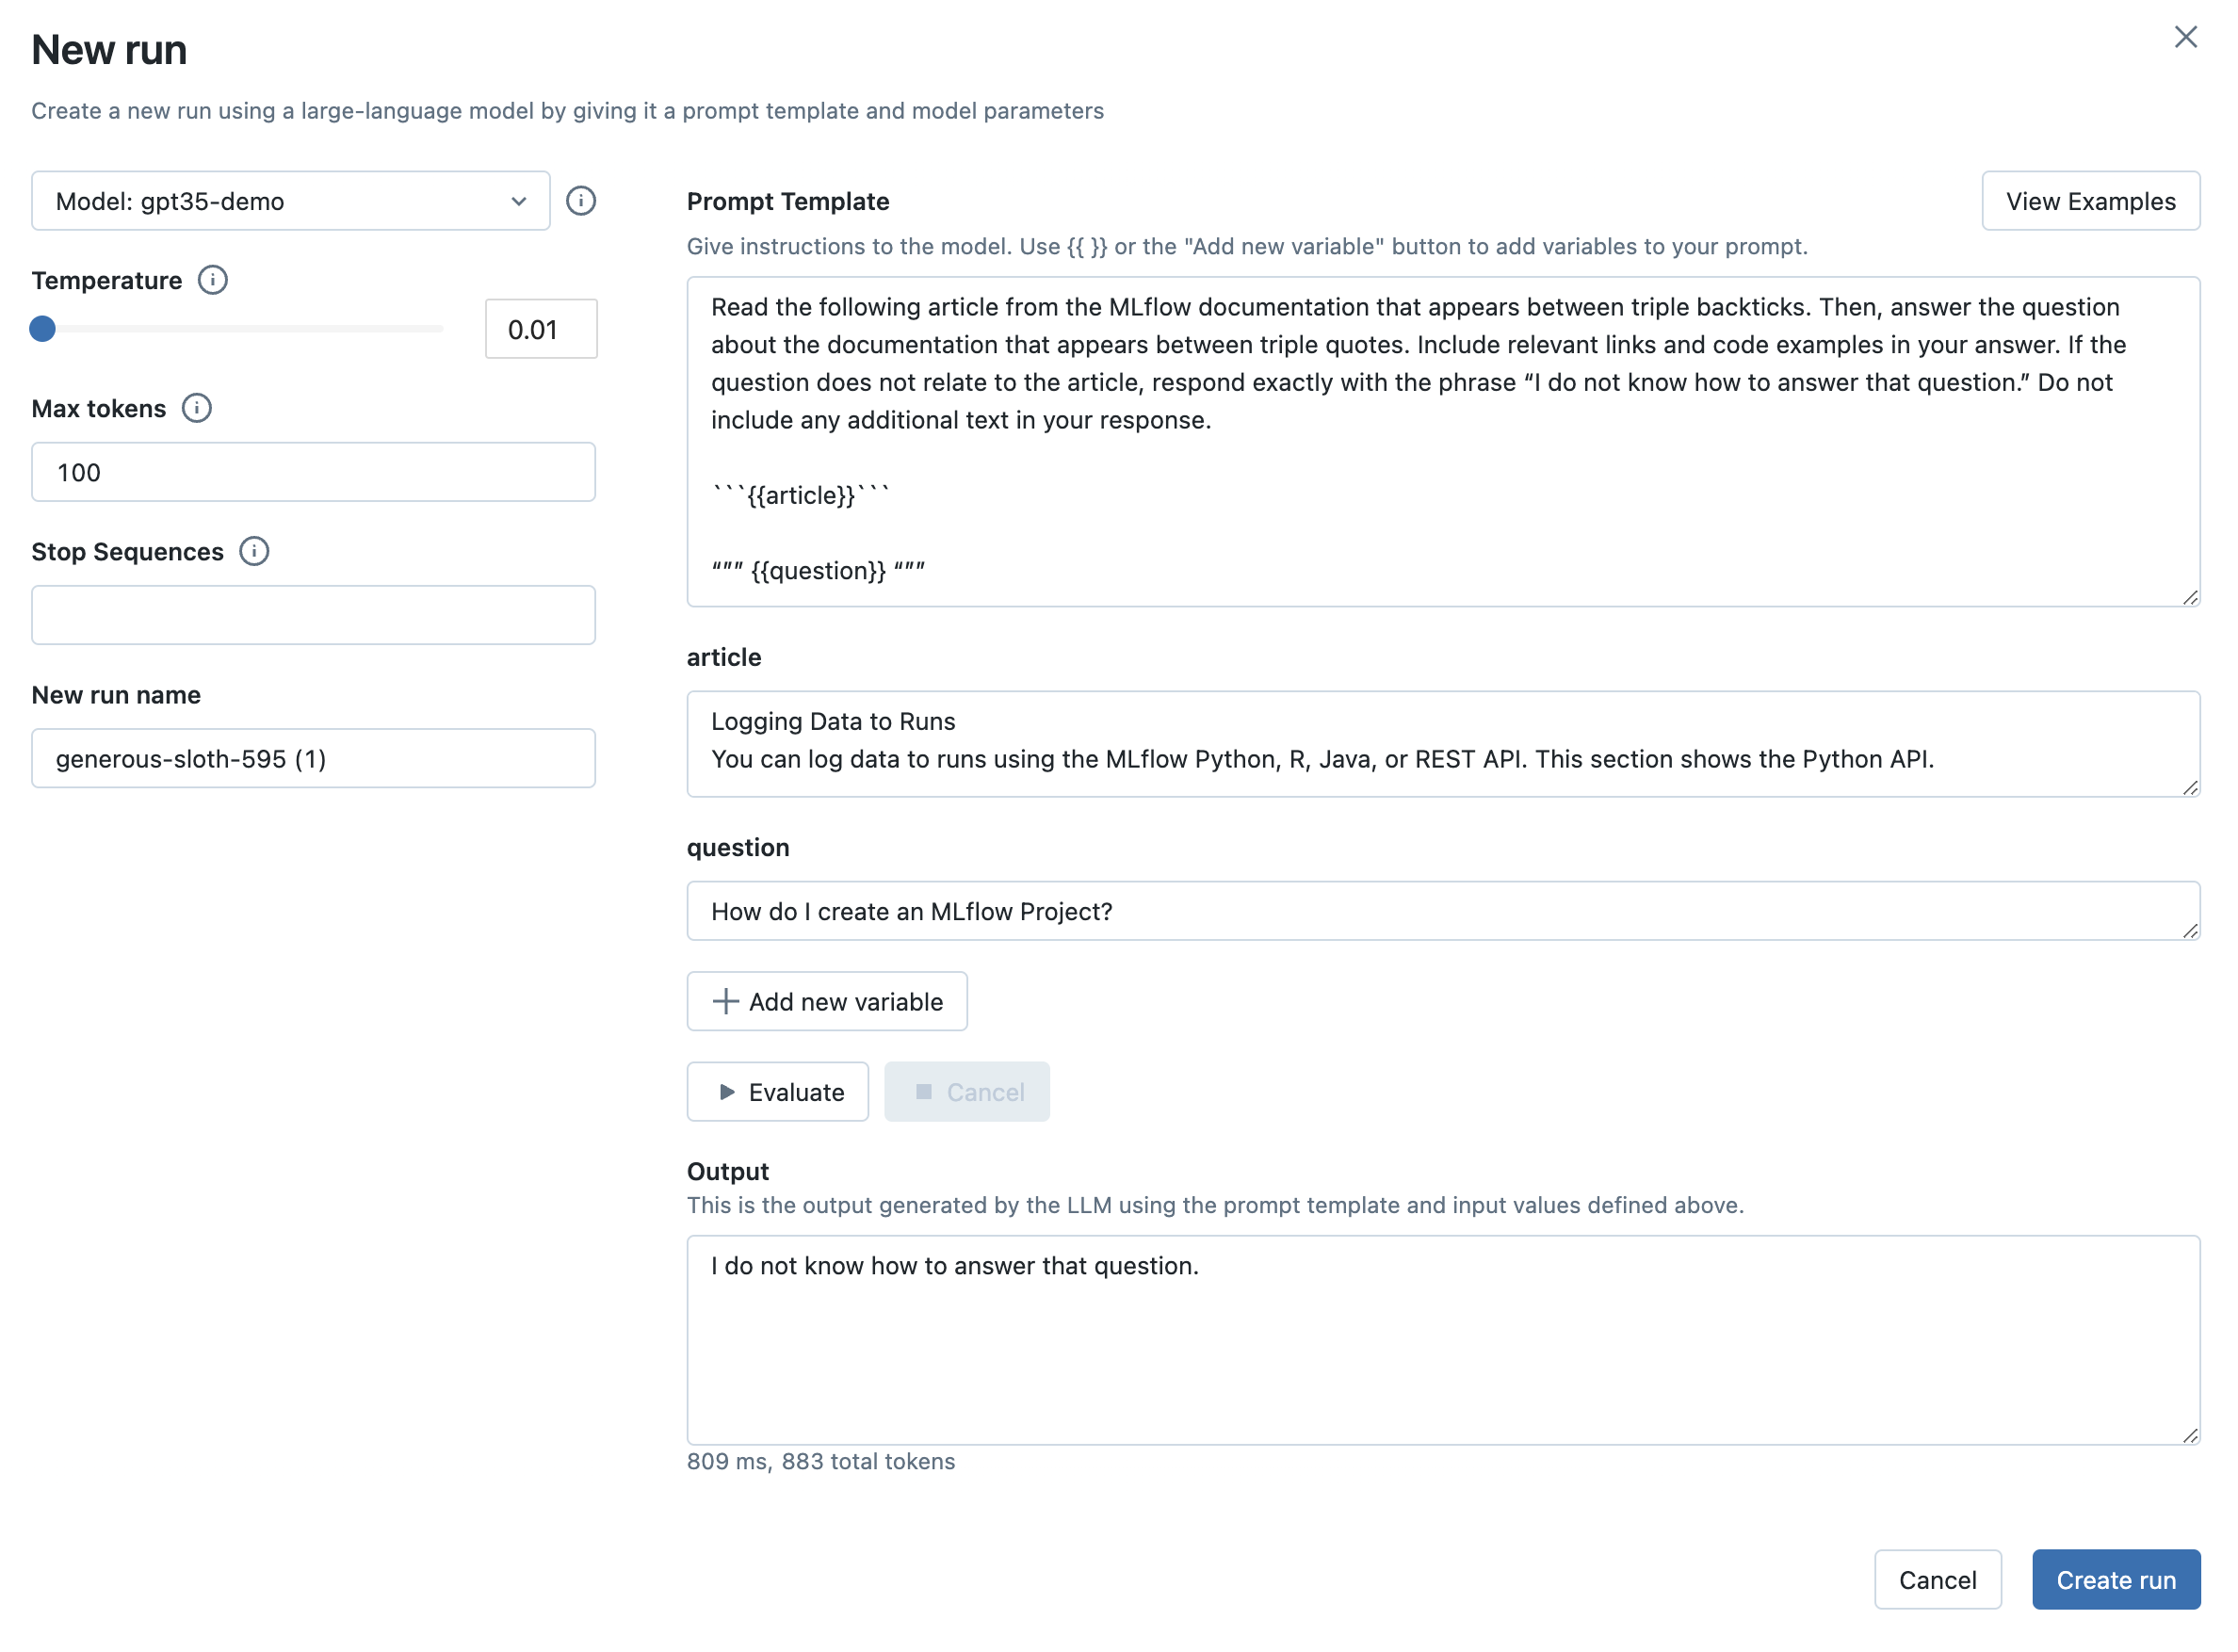
为了提高性能,请通过从上下文菜单中选择 Duplicate run 选项来创建一个新的 Run。例如,在 MLflow 文档用例中,在提示模板中添加以下文本有助于提高对不相关问题的鲁棒性:
textIf the question does not relate to the article, respond exactly with the phrase
"I do not know how to answer that question." Do not include any additional text in your
response.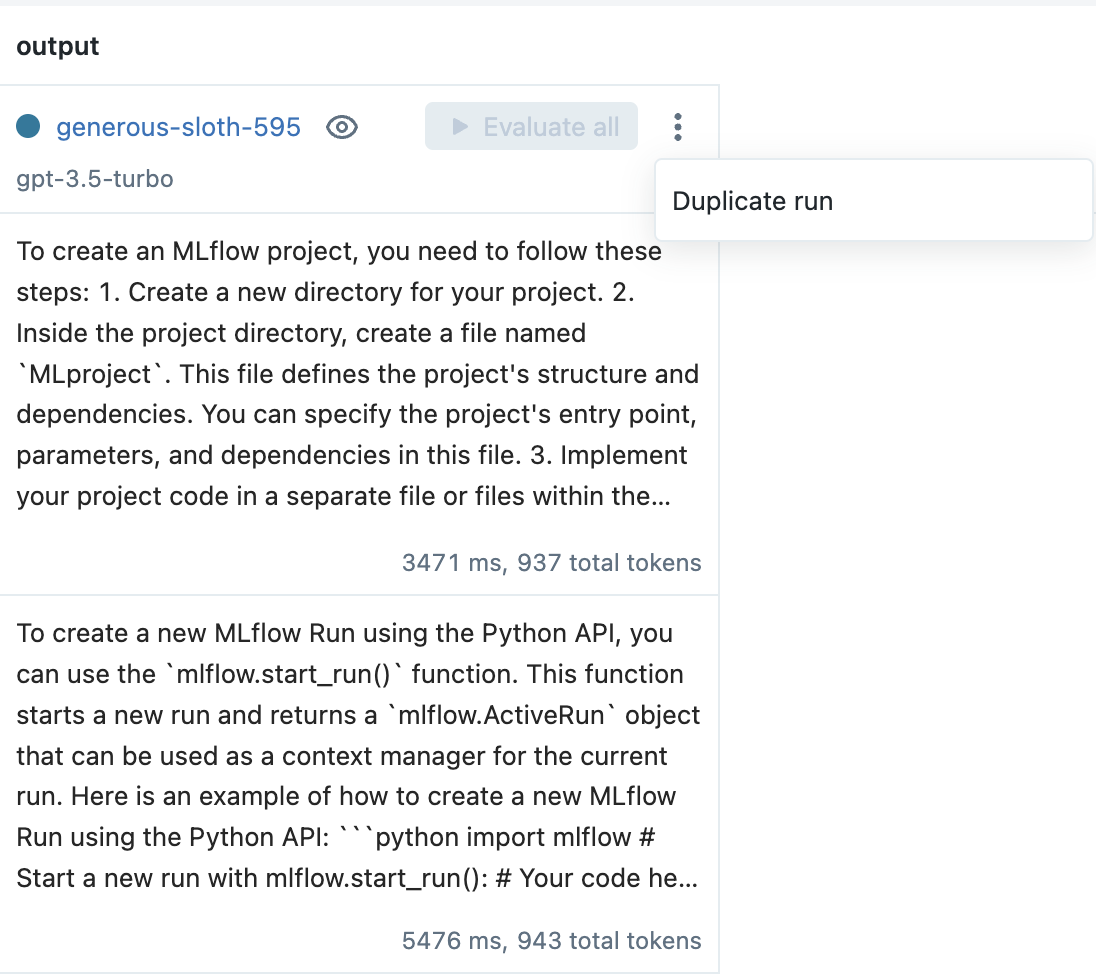
-
然后,在提示工程 playground 中,调整提示模板(和/或 LLM 选择和参数),评估一个输入,然后点击 Create Run 按钮来创建一个新的 Run。
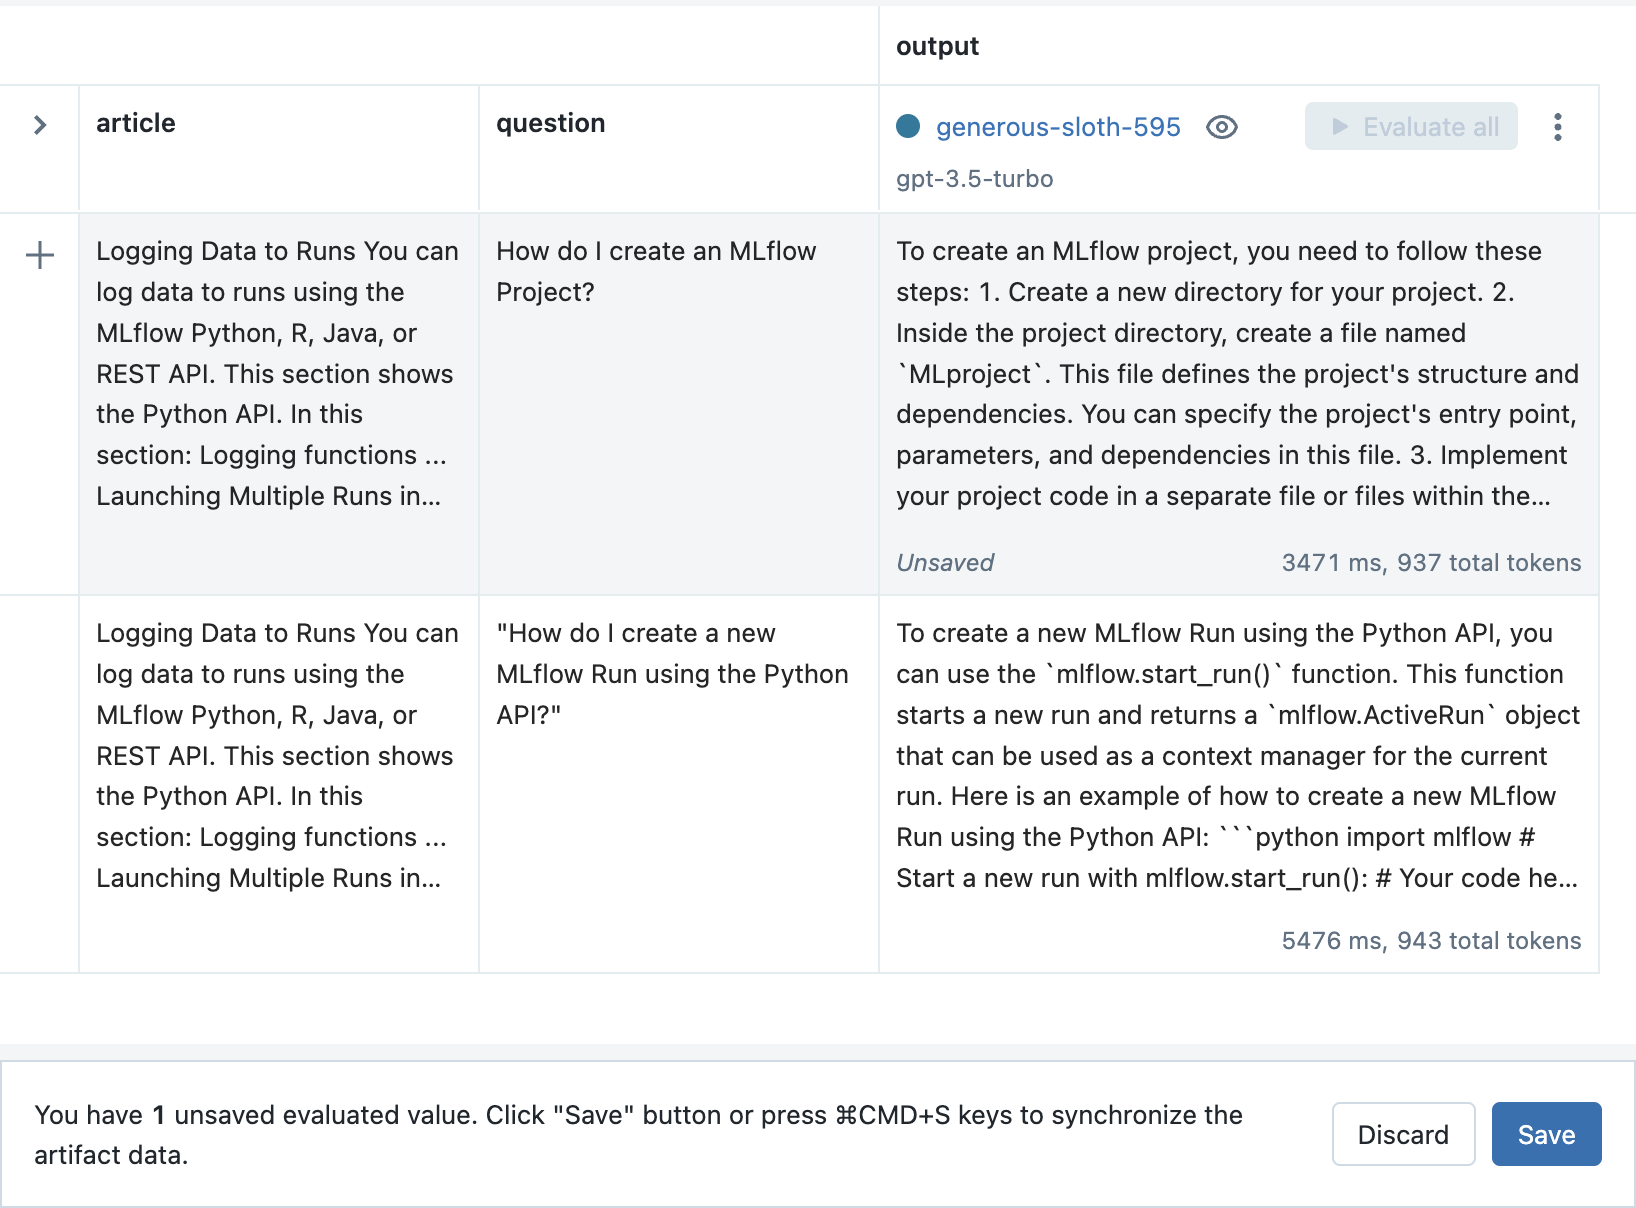
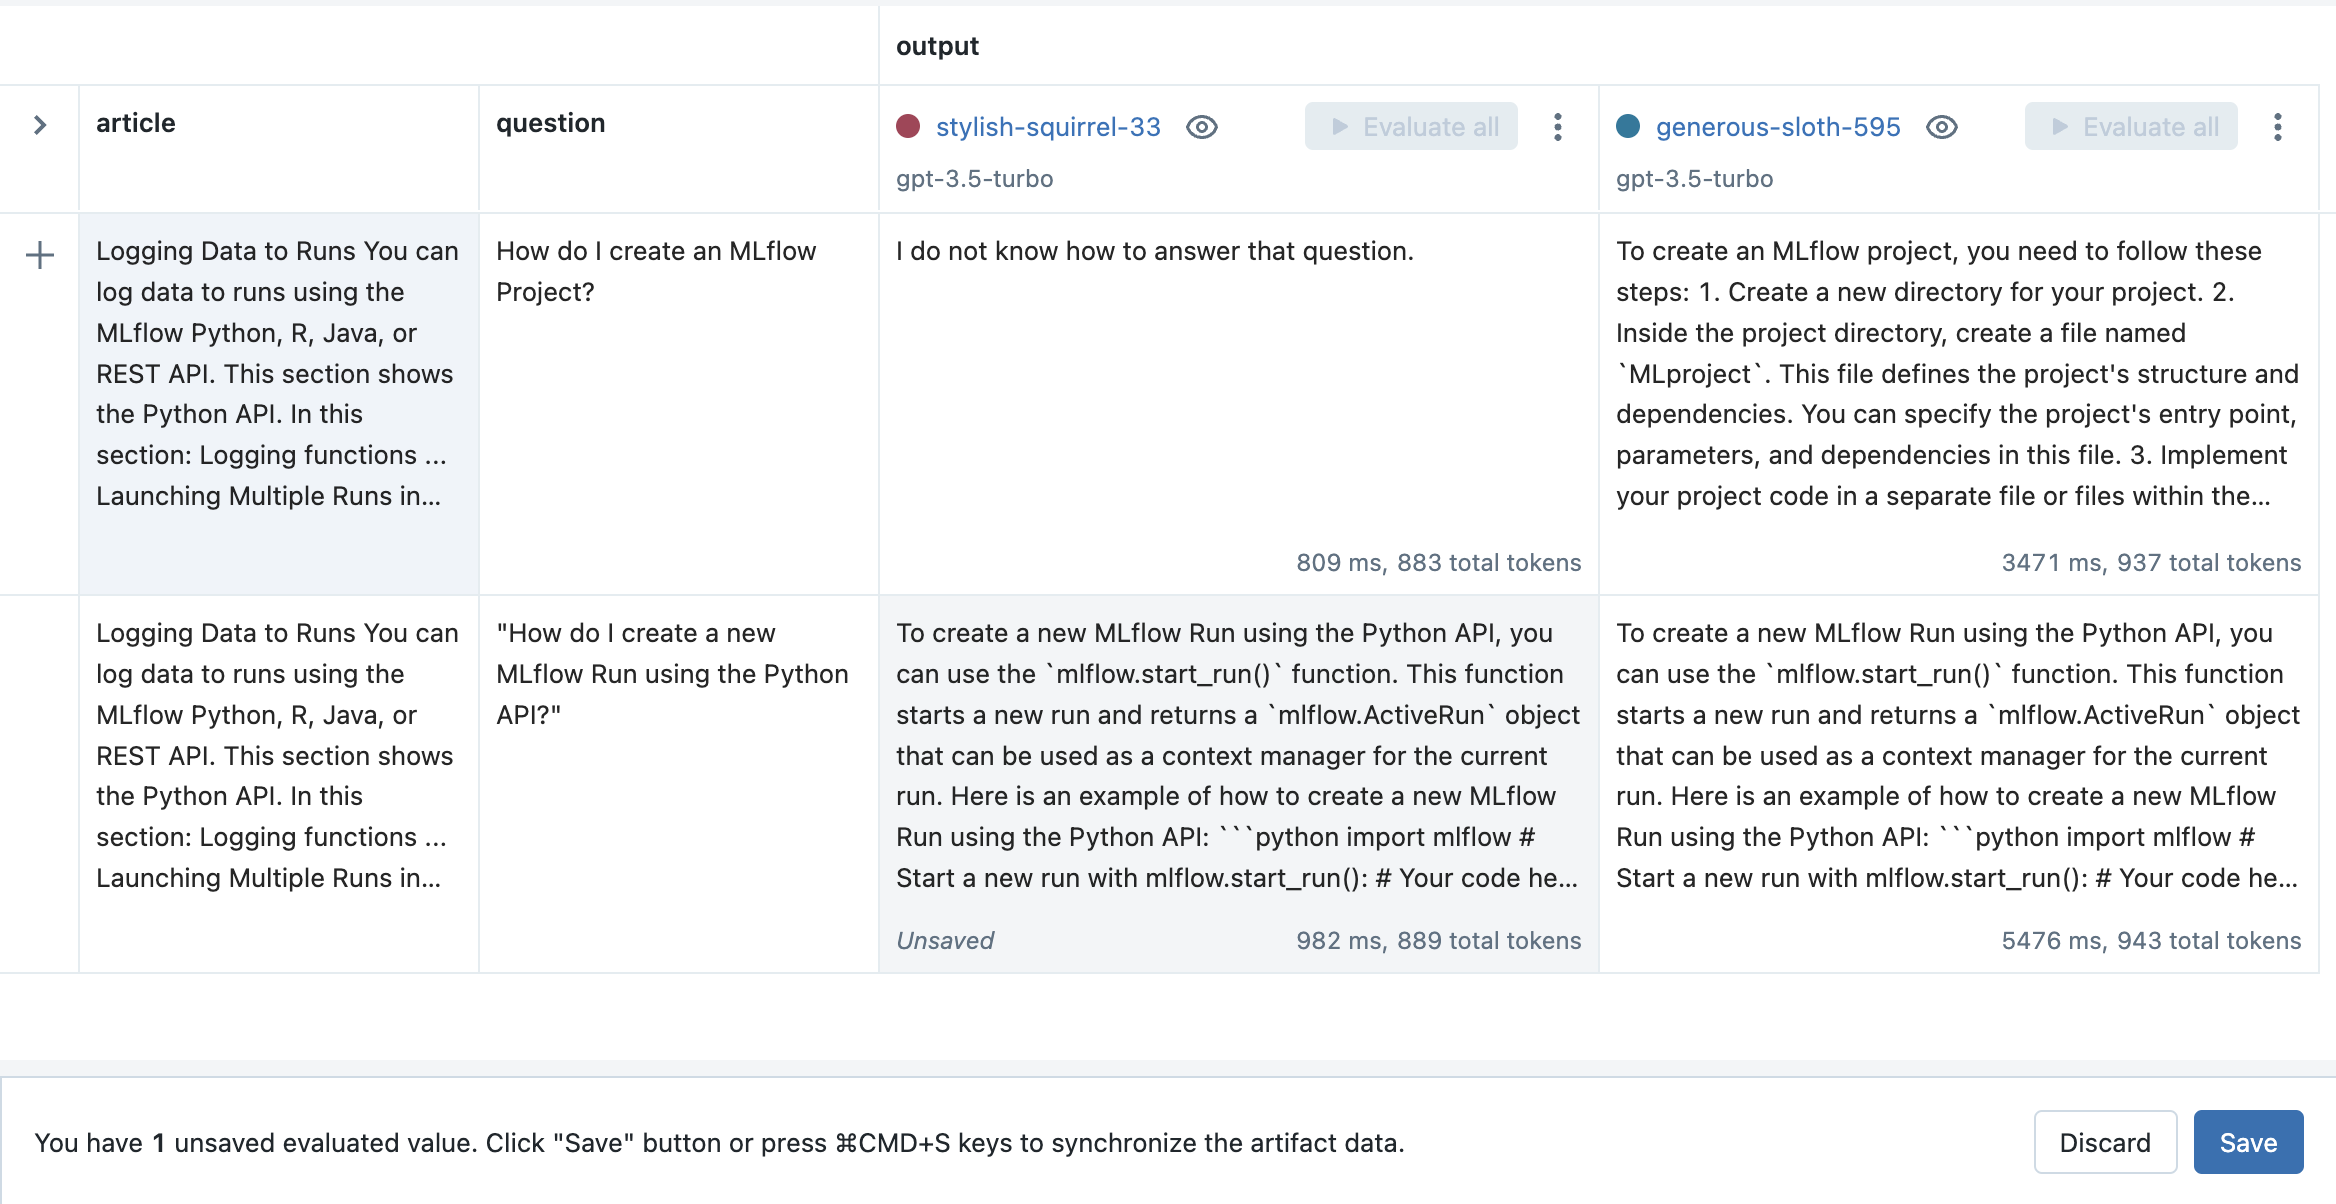
步骤 10:在之前的输入上评估新的提示模板
现在您已经调整了提示模板,重要的是要确保新模板在之前的输入上表现良好,并将输出与旧配置进行比较。
-
在 Evaluation 选项卡中,点击新 Run 旁边的 Evaluate all 按钮来评估所有之前的输入。
-
点击 Save 按钮以存储结果。
步骤 11:以编程方式加载评估数据
MLflow 提示工程 UI 和评估 UI 生成的所有输入和输出都作为 artifact 存储在 MLflow Runs 中。它们可以通过 mlflow.load_table() API 以编程方式访问,如下所示:
import mlflow

mlflow.set_experiment("/Path/to/your/prompt/engineering/experiment")

# Load input and output data across all Runs (configurations) as a Pandas DataFrame
inputs_outputs_pdf = mlflow.load_table(
    # All inputs and outputs created from the MLflow UI are stored in an artifact called
    # "eval_results_table.json"
    artifact_file="eval_results_table.json",
    # Include the run ID as a column in the table to distinguish inputs and outputs
    # produced by different runs
    extra_columns=["run_id"],
)
# Optionally convert the Pandas DataFrame to Spark where it can be stored as a Delta
# table or joined with existing Delta tables
inputs_outputs_sdf = spark.createDataFrame(inputs_outputs_pdf)
步骤 12:以编程方式生成预测
一旦您找到一个表现良好的 LLM、提示模板和参数配置,您就可以在您选择的 Python 环境中使用相应的 MLflow Model 生成预测,或者您可以 将其部署为实时服务。
-
要在 notebook 中加载 MLflow Model 以进行批量推理,请点击 Run 的名称以打开 Run Page,然后在 Artifact Viewer 中选择 model 目录。然后,从 Predict on a Pandas DataFrame 部分复制前几行代码,并在您选择的 Python 环境中运行它们,例如:
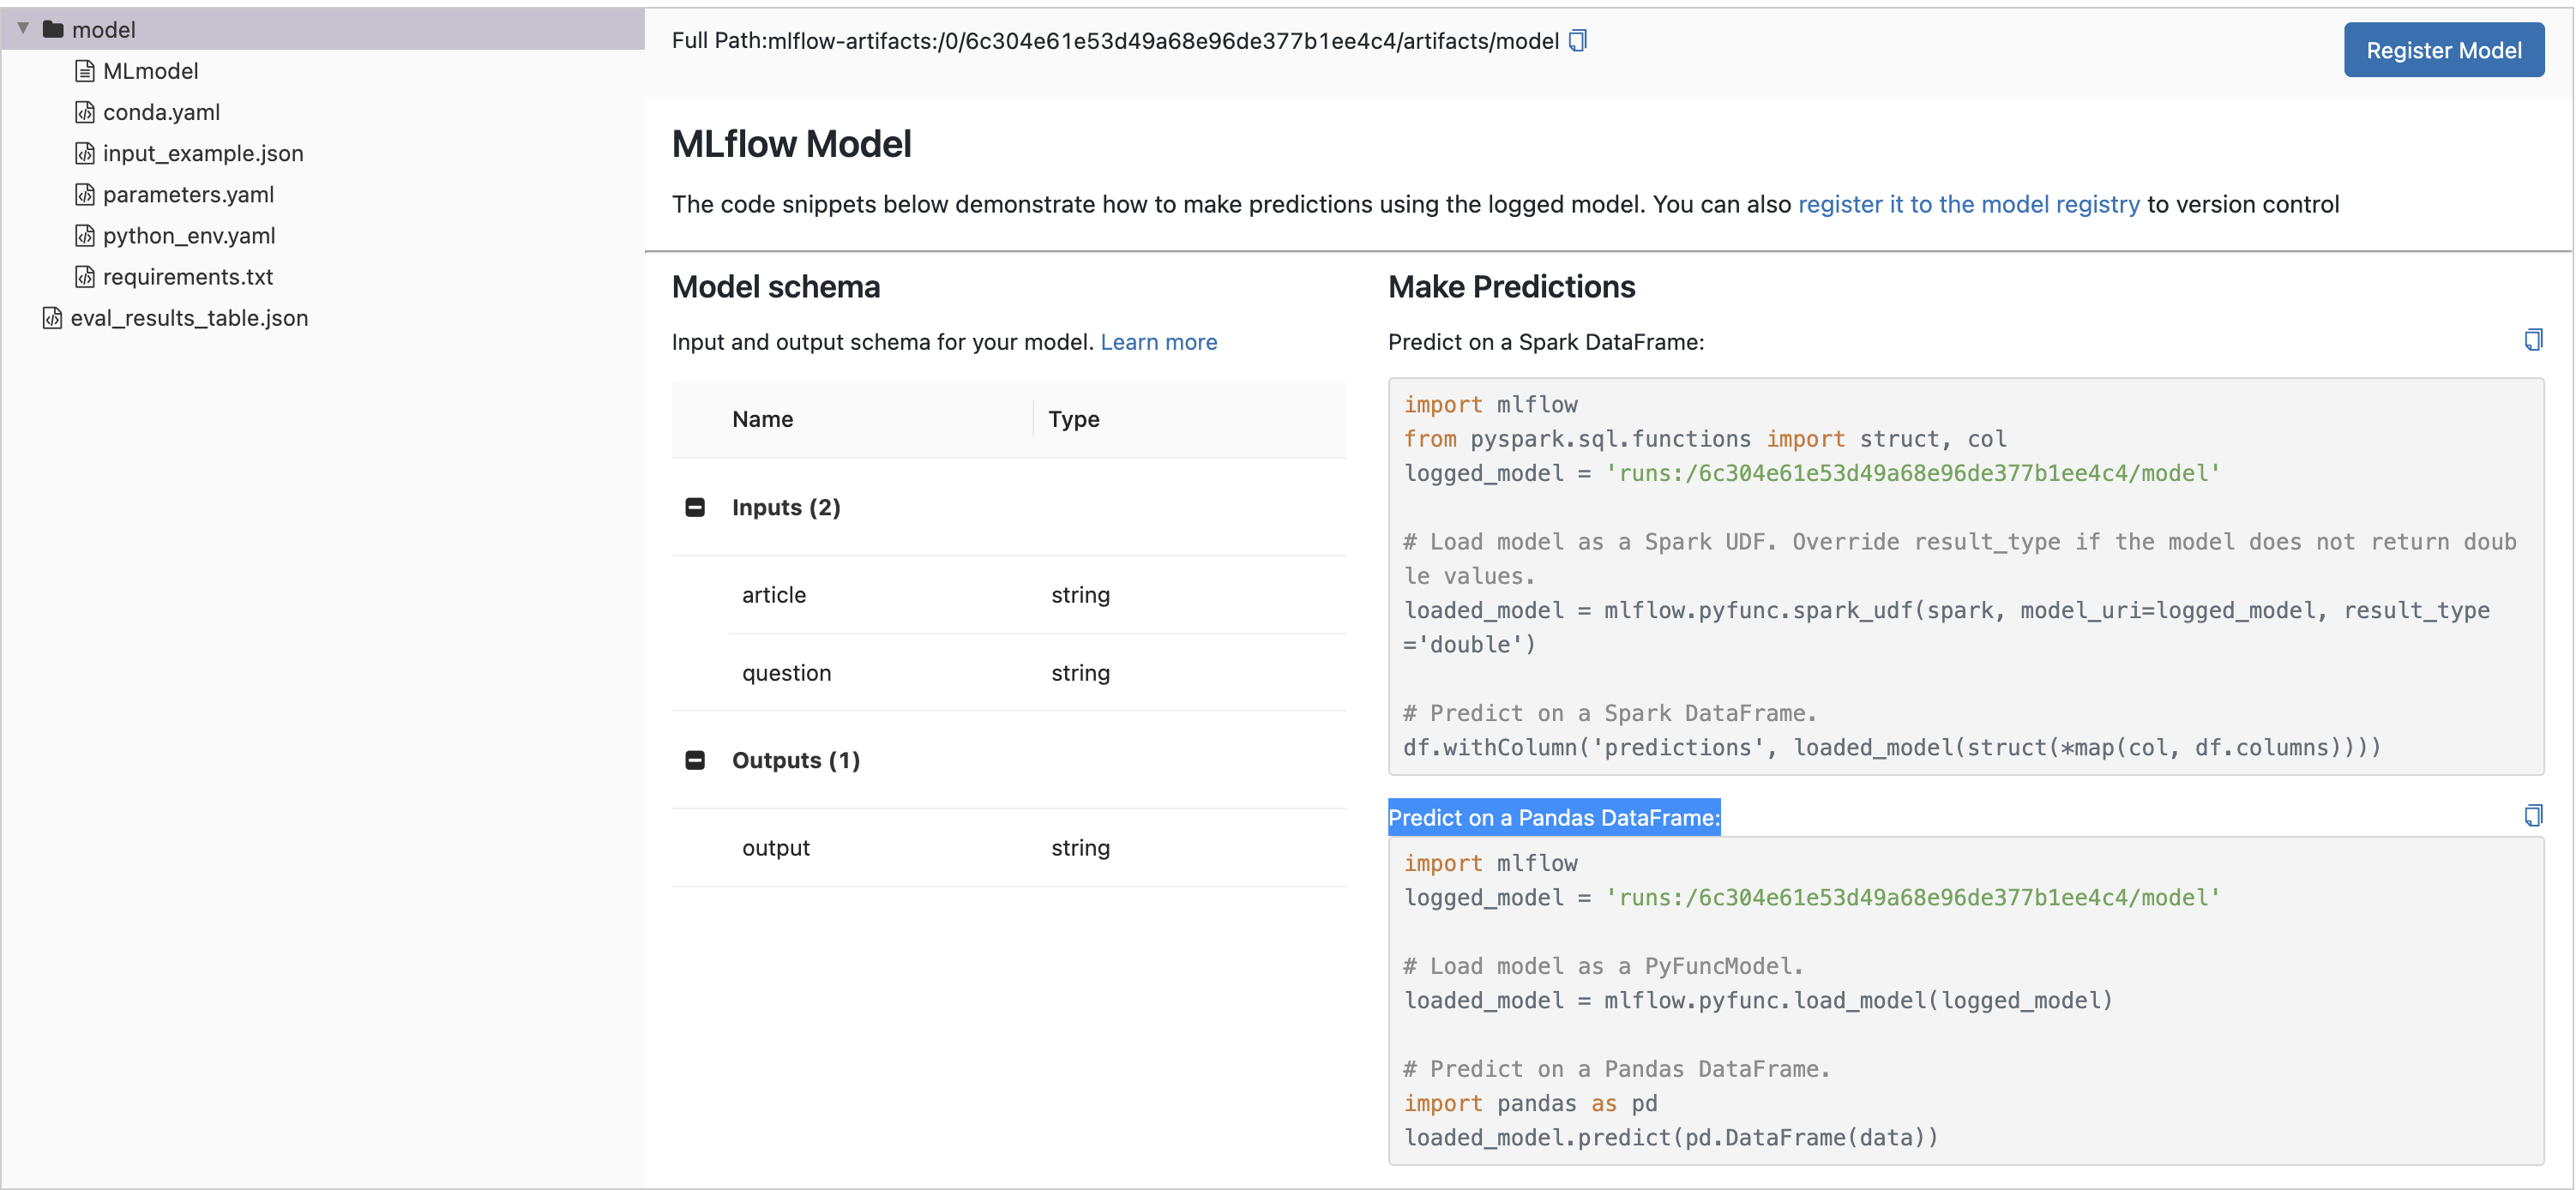 python
import mlflow

logged_model = "runs:/8451075c46964f82b85fe16c3d2b7ea0/model"

# Load model as a PyFuncModel.
loaded_model = mlflow.pyfunc.load_model(logged_model) -
然后,要生成预测,请调用
predict()方法并传入一个输入变量的字典。例如:pythonarticle_text = """
An MLflow Project is a format for packaging data science code in a reusable and reproducible way.
The MLflow Projects component includes an API and command-line tools for running projects, which
also integrate with the Tracking component to automatically record the parameters and git commit
of your source code for reproducibility.
This article describes the format of an MLflow Project and how to run an MLflow project remotely
using the MLflow CLI, which makes it easy to vertically scale your data science code.
"""
question = "What is an MLflow project?"
loaded_model.predict({"article": article_text, "question": question})有关使用 MLflow 进行实时服务部署的更多信息,请参阅 下面的说明。
部署为实时服务
一旦您找到一个表现良好的 LLM、提示模板和参数配置,您就可以按如下方式部署相应的 MLflow Model 以进行实时服务:
-
将您的模型注册到 MLflow Model Registry。以下示例将从 快速入门 创建的 MLflow Model 注册为名为
"mlflow_docs_qa_model"的注册模型的版本 1。pythonmlflow.register_model(
model_uri="runs:/8451075c46964f82b85fe16c3d2b7ea0/model",
name="mlflow_docs_qa_model",
) -
在将运行 MLflow Model Server 的环境中定义以下环境变量,例如本地机器上的 shell:
MLFLOW_DEPLOYMENTS_TARGET:MLflow AI Gateway 的 URL
-
使用 mlflow models serve 命令启动 MLflow Model Server。例如,从本地机器上的 shell 运行以下命令将在端口 8000 上提供模型:
bashmlflow models serve --model-uri models:/mlflow_docs_qa_model/1 --port 8000 -
服务器启动后,可以通过 REST API 调用进行查询。例如:
bashinput='
{
"dataframe_records": [
{
"article": "An MLflow Project is a format for packaging data science code...",
"question": "What is an MLflow Project?"
}
]
}'
echo $input | curl \
-s \
-X POST \
https://:8000/invocations
-H 'Content-Type: application/json' \
-d @-其中
article和question将被替换为您的提示模板中的输入变量。