PydanticAI 跟踪
PydanticAI 是一个 Python 框架,旨在简化生产级生成式 AI 应用程序的开发。它为 GenAI 应用开发带来了类型安全、符合人体工程学的 API 设计和对开发人员友好的体验。
通过调用 mlflow.pydantic_ai.autolog() 函数,MLflow 跟踪 为 PydanticAI(一个用于构建多代理应用程序的开源框架)提供了自动跟踪功能。启用 PydanticAI 的自动跟踪后,MLflow 将捕获 PydanticAI 工作流执行的嵌套跟踪,并将其记录到当前的 MLflow 实验中。
import mlflow

mlflow.pydantic_ai.autolog()
MLflow 跟踪会自动捕获 PydanticAI 代理的以下信息:
- 带有提示、关键字参数和输出响应的代理调用
- LLM 请求(记录模型名称、提示、参数和响应)
- 工具运行(捕获工具名称、参数和使用情况指标)
- MCP 服务器调用和列表,用于工具调用跟踪
- Span 元数据:延迟、错误和运行 ID 链接
当前,MLflow 的 PydanticAI 集成支持同步和异步执行的跟踪,但尚不支持流式操作。
示例用法
首先,为 PydanticAI 启用自动跟踪,并可选择创建一个 MLflow 实验来写入跟踪。这有助于更好地组织您的跟踪。
import mlflow

# Turn on auto tracing by calling mlflow.pydantic_ai.autolog()
mlflow.pydantic_ai.autolog()


# Optional: Set a tracking URI and an experiment
mlflow.set_tracking_uri("https://:5000")
mlflow.set_experiment("PydanticAI")
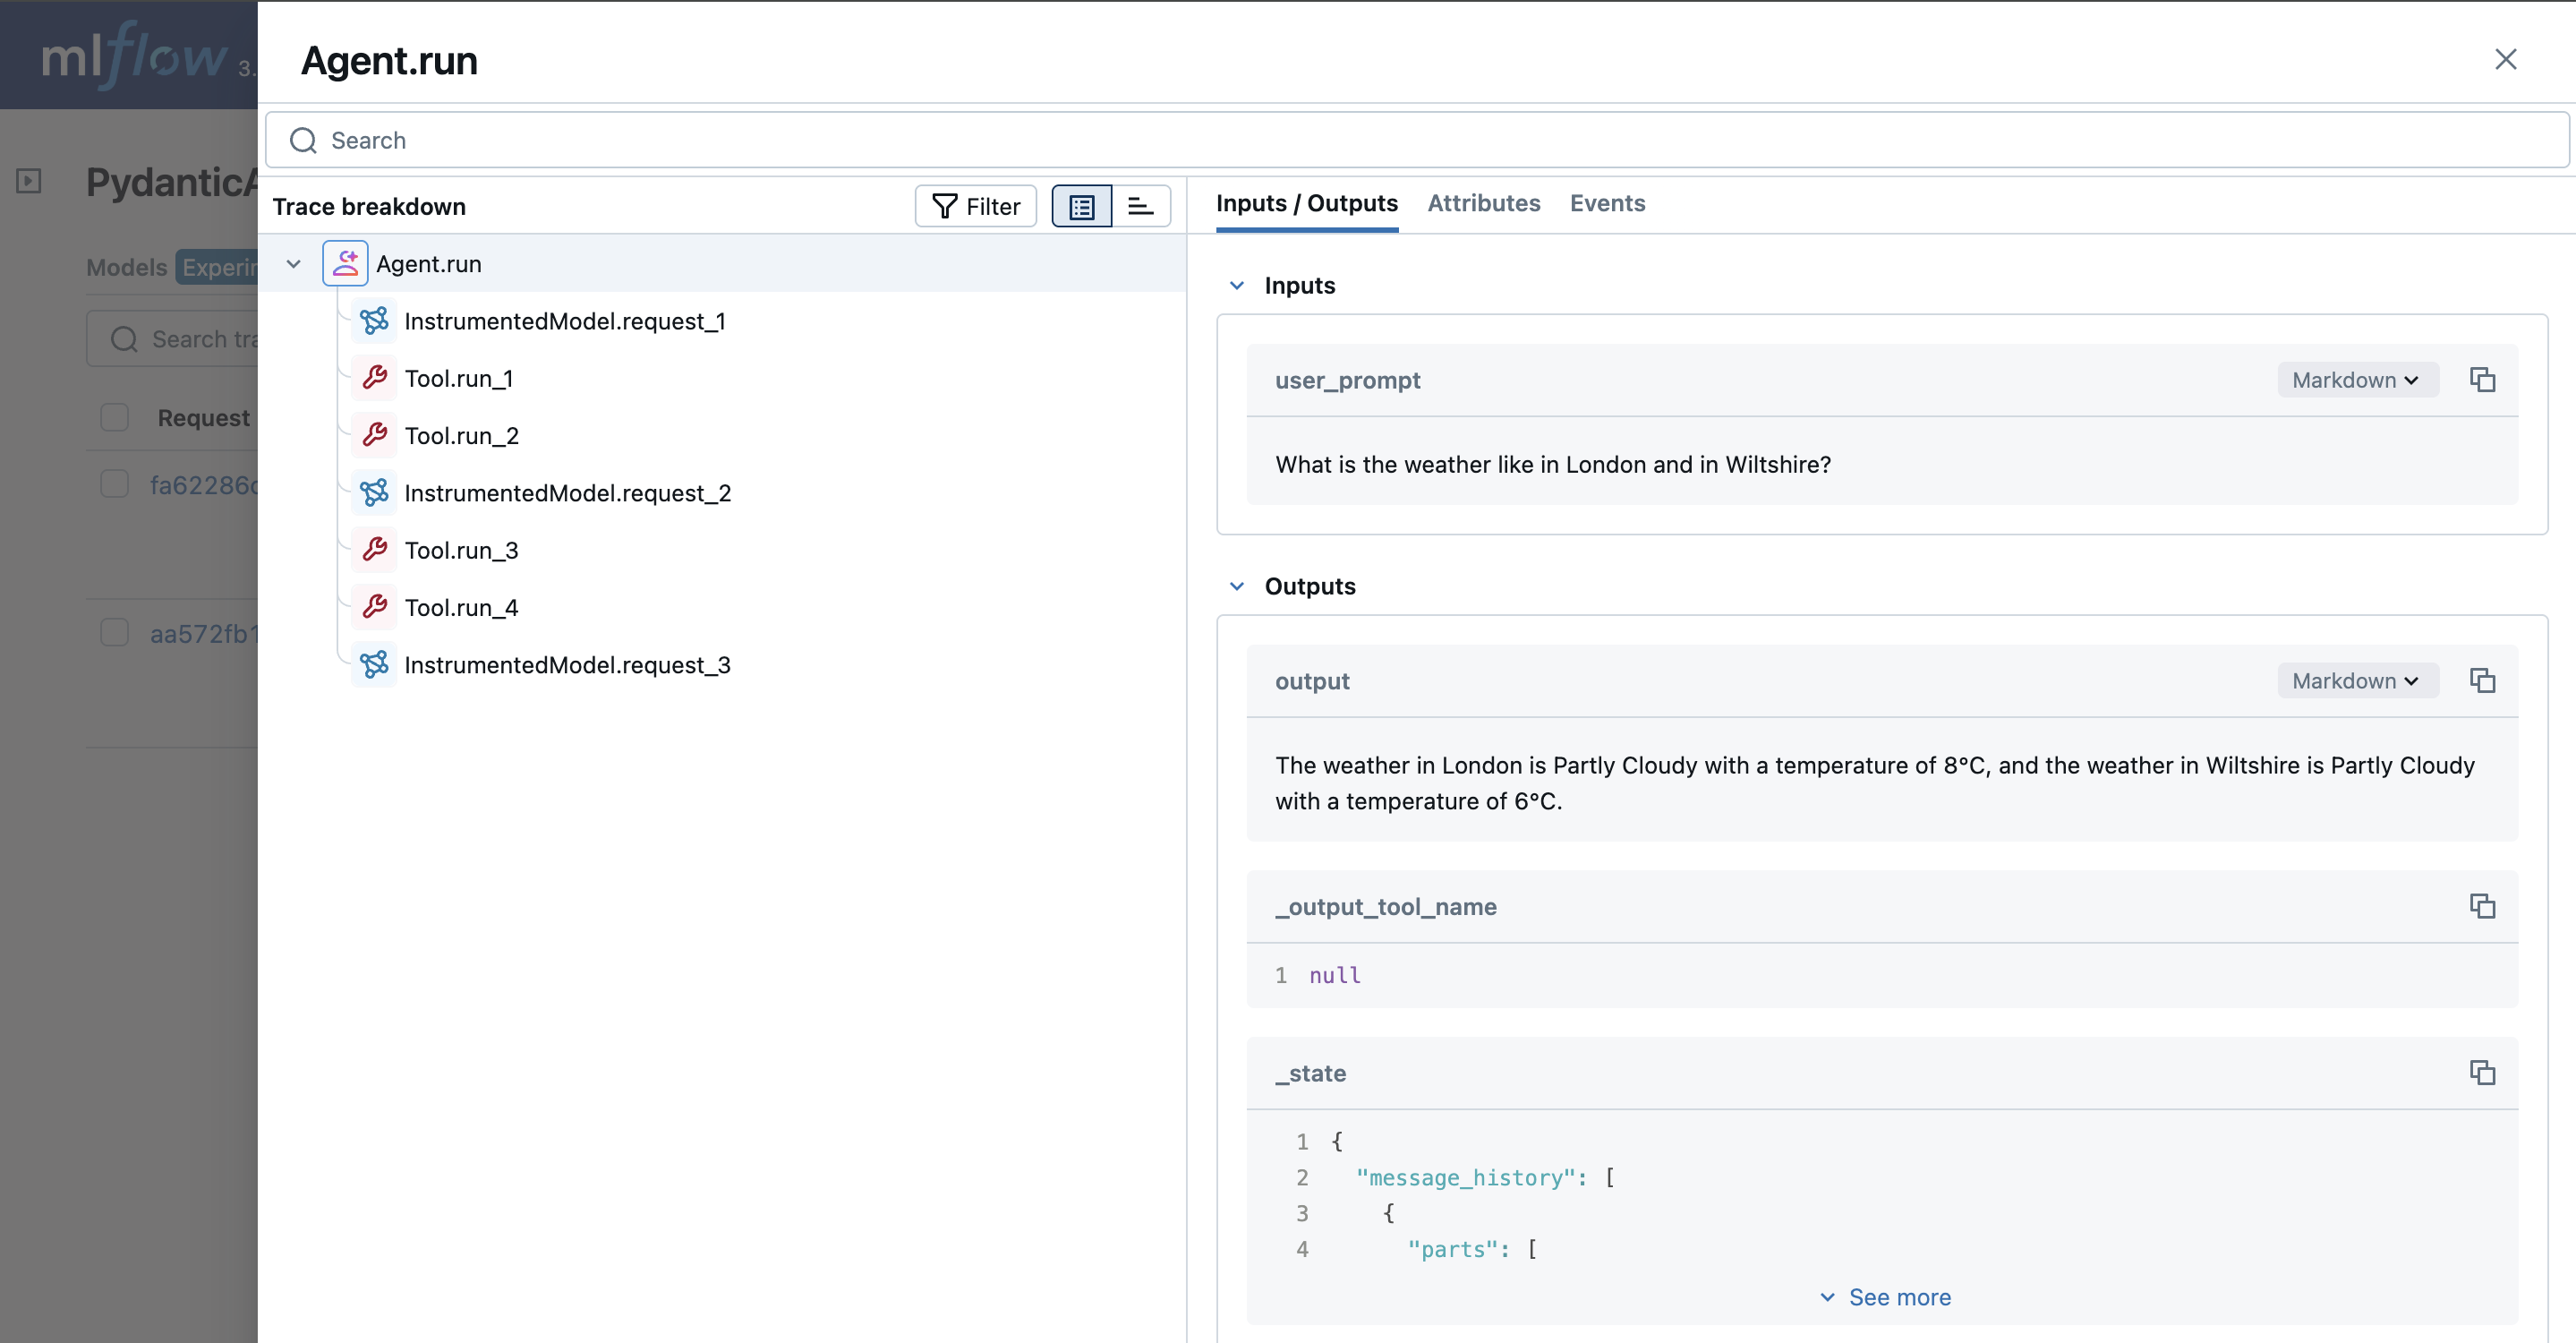
接下来,让我们使用 PydanticAI 定义一个多代理工作流。下面的示例设置了一个天气代理,用户可以查询多个地点]); 的天气。该代理将使用 get_lat_lng 工具获取地点的纬度和经度,然后使用 get_weather 工具获取这些地点的天气。
import os
from dataclasses import dataclass
from typing import Any

from httpx import AsyncClient

from pydantic_ai import Agent, ModelRetry, RunContext


@dataclass
class Deps:
    client: AsyncClient
    weather_api_key: str | None
    geo_api_key: str | None


weather_agent = Agent(
    # Switch to your favorite LLM
    "google-gla:gemini-2.0-flash",
    # 'Be concise, reply with one sentence.' is enough for some models (like openai) to use
    # the below tools appropriately, but others like anthropic and gemini require a bit more direction.
    system_prompt=(
        "Be concise, reply with one sentence."
        "Use the `get_lat_lng` tool to get the latitude and longitude of the locations, "
        "then use the `get_weather` tool to get the weather."
    ),
    deps_type=Deps,
    retries=2,
    instrument=True,
)


@weather_agent.tool
async def get_lat_lng(
    ctx: RunContext[Deps], location_description: str
) -> dict[str, float]:
    """Get the latitude and longitude of a location.

    Args:
        ctx: The context.
        location_description: A description of a location.
    """
    if ctx.deps.geo_api_key is None:
        return {"lat": 51.1, "lng": -0.1}

    params = {
        "q": location_description,
        "api_key": ctx.deps.geo_api_key,
    }
    r = await ctx.deps.client.get("https://geocode.maps.co/search", params=params)
    r.raise_for_status()
    data = r.json()

    if data:
        return {"lat": data[0]["lat"], "lng": data[0]["lon"]}
    else:
        raise ModelRetry("Could not find the location")


@weather_agent.tool
async def get_weather(ctx: RunContext[Deps], lat: float, lng: float) -> dict[str, Any]:
    """Get the weather at a location.

    Args:
        ctx: The context.
        lat: Latitude of the location.
        lng: Longitude of the location.
    """

    if ctx.deps.weather_api_key is None:
        return {"temperature": "21 °C", "description": "Sunny"}

    params = {
        "apikey": ctx.deps.weather_api_key,
        "location": f"{lat},{lng}",
        "units": "metric",
    }
    r = await ctx.deps.client.get(
        "https://api.tomorrow.io/v4/weather/realtime", params=params
    )
    r.raise_for_status()
    data = r.json()

    values = data["data"]["values"]
    # https://docs.tomorrow.io/reference/data-layers-weather-codes
    code_lookup = {
        1000: "Clear, Sunny",
        1100: "Mostly Clear",
        1101: "Partly Cloudy",
        1102: "Mostly Cloudy",
        1001: "Cloudy",
        2000: "Fog",
        2100: "Light Fog",
        4000: "Drizzle",
        4001: "Rain",
        4200: "Light Rain",
        4201: "Heavy Rain",
        5000: "Snow",
        5001: "Flurries",
        5100: "Light Snow",
        5101: "Heavy Snow",
        6000: "Freezing Drizzle",
        6001: "Freezing Rain",
        6200: "Light Freezing Rain",
        6201: "Heavy Freezing Rain",
        7000: "Ice Pellets",
        7101: "Heavy Ice Pellets",
        7102: "Light Ice Pellets",
        8000: "Thunderstorm",
    }
    return {
        "temperature": f'{values["temperatureApparent"]:0.0f}°C',
        "description": code_lookup.get(values["weatherCode"], "Unknown"),
    }


async def main():
    async with AsyncClient() as client:
        weather_api_key = os.getenv("WEATHER_API_KEY")
        geo_api_key = os.getenv("GEO_API_KEY")
        deps = Deps(
            client=client, weather_api_key=weather_api_key, geo_api_key=geo_api_key
        )
        result = await weather_agent.run(
            "What is the weather like in London and in Wiltshire?", deps=deps
        )
        print("Response:", result.output)


# If you are running this on a notebook
await main()

# Uncomment this is you are using an IDE or Python script.
# asyncio.run(main())
高级示例:利用 MCP 服务器
MLflow 跟踪会自动捕获 PydanticAI 中与 MCP 服务器相关的工具交互,包括 call_tool 和 list_tools 操作。这些操作在跟踪 UI 中被记录为单独的 span。
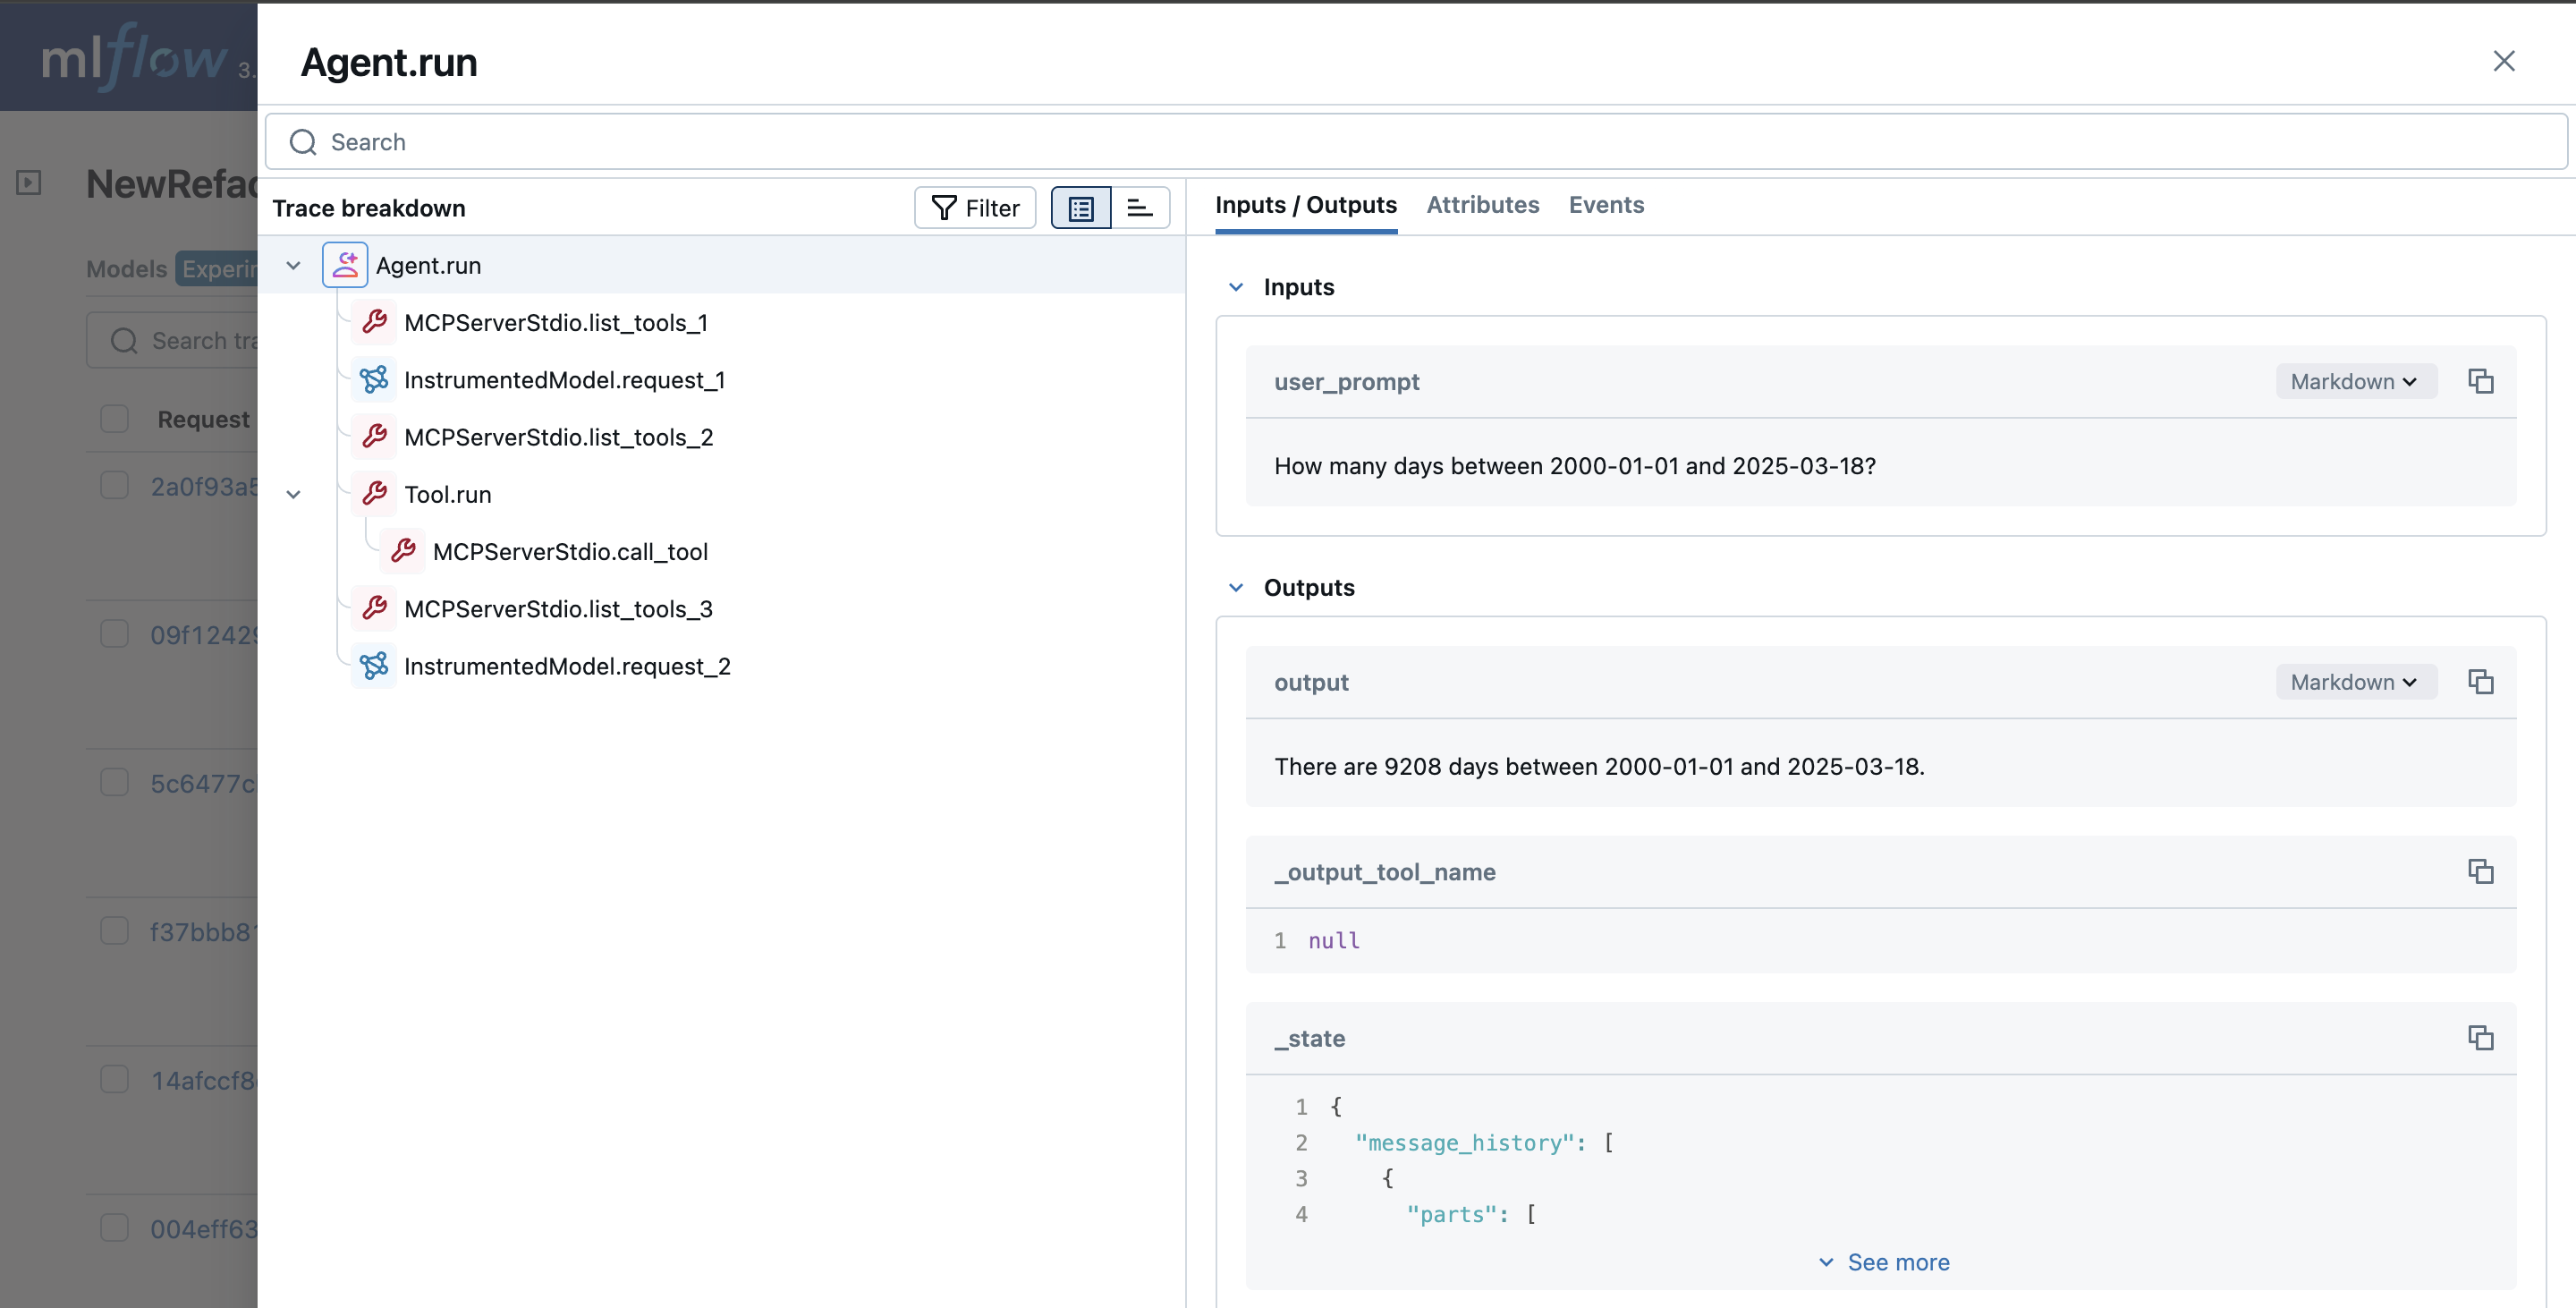
下面的示例演示了如何使用 PydanticAI 和启用了 MLflow 跟踪的 MCP 服务器。所有工具调用和列表操作都会在 UI 中自动捕获为跟踪 span,以及相关的元数据。
import mlflow
import asyncio

mlflow.set_tracking_uri("https://:5000")
mlflow.set_experiment("MCP Server")
mlflow.pydantic_ai.autolog()

from pydantic_ai import Agent
from pydantic_ai.mcp import MCPServerStdio

server = MCPServerStdio(
    "deno",
    args=[
        "run",
        "-N",
        "-R=node_modules",
        "-W=node_modules",
        "--node-modules-dir=auto",
        "jsr:@pydantic/mcp-run-python",
        "stdio",
    ],
)

agent = Agent("openai:gpt-4o", mcp_servers=[server], instrument=True)


async def main():
    async with agent.run_mcp_servers():
        result = await agent.run("How many days between 2000-01-01 and 2025-03-18?")
    print(result.output)
    # > There are 9,208 days between January 1, 2000, and March 18, 2025.


# If you are running this on a notebook
await main()

# Uncomment this is you are using an IDE or Python script.
# asyncio.run(main())
Token 用量
MLflow >= 3.1.0 支持 PydanticAI 的 Token 用量跟踪。每次 LLM 调用的 Token 用量将记录在 mlflow.chat.tokenUsage 属性中。整个跟踪的总 Token 用量可在跟踪信息对象的 token_usage 字段中找到。
import json
import mlflow

mlflow.pydantic_ai.autolog()

# Run the example given in previous
await main()

# Uncomment this is you are using an IDE or Python script.
# asyncio.run(main())


# Get the trace object just created
last_trace_id = mlflow.get_last_active_trace_id()
trace = mlflow.get_trace(trace_id=last_trace_id)

# Print the token usage
total_usage = trace.info.token_usage
print("== Total token usage: ==")
print(f"  Input tokens: {total_usage['input_tokens']}")
print(f"  Output tokens: {total_usage['output_tokens']}")
print(f"  Total tokens: {total_usage['total_tokens']}")

# Print the token usage for each LLM call
print("\n== Detailed usage for each LLM call: ==")
for span in trace.data.spans:
    if usage := span.get_attribute("mlflow.chat.tokenUsage"):
        print(f"{span.name}:")
        print(f"  Input tokens: {usage['input_tokens']}")
        print(f"  Output tokens: {usage['output_tokens']}")
        print(f"  Total tokens: {usage['total_tokens']}")
== Total token usage: ==
  Input tokens: 432
  Output tokens: 53
  Total tokens: 485

== Detailed usage for each LLM call: ==
InstrumentedModel.request_1:
  Input tokens: 108
  Output tokens: 19
  Total tokens: 127
InstrumentedModel.request_2:
  Input tokens: 145
  Output tokens: 14
  Total tokens: 159
InstrumentedModel.request_3:
  Input tokens: 179
  Output tokens: 20
  Total tokens: 199
禁用自动跟踪
可以通过调用 mlflow.pydantic_ai.autolog(disable=True) 或 mlflow.autolog(disable=True) 来全局禁用 PydanticAI 的自动跟踪。