追踪快速入门 (Python)
TypeScript/JavaScript 快速入门指南请见此处。
本快速入门指南将引导您使用 MLflow Tracing 设置一个简单的 GenAI 应用程序。在不到 10 分钟的时间里,您将启用追踪、运行一个基本应用程序,并在 MLflow UI 中浏览生成的追踪记录。
先决条件
通过运行以下命令安装所需的包
pip install --upgrade mlflow openai>=1.0.0
本指南中的代码示例使用了 OpenAI SDK;但是,本指南的内容也适用于任何其他 LLM 提供商,例如 Anthropic、Google、Bedrock 等。
第 1 步:设置您的环境
连接到 MLflow
MLflow 在跟踪服务器中记录追踪数据。通过以下方法之一将您的本地环境连接到跟踪服务器。
- 本地 MLflow
- 远程 MLflow 服务器
- Databricks
为了最快地完成设置,您可以在本地运行 MLflow
# Start MLflow tracking server locally
mlflow ui

# This will start the server at http://127.0.0.1:5000
如果您有远程 MLflow 跟踪服务器,请配置连接
import os
import mlflow

# Set your MLflow tracking URI
os.environ["MLFLOW_TRACKING_URI"] = "http://your-mlflow-server:5000"
# Or directly in code
mlflow.set_tracking_uri("http://your-mlflow-server:5000")
如果您有 Databricks 账户,请配置连接
import mlflow

mlflow.login()
这将提示您输入配置详细信息(Databricks 主机 URL 和 PAT)。
如果您不确定如何设置 MLflow 跟踪服务器,可以从由 Databricks 提供的基于云的 MLflow 开始:免费注册 →
创建一个新的 MLflow 实验
import mlflow

# This will create a new experiment called "Tracing Quickstart" and set it as active
mlflow.set_experiment("Tracing Quickstart")
配置 OpenAI API 密钥(或其他 LLM 提供商)
import os

# Use different env variable when using a different LLM provider
os.environ["OPENAI_API_KEY"] = "your-api-key-here"  # Replace with your actual API key
第 2 步:追踪单个 LLM 调用
让我们从一个追踪单个 LLM 调用的简单示例开始。我们首先通过调用 mlflow.openai.autolog() 来为 OpenAI API 调用启用自动追踪。之后,每次对 OpenAI API 的调用都会生成一个追踪 span,捕获输入、输出、延迟、令牌计数和其他元数据。
import mlflow
from openai import OpenAI

# Enable automatic tracing for all OpenAI API calls
mlflow.openai.autolog()

# Instantiate the OpenAI client
client = OpenAI()

# Invoke chat completion API
response = client.chat.completions.create(
    model="o4-mini",
    messages=[
        {"role": "system", "content": "You are a helpful weather assistant."},
        {"role": "user", "content": "What's the weather like in Seattle?"},
    ],
)
运行上述代码后,转到 MLflow UI 并选择“Traces”选项卡。它应该会显示新创建的追踪记录。

表格视图显示了追踪的主要元数据,例如追踪 ID、执行持续时间、令牌计数、源系统和状态。您可以通过在下拉菜单中选择列来添加或删除显示的列。通过单击请求行(链接的请求文本),您可以查看追踪中的详细 span。

上面截图中的“Chat”视图显示了用户和模型之间交换的完整聊天消息。通过单击其他表格,如“Inputs / Outputs”或“Attributes”,您可以看到追踪的不同方面,包括原始输入负载、令牌使用情况明细等。
第 3 步:追踪一个调用工具的代理
接下来,让我们为应用程序增加一点复杂性。为了获取实时天气信息,我们将使用一个外部天气 API 作为工具。该应用程序将包含一个工具调用流程,而不仅仅是一个简单的 LLM 调用。为了检测这个自定义的 Python 流程,我们将使用 @mlflow.trace 装饰器。使用这个简单的装饰器会为函数调用生成一个 span,并自动捕获函数的输入、输出、延迟和异常。
让我们定义一个从天气 API 获取天气信息的 Python 函数。
import requests
# Decorated with @mlflow.trace to trace the function call.
@mlflow.trace(span_type=SpanType.TOOL)
def get_weather(latitude, longitude):
response = requests.get(
f"https://api.open-meteo.com/v1/forecast?latitude={latitude}&longitude={longitude}¤t=temperature_2m,wind_speed_10m&hourly=temperature_2m,relative_humidity_2m,wind_speed_10m"
)
data = response.json()
return data["current"]["temperature_2m"]
要将该函数作为工具传递给 LLM,我们需要为该函数定义 JSON 模式。
tools = [
    {
        "type": "function",
        "function": {
            "name": "get_weather",
            "description": "Get current temperature for provided coordinates in celsius.",
            "parameters": {
                "type": "object",
                "properties": {
                    "latitude": {"type": "number"},
                    "longitude": {"type": "number"},
                },
                "required": ["latitude", "longitude"],
                "additionalProperties": False,
            },
            "strict": True,
        },
    }
]
最后,定义一个简单的流程,首先请求 LLM 获取调用工具的指令,然后调用工具函数,最后将结果返回给 LLM。
import json


# Define a simple tool calling agent
@mlflow.trace(span_type=SpanType.AGENT)
def run_tool_agent(question: str):
    messages = [{"role": "user", "content": question}]

    # Invoke the model with the given question and available tools
    response = client.chat.completions.create(
        model="o4-mini",
        messages=messages,
        tools=tools,
    )
    ai_msg = response.choices[0].message
    messages.append(ai_msg)

    # If the model requests tool call(s), invoke the function with the specified arguments
    if tool_calls := ai_msg.tool_calls:
        for tool_call in tool_calls:
            function_name = tool_call.function.name
            if function_name == "get_weather":
                # Invoke the tool function with the provided arguments
                args = json.loads(tool_call.function.arguments)
                tool_result = get_weather(**args)
            else:
                raise RuntimeError("An invalid tool is returned from the assistant!")

            messages.append(
                {
                    "role": "tool",
                    "tool_call_id": tool_call.id,
                    "content": str(tool_result),
                }
            )

        # Sent the tool results to the model and get a new response
        response = client.chat.completions.create(model="o4-mini", messages=messages)

    return response.choices[0].message.content
现在我们可以运行该应用程序了。
# Run the tool calling agent
question = "What's the weather like in Seattle?"
answer = run_tool_agent(question)
第 4 步:在 UI 中浏览追踪记录
运行应用程序后,您可以在 MLflow UI 中浏览追踪记录。
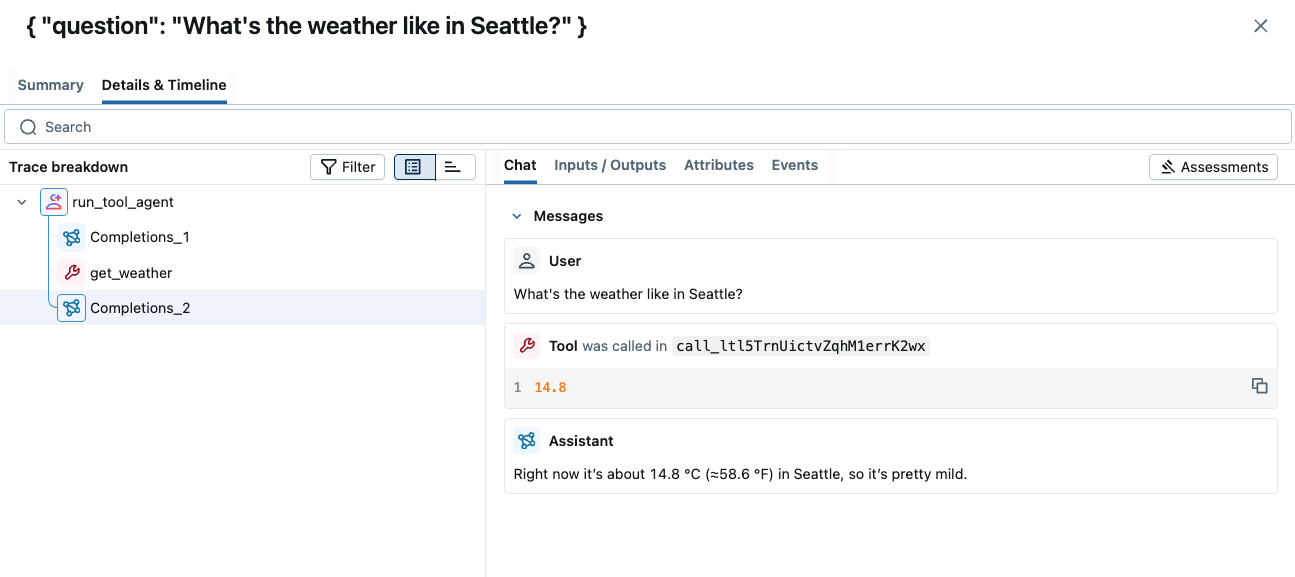
追踪记录以树状结构显示了所有的 LLM 调用和工具调用。您还可以通过单击树状视图旁边的时间线图标来检查时间线分解。这有助于您了解应用程序的时间都花在了哪里。

第 5 步:在追踪记录上附加反馈
作为本快速入门的最后一步,让我们在生成的追踪记录上附加反馈。在现实世界的开发中,人类反馈对于提高任何由 LLM 驱动的应用程序的质量至关重要。
要向追踪记录添加反馈,您可以打开追踪详情页面,然后单击右上角的“Add new Assessment”按钮。这将打开一个输入表单,您可以在其中提供各种反馈值和元数据。例如,我们可以添加一个名为“Quality”的反馈,其值为整数(1~5),表示答案的好坏程度。我们还可以为分数附上详细的理由,以供将来参考。

当您点击“Create”按钮提交表单时,反馈将被附加到该追踪记录上。
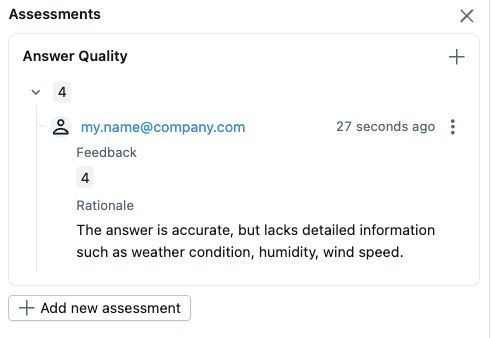
实验中的汇总分数可以在追踪列表中看到。您可以按各种标准进行切片和分析,例如时间戳、来源、标签,它会实时更新汇总分数。

总结
恭喜!您已成功完成
- ✅ 为 GenAI 应用程序设置 MLflow Tracing
- ✅ 为 OpenAI API 调用启用自动追踪
- ✅ 在 MLflow UI 中生成并浏览追踪记录
- ✅ 学习了如何使用装饰器添加自定义追踪
- ✅ 学习了如何在追踪记录上附加反馈
MLflow Tracing 为您的 GenAI 应用程序提供了强大的可观察性,帮助您监控性能、调试问题和理解用户交互。继续探索高级功能,以充分利用您的追踪设置!
后续步骤
既然您已经掌握了基本的追踪功能,可以探索这些高级功能