模型注册表工作流
本指南将引导您通过 UI 和 API 使用 MLflow 模型注册表。了解如何注册模型、管理版本、应用别名和标签,以及为部署组织模型。
如果您运行自己的 MLflow 服务器,则必须使用基于数据库的后端存储,才能通过 UI 或 API 访问模型注册表。 在此处 了解更多信息。
在将模型添加到模型注册表之前,必须使用相应模型类别的 log_model 方法将其记录下来。模型记录后,您可以通过 UI 或 API 在模型注册表中添加、修改、更新或删除模型。
UI 工作流
本节演示如何使用 MLflow 模型注册表 UI 管理您的 MLflow 模型。
注册模型
按照以下步骤在模型注册表中注册您的 MLflow 模型。
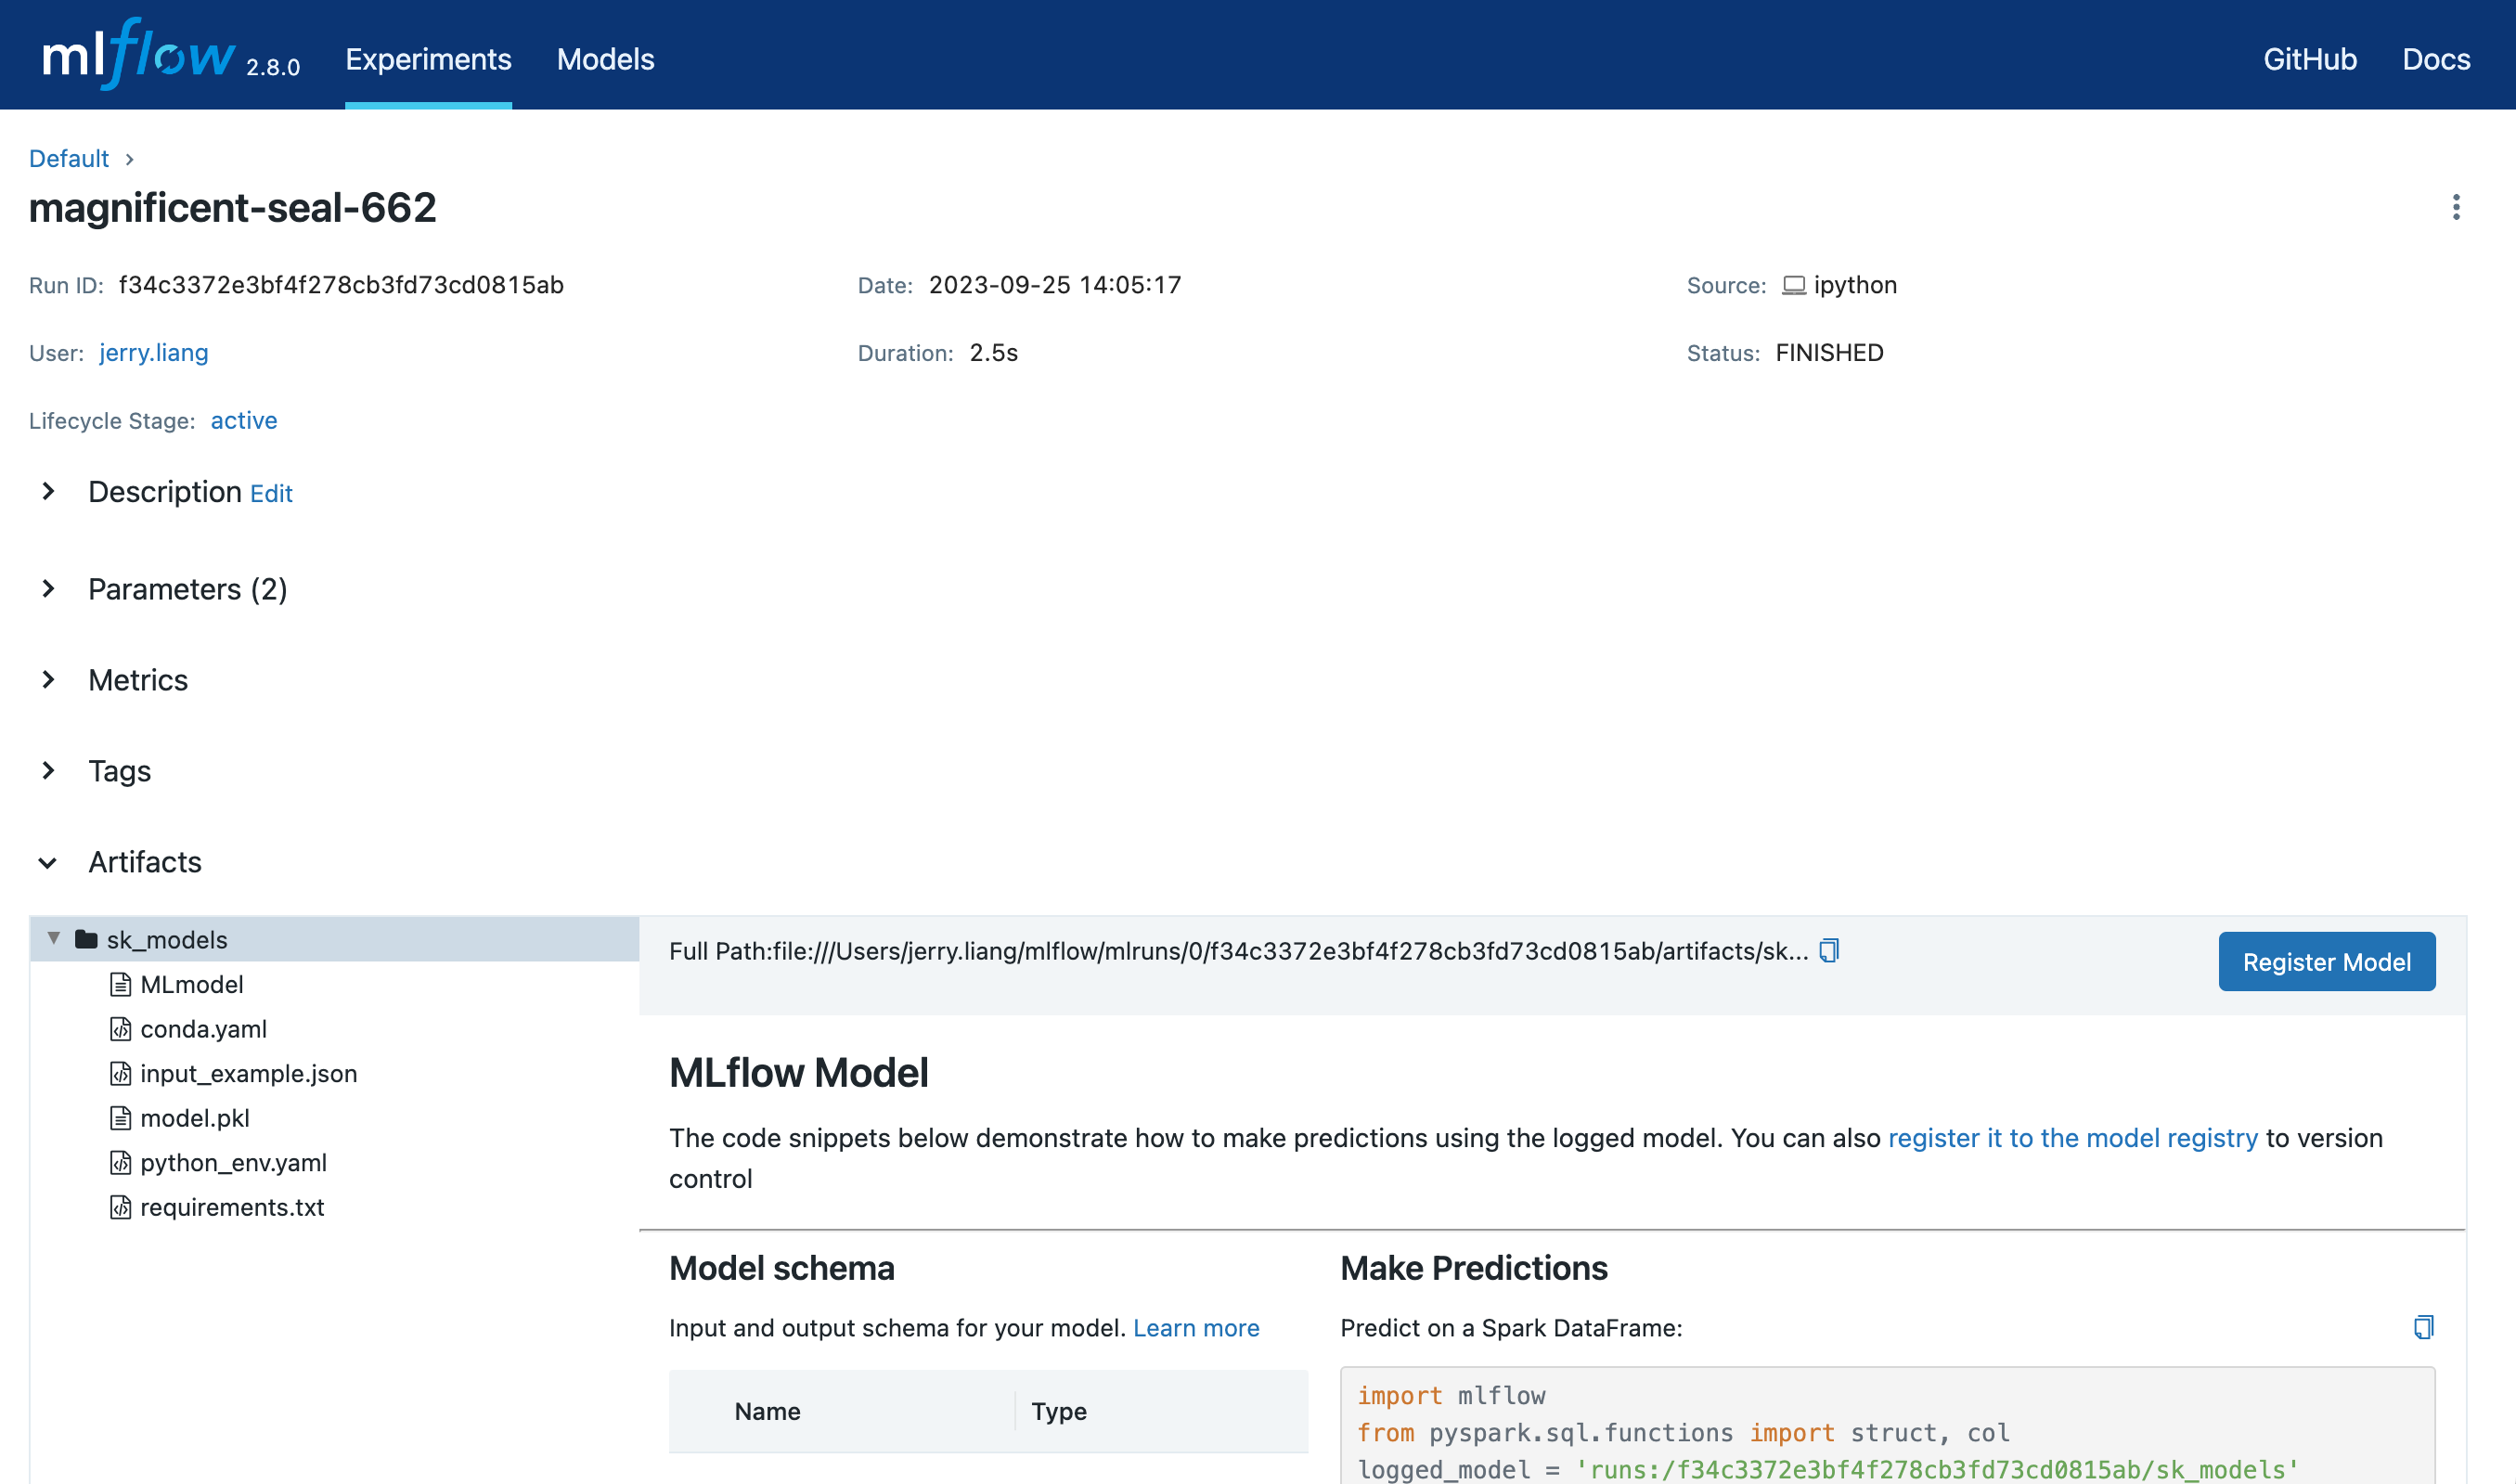
- 打开包含您想要注册的已记录 MLflow 模型的 MLflow Run 的详细信息页面。在Artifacts部分选择包含目标 MLflow 模型的模型文件夹。
-
点击Register Model按钮,这将触发一个弹出表单。
-
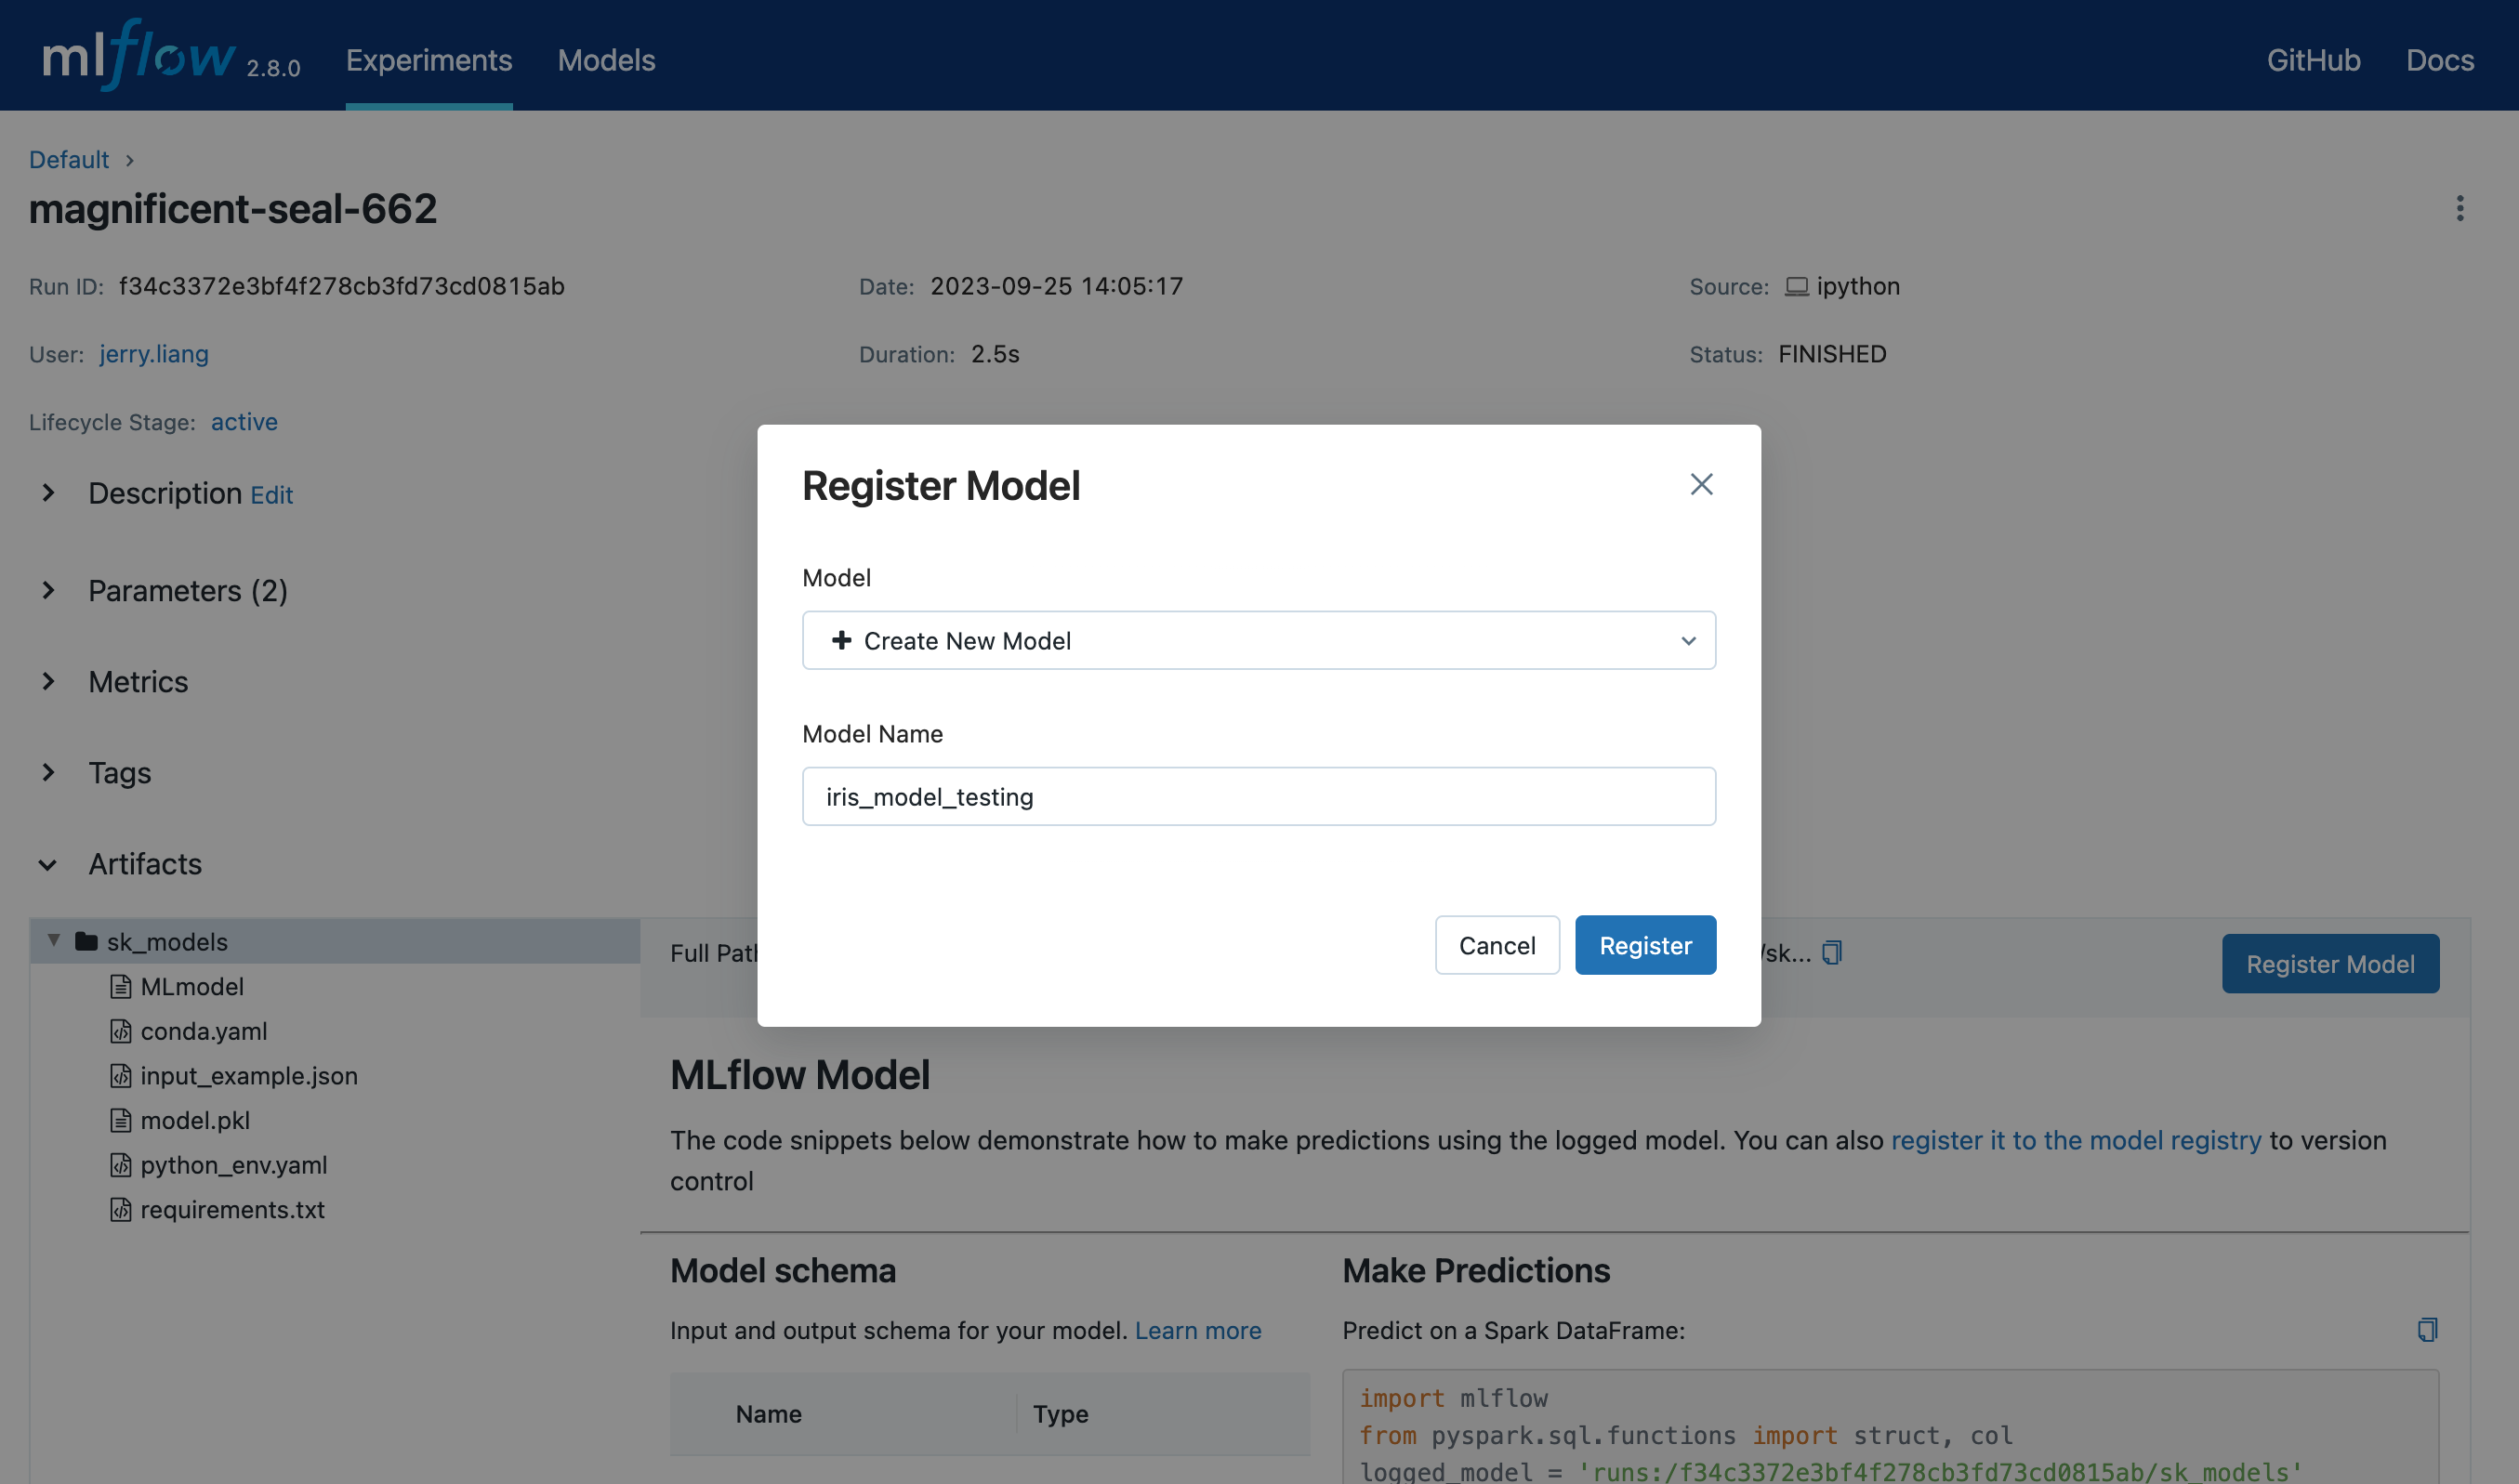
在表单的Model下拉菜单中,您可以选择“Create New Model”,这将创建一个新的注册模型,并将您的 MLflow 模型作为其初始版本;或者选择一个现有的注册模型,这将在此下注册您的模型作为一个新版本。下面的截图演示了将 MLflow 模型注册到一个名为
"iris_model_testing"的新注册模型。
查找已注册模型
注册模型后,您可以通过以下方式导航到它们。
-
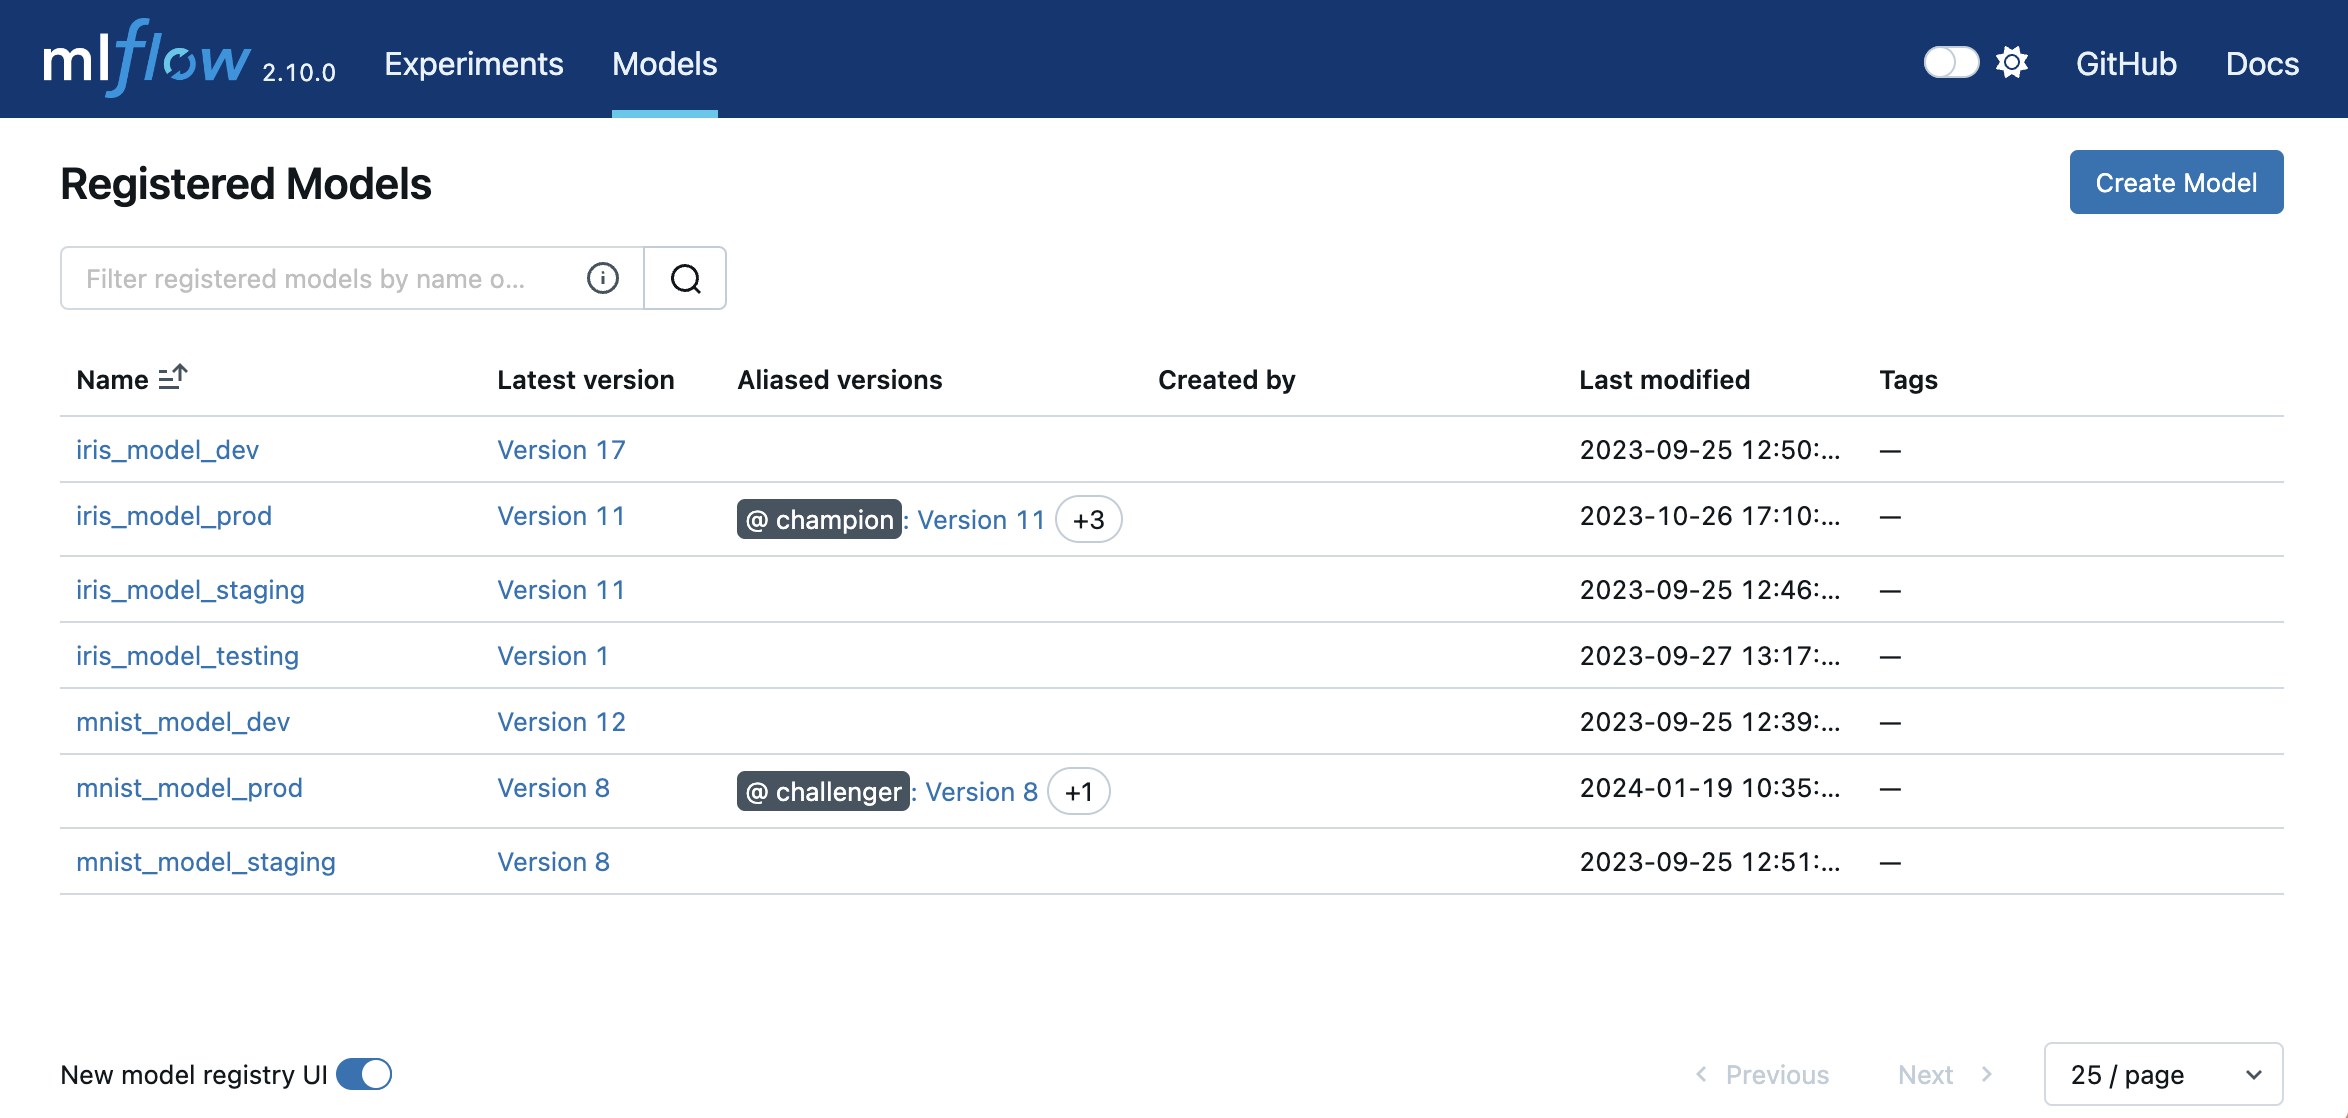
导航到Registered Models页面,该页面链接到您的已注册模型和相应的模型版本。
-
转到 MLflow Runs 详细信息页面的Artifacts部分,点击模型文件夹,然后点击右上角的模型版本,以查看从该模型创建的版本。

部署和组织模型
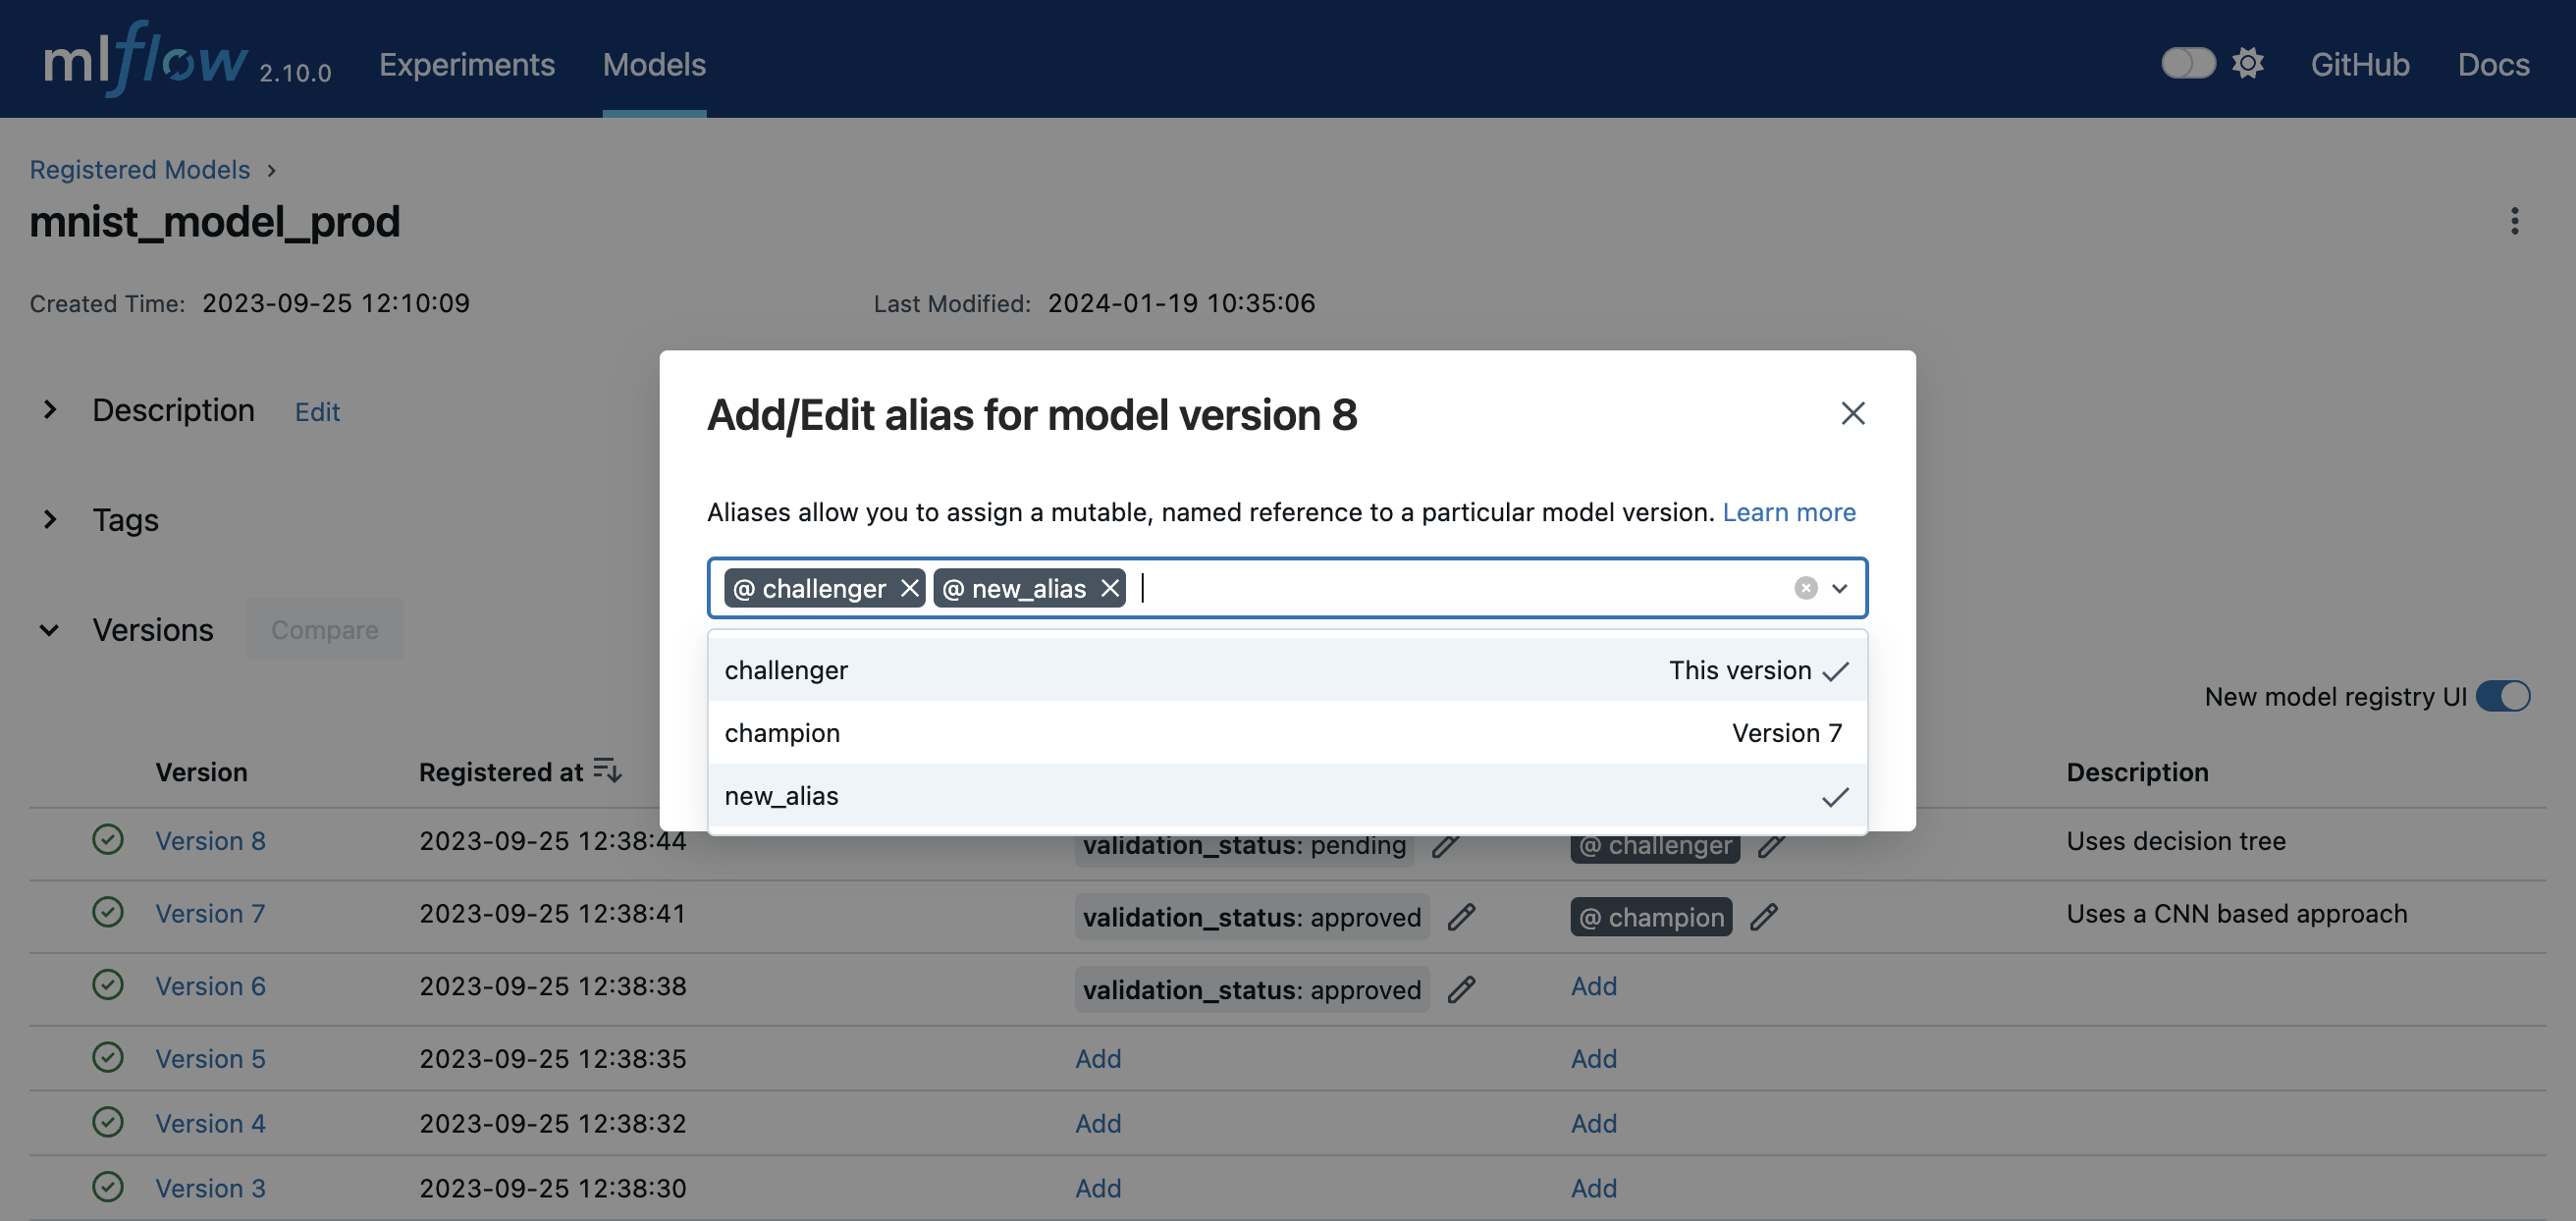
您可以使用模型别名和标签在模型注册表中部署和组织模型。要为已注册模型中的模型版本设置别名和标签,请导航到已注册模型的概览页面,例如下图所示。
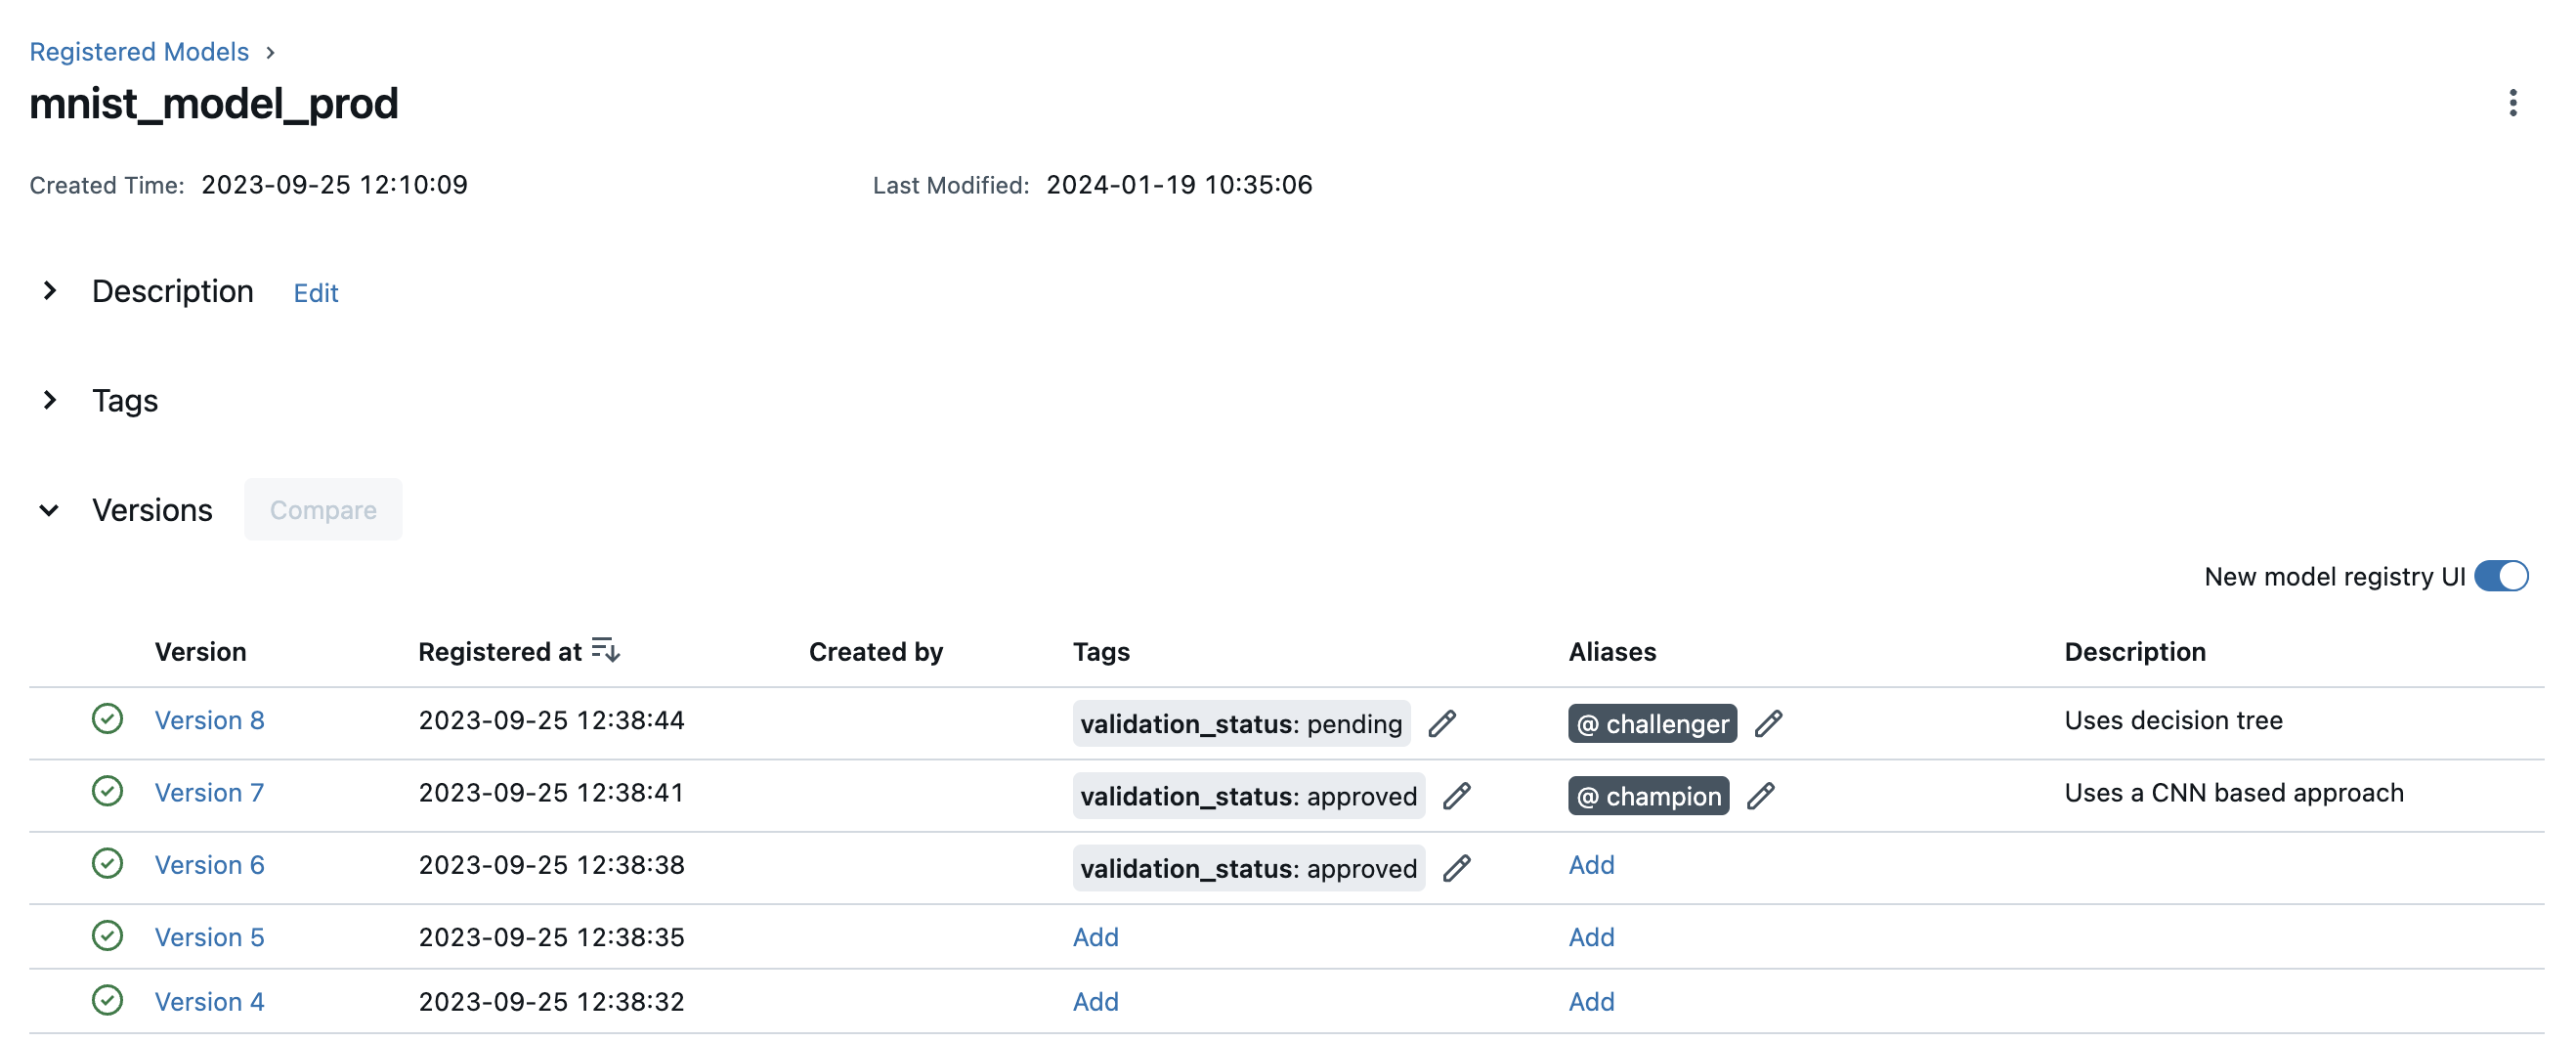
通过点击模型版本表中的相应Add链接或铅笔图标,可以为特定模型版本添加或编辑别名和标签。
要了解特定模型版本的更多信息,请导航到该模型版本的详细信息页面。
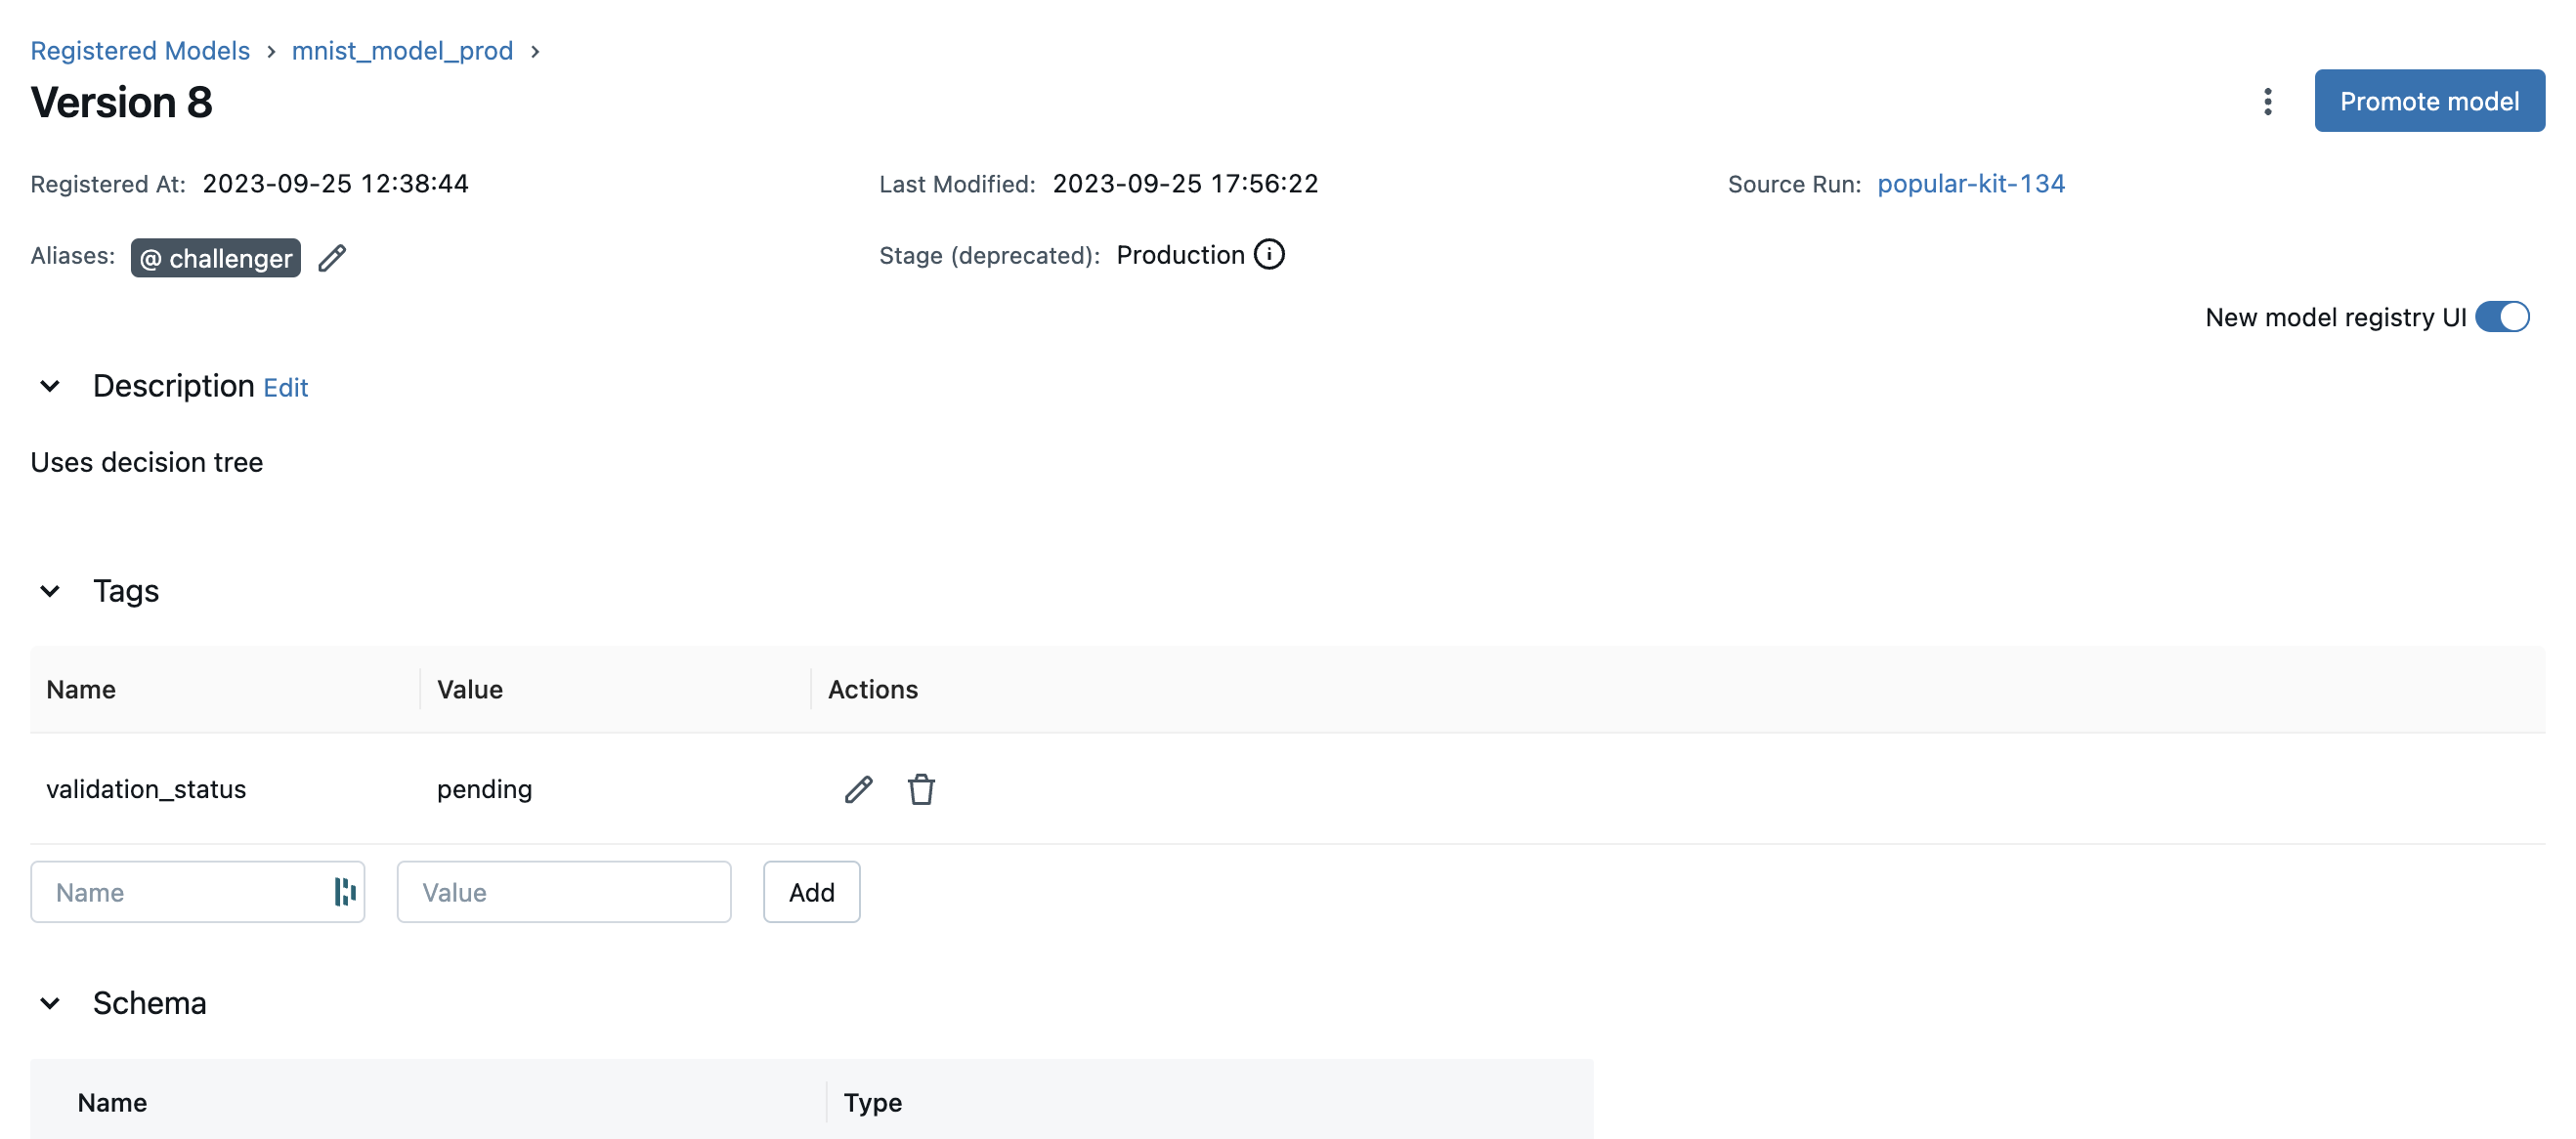
在此页面,您可以检查模型版本详细信息,如模型签名、MLflow 源运行和创建时间戳。您还可以查看和配置版本的别名、标签和描述。
API 工作流
与模型注册表交互的另一种方法是使用 MLflow 模型类别 或 MLflow Client Tracking API 接口。特别是,您可以在 MLflow 实验运行期间或所有实验运行完成后注册模型。
将 MLflow 模型添加到模型注册表
有三种程序化方法可以将模型添加到注册表中。首先,您可以使用 mlflow.<model_flavor>.log_model() 方法。例如,在您的代码中
from sklearn.datasets import make_regression
from sklearn.ensemble import RandomForestRegressor
from sklearn.metrics import mean_squared_error
from sklearn.model_selection import train_test_split

import mlflow
import mlflow.sklearn
from mlflow.models import infer_signature

with mlflow.start_run() as run:
    X, y = make_regression(n_features=4, n_informative=2, random_state=0, shuffle=False)
    X_train, X_test, y_train, y_test = train_test_split(
        X, y, test_size=0.2, random_state=42
    )
    params = {"max_depth": 2, "random_state": 42}
    model = RandomForestRegressor(**params)
    model.fit(X_train, y_train)

    # Infer the model signature
    y_pred = model.predict(X_test)
    signature = infer_signature(X_test, y_pred)

    # Log parameters and metrics using the MLflow APIs
    mlflow.log_params(params)
    mlflow.log_metrics({"mse": mean_squared_error(y_test, y_pred)})

    # Log the sklearn model and register as version 1
    mlflow.sklearn.log_model(
        sk_model=model,
        name="sklearn-model",
        signature=signature,
        registered_model_name="sk-learn-random-forest-reg-model",
    )
在上面的代码片段中,如果不存在同名已注册模型,该方法将注册一个新模型并创建版本 1。如果存在同名已注册模型,该方法将创建一个新的模型版本。
第二种方法是使用 mlflow.register_model() 方法,在所有实验运行完成后,并且您已确定哪个模型最适合添加到注册表时。对于此方法,您需要 run_id 作为 runs:URI 参数的一部分。
result = mlflow.register_model(
    "runs:/d16076a3ec534311817565e6527539c0/sklearn-model", "sk-learn-random-forest-reg"
)
如果不存在同名已注册模型,该方法将注册一个新模型,创建版本 1,并返回一个 ModelVersion MLflow 对象。如果存在同名已注册模型,该方法将创建一个新的模型版本并返回该版本对象。
最后,您可以使用 create_registered_model() 来创建一个新的已注册模型。如果模型名称已存在,此方法将抛出 MLflowException,因为创建新的已注册模型需要唯一的名称。
from mlflow import MlflowClient

client = MlflowClient()
client.create_registered_model("sk-learn-random-forest-reg-model")
上述方法将创建一个空的已注册模型,不关联任何版本。您可以像下面这样使用 create_model_version() 来创建一个新的模型版本。
client = MlflowClient()
result = client.create_model_version(
    name="sk-learn-random-forest-reg-model",
    source="mlruns/0/d16076a3ec534311817565e6527539c0/artifacts/sklearn-model",
    run_id="d16076a3ec534311817565e6527539c0",
)
Databricks Unity Catalog 模型注册表
要使用 Databricks Unity Catalog 模型注册表,请将 MLflow 注册表 URI 设置为 "databricks-uc",并定义两个环境变量 "DATABRICKS_HOST" 和 "DATABRICKS_TOKEN"。如果您使用的是 Databricks OAuth 身份验证,请设置三个环境变量 "DATABRICKS_HOST"、"DATABRICKS_CLIENT_ID" 和 "DATABRICKS_CLIENT_SECRET"。如果您已在 '~/.databrickscfg' 文件中配置了访问身份验证,则无需设置上述环境变量。相反,您可以将 MLflow 注册表 URI 设置为 "databricks-uc://{profile}",其中 '{profile}' 部分是您的 '~/.databrickscfg' 配置文件中的配置名称。有关 Databricks 身份验证类型的详细信息,请参阅 本文档。
使用 Databricks 分片令牌使用 Databricks unity catalog 模型注册表
import mlflow
import os

mlflow.set_registry_uri("databricks-uc")
os.environ["DATABRICKS_HOST"] = "<your Databricks shard URI>"
os.environ["DATABRICKS_TOKEN"] = "<your Databricks shard access token>"
使用 Databricks OAuth 身份验证使用 Databricks unity catalog 模型注册表
import mlflow
import os

mlflow.set_registry_uri("databricks-uc")
os.environ["DATABRICKS_HOST"] = "<your Databricks shard URI>"
os.environ["DATABRICKS_CLIENT_ID"] = "<your Databricks oauth client ID>"
os.environ["DATABRICKS_CLIENT_SECRET"] = "<your Databricks oauth client secret>"
使用 '~/.databrickscfg' 配置文件使用 Databricks unity catalog 模型注册表
假设您已使用类似以下部分的本地 '~/.databrickscfg' 文件进行了配置:
[my-databricks-shard1]
host = <your Databricks shard URI>
token = <your Databricks shard access token>
import mlflow
import os

mlflow.set_registry_uri("databricks-uc://my-databricks-shard1")
将 Databricks Workspace 模型注册表迁移到 Databricks Unity Catalog 模型注册表
要将模型版本从 Databricks Workspace 模型注册表迁移到 Databricks Unity Catalog 模型注册表,我们建议使用 copy_model_version() API。源 URI 将来自您的工作区注册表,目标将是三级 UC 模型名称,例如:
from mlflow import MlflowClient

# Registry URI must be set to workspace registry
client = MlflowClient(registry_uri="databricks")
src_model_uri = f"models:/my_wmr_model/1"
uc_migrated_copy = client.copy_model_version(
    src_model_uri, "mycatalog.myschema.my_uc_model"
)
如果目标 UC 模型不存在,它将在本次 API 调用中被创建。
此外,注册到 Databricks Unity Catalog 的模型需要设置签名。如果工作区注册模型版本尚未设置签名,我们建议按照 模型签名 说明添加签名。但是,为了简化迁移过程,您也可以将环境变量 MLFLOW_SKIP_SIGNATURE_CHECK_FOR_UC_REGISTRY_MIGRATION 设置为 true。这仅在如上所述的 copy_model_version() API 中有效,并且允许您在绕过签名要求的情况下将模型迁移到 Unity Catalog。
copy_model_version() API,如上所示,它允许您在绕过签名要求的情况下将模型迁移到 Unity Catalog。
注册到 Databricks Unity Catalog 但没有签名的模型版本存在限制。有关限制的详细列表,请参阅 Databricks 文档。
import os

os.environ["MLFLOW_SKIP_SIGNATURE_CHECK_FOR_UC_REGISTRY_MIGRATION"] = "true"
如果您想将工作区注册模型中的所有模型版本迁移到目标 UC 模型,您可以使用如下脚本:
import mlflow
from mlflow import MlflowClient
from mlflow.exceptions import MlflowException
from mlflow.models import ModelSignature
from mlflow.types.schema import Schema, ColSpec, AnyType

workspace_client = MlflowClient(registry_uri="databricks")
uc_client = MlflowClient(registry_uri="databricks-uc")


# Make a placeholder model that can be used to increment the version number
def make_placeholder_model() -> str:
    class _Placeholder(mlflow.pyfunc.PythonModel):
        def predict(self, ctx, x):
            return None

    with mlflow.start_run() as run:
        schema = Schema([ColSpec(AnyType())])
        model = mlflow.pyfunc.log_model(
            name="m",
            python_model=_Placeholder(),
            signature=ModelSignature(inputs=schema, outputs=schema),
        )
        return f"models:/{model.model_id}"


# Check if the source model has a particular version number
def workspace_model_exists(name: str, version: int) -> bool:
    try:
        workspace_client.get_model_version(name, str(version))
        return True
    except MlflowException as e:
        if e.error_code == "RESOURCE_DOES_NOT_EXIST":
            # Convert the RESOURCE_DOES_NOT_EXIST error into False
            return False
        # Raise all other exceptions
        raise e


# Copy model versions from a source Databricks workspace-registered model to
# a destination Databricks Unity Catalog registered model
def copy_model_versions_to_uc(src: str, dst: str) -> None:
    latest_versions = workspace_client.get_latest_versions(src)
    max_version_number = max(int(v.version) for v in latest_versions)
    placeholder_model = make_placeholder_model()

    for v in range(1, max_version_number + 1):
        if workspace_model_exists(src, v):
            workspace_client.copy_model_version(f"models:/{src}/{str(v)}", dst)
        else:
            # Create and immediately delete a placeholder model version to increment
            # the version counter on the UC model, so the version numbers on the UC
            # model match those on the workspace registered model.
            mv = uc_client.create_model_version(dst, placeholder_model)
            uc_client.delete_model_version(dst, mv.version)


copy_model_versions_to_uc("my_workspace_model", "mycatalog.myschema.my_uc_model")
OSS Unity Catalog 模型注册表
要将 OSS Unity Catalog 服务器用作 MLflow 模型注册表,请在 MLflow 注册表 URI 中以 "uc:https://:8080" 的格式指定 UC 服务器地址。如果您的 unity catalog 服务器配置为使用身份验证,请设置环境变量 "MLFLOW_UC_OSS_TOKEN"。
使用持有者令牌使用 OSS unity catalog 模型注册表
import mlflow
import os

mlflow.set_registry_uri("uc:https://:8080")
# Set this environment variable for MLflow to use your UC OSS token
os.environ["MLFLOW_UC_OSS_TOKEN"] = "<your OSS UC access token>"
使用别名和标签部署和组织模型
模型别名和标签可帮助您在模型注册表中部署和组织模型。
设置和删除模型上的别名
要使用 MLflow Client API 设置、更新和删除别名,请参阅下面的示例:
from mlflow import MlflowClient

client = MlflowClient()

# create "champion" alias for version 1 of model "example-model"
client.set_registered_model_alias("example-model", "champion", 1)

# reassign the "Champion" alias to version 2
client.set_registered_model_alias("example-model", "Champion", 2)

# get a model version by alias
client.get_model_version_by_alias("example-model", "Champion")

# delete the alias
client.delete_registered_model_alias("example-model", "Champion")
设置和删除模型上的标签
要使用 MLflow Client API 设置和删除标签,请参阅下面的示例:
from mlflow import MlflowClient

client = MlflowClient()

# Set registered model tag
client.set_registered_model_tag("example-model", "task", "classification")

# Delete registered model tag
client.delete_registered_model_tag("example-model", "task")

# Set model version tag
client.set_model_version_tag("example-model", "1", "validation_status", "approved")

# Delete model version tag
client.delete_model_version_tag("example-model", "1", "validation_status")
有关别名和标签客户端 API 的更多详细信息,请参阅 mlflow.client API 文档。
从模型注册表中获取 MLflow 模型
注册 MLflow 模型后,您可以使用 mlflow.<model_flavor>.load_model(),或者更通用的 load_model() 来获取该模型。加载的模型可用于一次性预测或批量推理等推理工作负载。
获取特定模型版本
要获取特定模型版本,只需将该版本号作为模型 URI 的一部分提供即可。
import mlflow.pyfunc

model_name = "sk-learn-random-forest-reg-model"
model_version = 1

model = mlflow.pyfunc.load_model(model_uri=f"models:/{model_name}/{model_version}")

model.predict(data)
按别名获取模型版本
要按别名获取模型版本,请在模型 URI 中指定模型别名,它将获取该别名下当前的模型版本。
import mlflow.pyfunc

model_name = "sk-learn-random-forest-reg-model"
alias = "champion"

champion_version = mlflow.pyfunc.load_model(f"models:/{model_name}@{alias}")

champion_version.predict(data)
请注意,模型别名分配可以独立于您的生产代码进行更新。如果上面的代码片段中的 champion 别名被重新分配给模型注册表中的新模型版本,则该代码片段的下一次执行将自动拾取新模型版本。这使您可以将模型部署与推理工作负载解耦。
从模型注册表提供 MLflow 模型
注册 MLflow 模型后,您可以将模型作为服务在您的主机上提供。
#!/usr/bin/env sh

# Set environment variable for the tracking URL where the Model Registry resides
export MLFLOW_TRACKING_URI=https://:5000

# Serve the production model from the model registry
mlflow models serve -m "models:/sk-learn-random-forest-reg-model@champion"
在环境之间推广 MLflow 模型
在成熟的 DevOps 和 MLOps 工作流中,组织使用单独的环境(通常是 dev、staging 和 prod)并进行访问控制,以便在不损害生产环境稳定性的情况下快速进行开发。在 MLflow 中,您可以使用已注册模型和 MLflow 身份验证 来表达 MLflow 模型的访问控制环境。例如,您可以创建与环境和业务问题组合对应的已注册模型(例如 prod.ml_team.revenue_forecasting、dev.ml_team.revenue_forecasting),并相应地配置权限。随着您针对业务问题迭代 MLflow 模型,您可以将其推广到各种环境以进行持续集成和部署。
对于成熟的生产级设置,我们建议设置自动化工作流,在每个环境中训练和注册模型。要生产化业务问题的最新迭代,请通过源代码控制和 CI/CD 系统在不同环境之间推广您的机器学习代码。
对于简单的模型部署用例,您可以将训练好的 MLflow 模型注册为 dev 环境已注册模型中的最新模型版本,然后使用 copy_model_version() 将其推广到已注册模型。
from mlflow import MlflowClient

client = MlflowClient()
client.copy_model_version(
    src_model_uri="models:/regression-model-staging@candidate",
    dst_name="regression-model-production",
)
此代码片段将 regression-model-staging 模型中带有 candidate 别名的模型版本复制到 regression-model-production 模型中,作为最新版本。
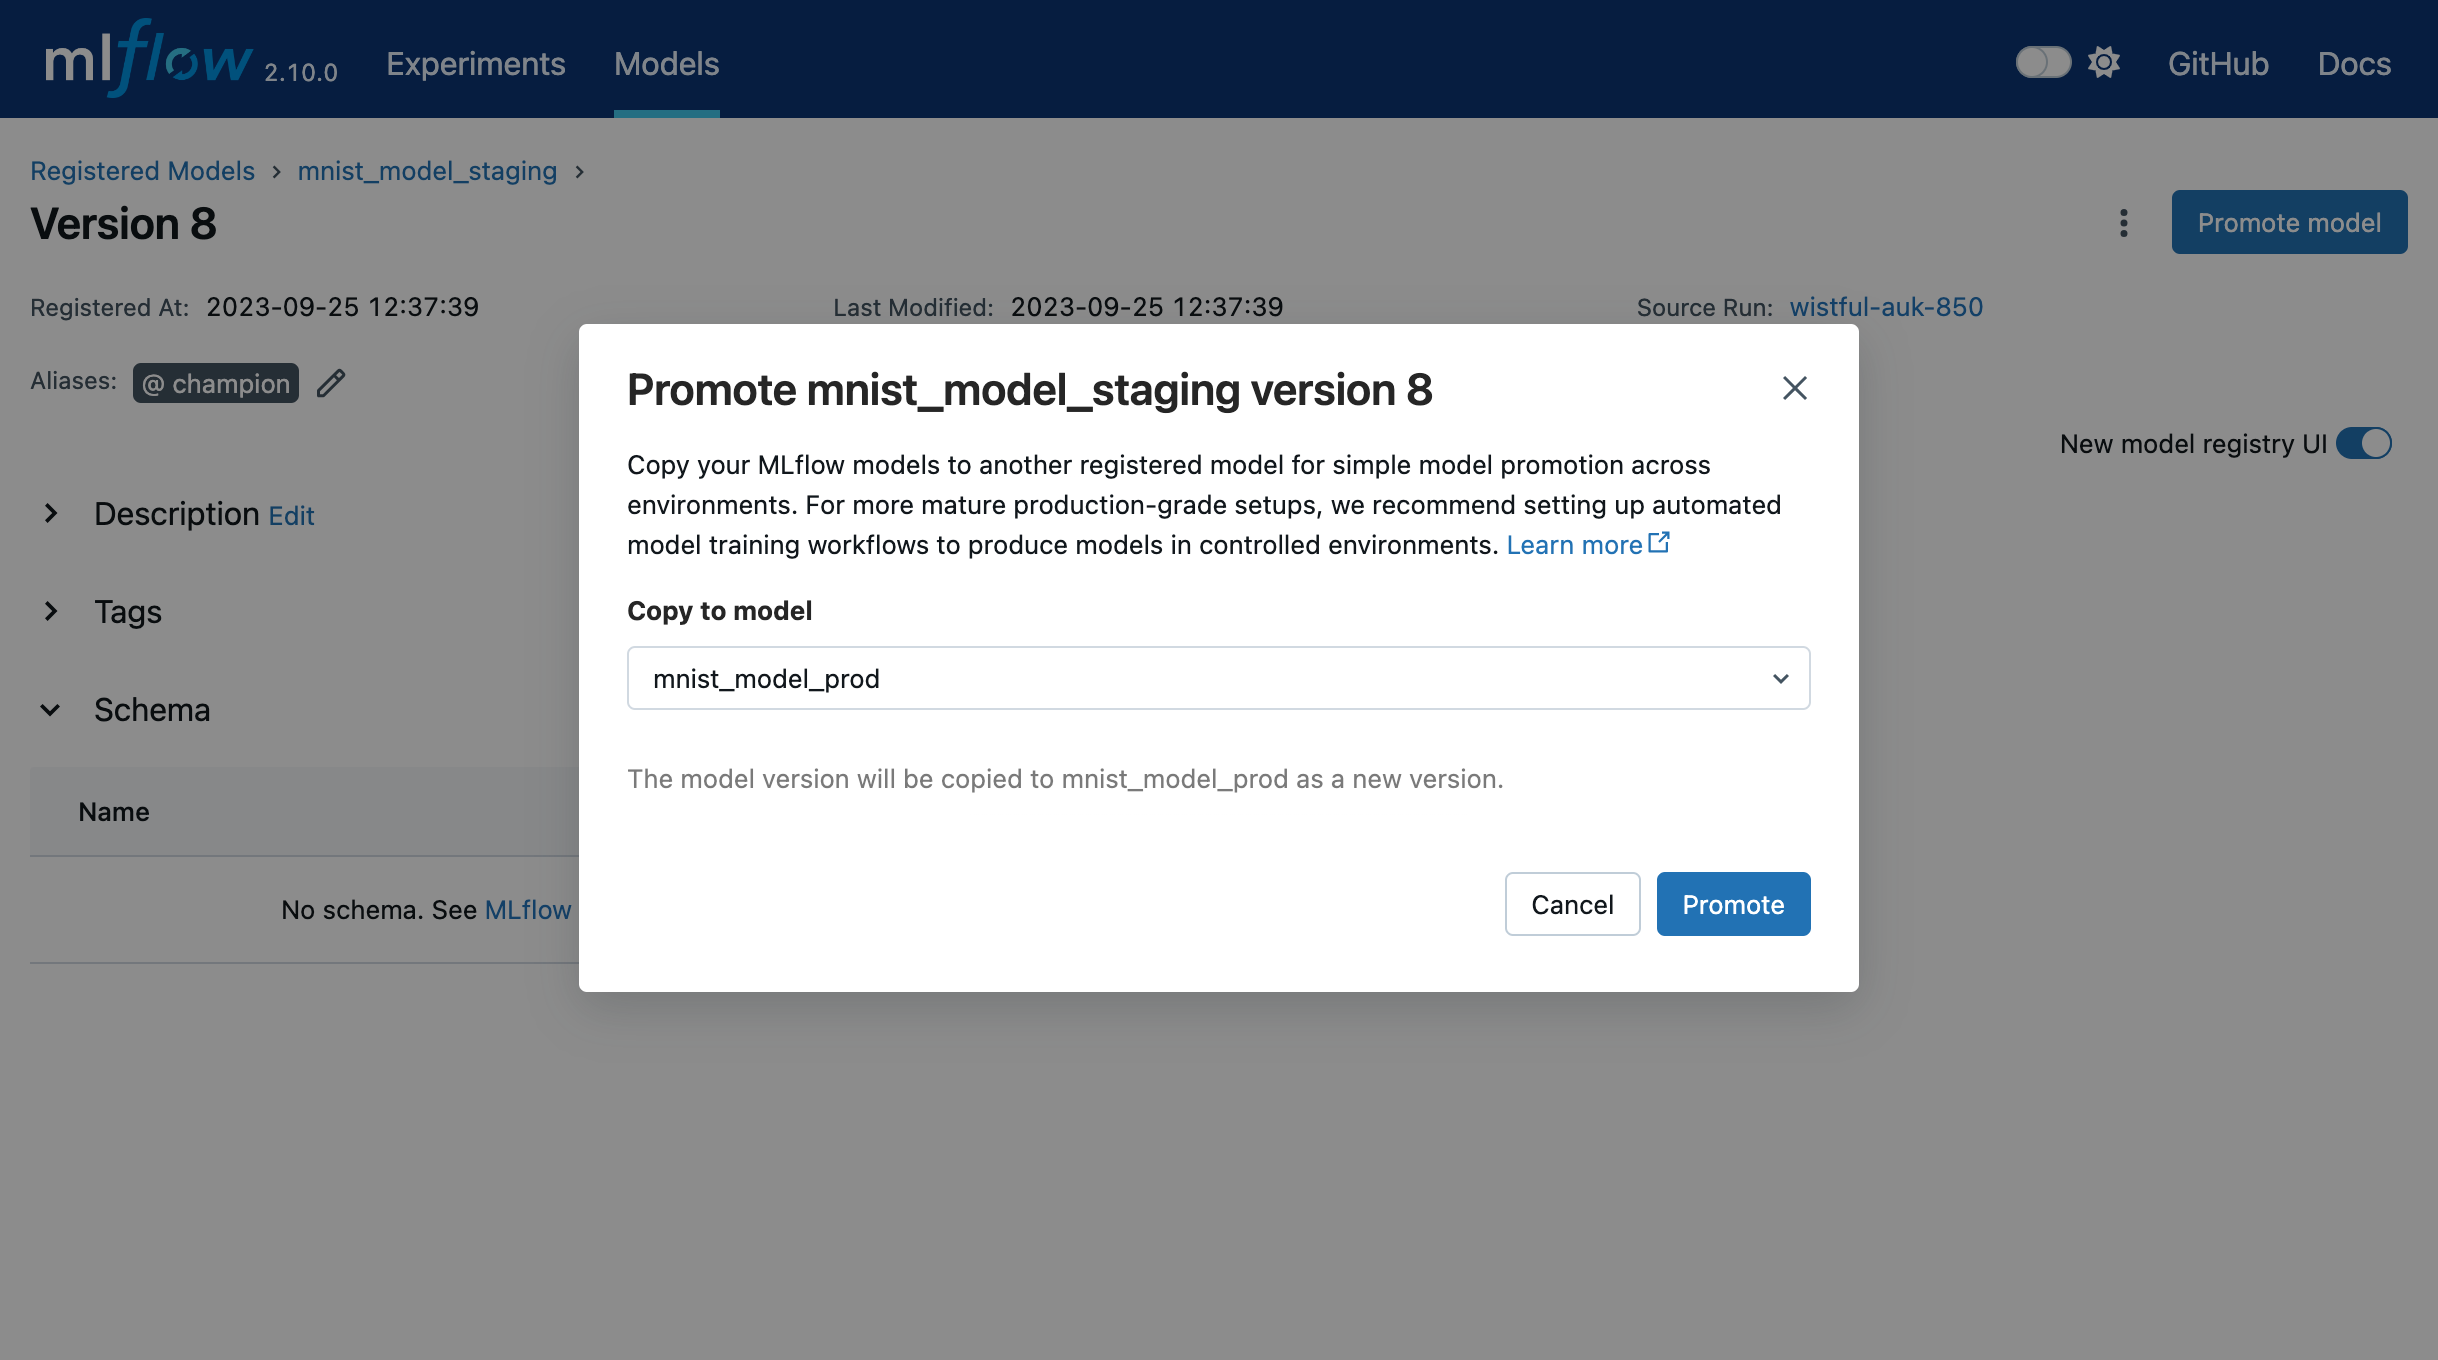
您也可以在 UI 中推广模型版本。为此,请导航到模型版本详细信息页面,然后选择 Promote model 按钮。这将打开一个模态窗口,您可以在其中选择当前模型版本将被复制到的已注册模型。
添加或更新 MLflow 模型描述
在模型生命周期的任何开发阶段,您都可以使用 update_model_version() 来更新模型版本的描述。
client = MlflowClient()
client.update_model_version(
    name="sk-learn-random-forest-reg-model",
    version=1,
    description="This model version is a scikit-learn random forest containing 100 decision trees",
)
重命名 MLflow 模型
除了添加或更新特定模型版本的描述外,您还可以使用 rename_registered_model() 重命名现有已注册模型。
client = MlflowClient()
client.rename_registered_model(
    name="sk-learn-random-forest-reg-model",
    new_name="sk-learn-random-forest-reg-model-100",
)
列出和搜索 MLflow 模型
当使用 MLflow ≥ 2.21.0 客户端与旧的模型注册表服务器(< 2.21.0)时,搜索 API 的行为可能与预期结果不符。此版本不匹配可能导致不一致的搜索结果或遗漏结果。为确保行为一致,请通过将服务器升级到 MLflow 2.21.0 或更高版本(推荐)或将客户端降级到与服务器版本匹配的版本来对齐 MLflow 版本。
您可以使用一个简单的方法获取注册表中已注册模型的列表。
from pprint import pprint

client = MlflowClient()
for rm in client.search_registered_models():
    pprint(dict(rm), indent=4)
这将输出:
{   'creation_timestamp': 1582671933216,
    'description': None,
    'last_updated_timestamp': 1582671960712,
    'latest_versions': [<ModelVersion: creation_timestamp=1582671933246, current_stage='Production', description='A random forest model containing 100 decision trees trained in scikit-learn', last_updated_timestamp=1582671960712, name='sk-learn-random-forest-reg-model', run_id='ae2cc01346de45f79a44a320aab1797b', source='./mlruns/0/ae2cc01346de45f79a44a320aab1797b/artifacts/sklearn-model', status='READY', status_message=None, user_id=None, version=1>,
                        <ModelVersion: creation_timestamp=1582671960628, current_stage='None', description=None, last_updated_timestamp=1582671960628, name='sk-learn-random-forest-reg-model', run_id='d994f18d09c64c148e62a785052e6723', source='./mlruns/0/d994f18d09c64c148e62a785052e6723/artifacts/sklearn-model', status='READY', status_message=None, user_id=None, version=2>],
    'name': 'sk-learn-random-forest-reg-model'}
当有成百上千个模型时,逐一查看此调用返回的结果可能会很麻烦。一个更有效的方法是搜索特定模型名称,并使用 search_model_versions() 方法列出其版本详细信息,并提供一个过滤字符串,例如 "name='sk-learn-random-forest-reg-model'"。
client = MlflowClient()
for mv in client.search_model_versions("name='sk-learn-random-forest-reg-model'"):
    pprint(dict(mv), indent=4)
这将输出:
{
    "creation_timestamp": 1582671933246,
    "current_stage": "Production",
    "description": "A random forest model containing 100 decision trees "
    "trained in scikit-learn",
    "last_updated_timestamp": 1582671960712,
    "name": "sk-learn-random-forest-reg-model",
    "run_id": "ae2cc01346de45f79a44a320aab1797b",
    "source": "./mlruns/0/ae2cc01346de45f79a44a320aab1797b/artifacts/sklearn-model",
    "status": "READY",
    "status_message": None,
    "user_id": None,
    "version": 1,
}

{
    "creation_timestamp": 1582671960628,
    "current_stage": "None",
    "description": None,
    "last_updated_timestamp": 1582671960628,
    "name": "sk-learn-random-forest-reg-model",
    "run_id": "d994f18d09c64c148e62a785052e6723",
    "source": "./mlruns/0/d994f18d09c64c148e62a785052e6723/artifacts/sklearn-model",
    "status": "READY",
    "status_message": None,
    "user_id": None,
    "version": 2,
}
删除 MLflow 模型
删除已注册模型或模型版本是不可逆的,请谨慎使用。
您可以删除已注册模型的特定版本,也可以删除已注册模型及其所有版本。
# Delete versions 1,2, and 3 of the model
client = MlflowClient()
versions = [1, 2, 3]
for version in versions:
    client.delete_model_version(
        name="sk-learn-random-forest-reg-model", version=version
    )

# Delete a registered model along with all its versions
client.delete_registered_model(name="sk-learn-random-forest-reg-model")
虽然上面的工作流 API 演示了与模型注册表的交互,但有两个特殊情况需要注意。一是当您拥有在未使用 MLflow 的情况下训练的现有 ML 模型时。这些模型以 sklearn 的 pickled 格式序列化并持久化到磁盘,您想将此模型注册到模型注册表。二是当您使用没有内置 MLflow 模型类别支持的 ML 框架时,例如 vaderSentiment,并且想要注册该模型。
注册 MLflow 外部保存的模型
并非所有人都将从 MLflow 开始模型训练。所以您可能在 MLflow 使用之前训练了一些模型。与其重新训练模型,您所要做的就是将您保存的模型注册到模型注册表。
此代码片段创建了一个 sklearn 模型,我们假设您已经用原生的 pickle 格式创建并保存了该模型。
保存模型的 sklearn 库和 pickle 版本应与当前 MLflow 支持的内置 sklearn 模型类别兼容。
import numpy as np
import pickle

from sklearn import datasets, linear_model
from sklearn.metrics import mean_squared_error, r2_score

# source: https://scikit-learn.cn/stable/auto_examples/linear_model/plot_ols.html

# Load the diabetes dataset
diabetes_X, diabetes_y = datasets.load_diabetes(return_X_y=True)

# Use only one feature
diabetes_X = diabetes_X[:, np.newaxis, 2]

# Split the data into training/testing sets
diabetes_X_train = diabetes_X[:-20]
diabetes_X_test = diabetes_X[-20:]

# Split the targets into training/testing sets
diabetes_y_train = diabetes_y[:-20]
diabetes_y_test = diabetes_y[-20:]


def print_predictions(m, y_pred):
    # The coefficients
    print("Coefficients: \n", m.coef_)
    # The mean squared error
    print("Mean squared error: %.2f" % mean_squared_error(diabetes_y_test, y_pred))
    # The coefficient of determination: 1 is perfect prediction
    print("Coefficient of determination: %.2f" % r2_score(diabetes_y_test, y_pred))


# Create linear regression object
lr_model = linear_model.LinearRegression()

# Train the model using the training sets
lr_model.fit(diabetes_X_train, diabetes_y_train)

# Make predictions using the testing set
diabetes_y_pred = lr_model.predict(diabetes_X_test)
print_predictions(lr_model, diabetes_y_pred)

# save the model in the native sklearn format
filename = "lr_model.pkl"
pickle.dump(lr_model, open(filename, "wb"))
Coefficients:
[938.23786125]
Mean squared error: 2548.07
Coefficient of determination: 0.47
一旦以 pickled 格式保存,您就可以使用 pickle API 将 sklearn 模型加载到内存中,并将加载的模型注册到模型注册表。
import mlflow
from mlflow.models import infer_signature
import numpy as np
from sklearn import datasets

# load the model into memory
loaded_model = pickle.load(open(filename, "rb"))

# create a signature for the model based on the input and output data
diabetes_X, diabetes_y = datasets.load_diabetes(return_X_y=True)
diabetes_X = diabetes_X[:, np.newaxis, 2]
signature = infer_signature(diabetes_X, diabetes_y)

# log and register the model using MLflow scikit-learn API
mlflow.set_tracking_uri("sqlite:///mlruns.db")
reg_model_name = "SklearnLinearRegression"
print("--")
mlflow.sklearn.log_model(
    loaded_model,
    name="sk_learn",
    serialization_format="cloudpickle",
    signature=signature,
    registered_model_name=reg_model_name,
)
--
Successfully registered model 'SklearnLinearRegression'.
2021/04/02 16:30:57 INFO mlflow.tracking._model_registry.client: Waiting up to 300 seconds for model version to finish creation.
Model name: SklearnLinearRegression, version 1
Created version '1' of model 'SklearnLinearRegression'.
现在,使用 MLflow 提供的 API,您可以从模型注册表中重新加载模型并进行评分。
# load the model from the Model Registry and score
model_uri = f"models:/{reg_model_name}/1"
loaded_model = mlflow.sklearn.load_model(model_uri)
print("--")

# Make predictions using the testing set
diabetes_y_pred = loaded_model.predict(diabetes_X_test)
print_predictions(loaded_model, diabetes_y_pred)
--
Coefficients:
[938.23786125]
Mean squared error: 2548.07
Coefficient of determination: 0.47
注册不受支持的机器学习模型
在某些情况下,您可能使用没有内置 MLflow 模型类别支持的机器学习框架。例如,vaderSentiment 库是一个用于情感分析的标准自然语言处理(NLP)库。由于它没有内置的 MLflow 模型类别,您无法使用 MLflow 模型提供的 API 来记录或注册模型。
为了解决这个问题,您可以创建一个 mlflow.pyfunc 模型类别的实例,并将您的 NLP 模型嵌入其中,从而允许您保存、记录或注册模型。注册后,从模型注册表中加载模型并使用 predict 函数进行评分。
下面的代码部分演示了如何创建一个包含嵌入式 vaderSentiment 模型的 PythonFuncModel 类,将其保存、记录、注册并从模型注册表中加载以进行评分。
要使用此示例,您需要 pip install vaderSentiment。
from sys import version_info
import cloudpickle
import pandas as pd

import mlflow.pyfunc
from vaderSentiment.vaderSentiment import SentimentIntensityAnalyzer

#
# Good and readable paper from the authors of this package
# http://comp.social.gatech.edu/papers/icwsm14.vader.hutto.pdf
#

INPUT_TEXTS = [
    {"text": "This is a bad movie. You don't want to see it! :-)"},
    {"text": "Ricky Gervais is smart, witty, and creative!!!!!! :D"},
    {"text": "LOL, this guy fell off a chair while sleeping and snoring in a meeting"},
    {"text": "Men shoots himself while trying to steal a dog, OMG"},
    {"text": "Yay!! Another good phone interview. I nailed it!!"},
    {
        "text": "This is INSANE! I can't believe it. How could you do such a horrible thing?"
    },
]

PYTHON_VERSION = f"{version_info.major}.{version_info.minor}.{version_info.micro}"


def score_model(loaded_model):
    # Use inference to predict output from the customized PyFunc model
    for i, text in enumerate(INPUT_TEXTS):
        text = INPUT_TEXTS[i]["text"]
        m_input = pd.DataFrame([text])
        scores = loaded_model.predict(m_input)
        print(f"<{text}> -- {str(scores[0])}")


# Define a class and extend from PythonModel
class SocialMediaAnalyserModel(mlflow.pyfunc.PythonModel):
    def __init__(self):
        super().__init__()
        # embed your vader model instance
        self._analyser = SentimentIntensityAnalyzer()

    # preprocess the input with prediction from the vader sentiment model
    def _score(self, txt):
        prediction_scores = self._analyser.polarity_scores(txt)
        return prediction_scores

    def predict(self, context, model_input, params=None):
        # Apply the preprocess function from the vader model to score
        model_output = model_input.apply(lambda col: self._score(col))
        return model_output


model_path = "vader"
reg_model_name = "PyFuncVaderSentiments"
vader_model = SocialMediaAnalyserModel()

# Set the tracking URI to use local SQLAlchemy db file and start the run
# Log MLflow entities and save the model
mlflow.set_tracking_uri("sqlite:///mlruns.db")

# Save the conda environment for this model.
conda_env = {
    "channels": ["defaults", "conda-forge"],
    "dependencies": [f"python={PYTHON_VERSION}", "pip"],
    "pip": [
        "mlflow",
        f"cloudpickle=={cloudpickle.__version__}",
        "vaderSentiment==3.3.2",
    ],
    "name": "mlflow-env",
}

# Save the model
with mlflow.start_run(run_name="Vader Sentiment Analysis") as run:
    model_path = f"{model_path}-{run.info.run_id}"
    mlflow.log_param("algorithm", "VADER")
    mlflow.log_param("total_sentiments", len(INPUT_TEXTS))
    mlflow.pyfunc.save_model(
        path=model_path, python_model=vader_model, conda_env=conda_env
    )

# Use the saved model path to log and register into the model registry
mlflow.pyfunc.log_model(
    name=model_path,
    python_model=vader_model,
    registered_model_name=reg_model_name,
    conda_env=conda_env,
)

# Load the model from the model registry and score
model_uri = f"models:/{reg_model_name}/1"
loaded_model = mlflow.pyfunc.load_model(model_uri)
score_model(loaded_model)
Successfully registered model 'PyFuncVaderSentiments'.
2021/04/05 10:34:15 INFO mlflow.tracking._model_registry.client: Waiting up to 300 seconds for model version to finish creation.
Created version '1' of model 'PyFuncVaderSentiments'.

<This is a bad movie. You don't want to see it! :-)> -- {'neg': 0.307, 'neu': 0.552, 'pos': 0.141, 'compound': -0.4047}
<Ricky Gervais is smart, witty, and creative!!!!!! :D> -- {'neg': 0.0, 'neu': 0.316, 'pos': 0.684, 'compound': 0.8957}
<LOL, this guy fell off a chair while sleeping and snoring in a meeting> -- {'neg': 0.0, 'neu': 0.786, 'pos': 0.214, 'compound': 0.5473}
<Men shoots himself while trying to steal a dog, OMG> -- {'neg': 0.262, 'neu': 0.738, 'pos': 0.0, 'compound': -0.4939}
<Yay!! Another good phone interview. I nailed it!!> -- {'neg': 0.0, 'neu': 0.446, 'pos': 0.554, 'compound': 0.816}
<This is INSANE! I can't believe it. How could you do such a horrible thing?> -- {'neg': 0.357, 'neu': 0.643, 'pos': 0.0, 'compound': -0.8034}
已弃用:使用模型阶段
模型阶段已被弃用,将在未来的主要版本中移除。有关此弃用的更多信息,请参阅下面的 迁移指南。
请参阅下面的部分,了解如何在 MLflow 模型注册表中为模型阶段设置。
转换 MLflow 模型的阶段
在模型的生命周期过程中,模型会不断演进——从开发到暂存再到生产。您可以将已注册模型转换为以下阶段之一:Staging、Production 或 Archived。
client = MlflowClient()
client.transition_model_version_stage(
    name="sk-learn-random-forest-reg-model", version=3, stage="Production"
)
<stage> 的可接受值为:Staging|Archived|Production|None。
获取特定阶段的最新模型版本
要按阶段获取模型版本,只需将模型阶段作为模型 URI 的一部分提供即可,它将获取该阶段模型的最新版本。
import mlflow.pyfunc

model_name = "sk-learn-random-forest-reg-model"
stage = "Staging"

model = mlflow.pyfunc.load_model(model_uri=f"models:/{model_name}/{stage}")

model.predict(data)
归档 MLflow 模型
您可以将模型版本从 Production 阶段移至 Archived 阶段。稍后,如果不再需要该已归档模型,您可以将其删除。
# Archive models version 3 from Production into Archived
client = MlflowClient()
client.transition_model_version_stage(
    name="sk-learn-random-forest-reg-model", version=3, stage="Archived"
)
从阶段迁移
自 MLflow 2.9.0 起,模型阶段已被弃用,并将在未来的主要版本中移除。这是对模型阶段在表达 MLOps 工作流时的不灵活性的反馈的总结,基于此,我们开发并引入了新的工具来管理和部署 MLflow 模型注册表中的模型。下方了解更多。
新的模型部署工具
模型阶段曾用于表达 MLflow 模型在生产化和部署方面的生命周期。用户将模型版本通过四个固定阶段(从none到staging,再到production,最后到archived)进行转换,用于提出、验证、部署和弃用 ML 用例的模型。通过这样做,模型注册表阶段为模型版本提供了标签和别名功能,通过在 UI 中表示模型版本的状态,并在代码中提供对模型版本的命名引用(例如,模型 URI 中的 /Staging)。模型注册表阶段也用于表示模型所在的部署环境,尽管无法为其设置访问控制。
为了替换和改进阶段,我们提升了 UI 中的模型版本标签,并引入了模型版本别名,以提供灵活且强大的方式在 MLflow 模型注册表中进行标签和别名设置。我们还使得能够为您的模型设置独立的部署环境并为每个环境配置访问控制。
模型版本标签
模型版本标签可用于注释模型版本及其状态。例如,您可以在模型版本正在验证时为其应用键为 validation_status、值为 pending 的标签,并在通过烟雾测试和性能测试后将标签值更新为 passed。
模型版本别名
模型版本别名提供了一种灵活的方式来创建特定模型版本的命名引用,并且对于识别部署在某个环境中的模型版本很有用。例如,为模型版本设置 champion 别名,使您能够通过 get_model_version_by_alias() 客户端 API 或模型 URI models:/<registered model name>@champion 来获取该模型版本。别名可以通过 UI 和客户端 API 重新分配给新的模型版本。与模型注册表阶段不同,任何给定的模型版本都可以应用多个别名,从而更轻松地进行 A/B 测试和模型滚动更新。
为模型设置单独的环境
在成熟的 DevOps 和 MLOps 工作流中,组织使用单独的环境(通常是 dev、staging 和 prod)并进行访问控制,以便在不损害生产环境稳定性的情况下快速进行开发。通过 MLflow 身份验证,您可以使用已注册模型来表达 MLflow 模型的访问控制环境。例如,您可以创建与环境和业务问题组合对应的已注册模型(例如 prod.ml_team.revenue_forecasting、dev.ml_team.revenue_forecasting),并相应地配置权限。自动化针对生产环境已注册模型的模型再训练,或对于简单的模型部署用例,使用 copy_model_version() 将模型版本推广到已注册模型。
将模型从阶段迁移
请参阅下面的信息,了解如何为您的旧模型阶段用例使用新工具。
模型环境
要为模型版本设置单独的环境和权限,请创建单独的已注册模型。
- 给定模型用例的基础名称(例如
revenue_forecasting),为具有不同前缀的环境设置各种已注册模型。 - 例如,如果您需要三个独立的开发、暂存和生产环境,您可以设置
dev.ml_team.revenue_forecasting、staging.ml_team.revenue_forecasting和prod.ml_team.revenue_forecasting已注册模型。 - 使用 MLflow 身份验证 为这些模型授予适当的权限。
在环境之间转换模型
一旦为每个环境设置了已注册模型,您就可以在此基础上构建您的 MLOps 工作流。
- 对于简单的模型推广用例,您可以首先将 MLflow 模型注册到开发已注册模型下,然后使用
copy_model_version()客户端 API 将模型推广到不同环境。 - 对于更成熟的生产级设置,我们建议将 ML 代码(包括模型训练代码、推理代码和 ML 基础设施即代码)跨环境进行推广。这消除了在环境之间转换模型的需要。开发 ML 代码是实验性的,在开发环境中,因此目标是开发已注册模型。在将开发的 ML 代码合并到您的源代码存储库之前,您的 CI 会在暂存环境中对代码进行分阶段以进行集成测试(目标是暂存已注册模型)。合并后,ML 代码将部署到生产环境进行自动再训练(目标是生产环境已注册模型)。此类设置实现了 ML 系统的安全可靠的 CI/CD,包括不仅是模型训练,还有特征工程、模型监控和自动化再训练。
模型别名
使用模型别名来指定(通过命名引用)要部署到哪个模型版本来为某个环境(例如生产环境)提供流量。
- 为每个模型注册表阶段决定一个等效的模型别名(例如,为Production阶段设置champion,以指定旨在处理大部分流量的模型)。
- 为每个阶段下的最新模型版本分配所选别名。您可以使用下面的辅助函数来实现此目的。
- 更新 ML 工作流以目标别名而不是阶段。例如,模型 URI
models:/regression_model/Production将被生产代码中的模型 URImodels:/prod.ml_team.regression_model@champion替换。
from mlflow import MlflowClient

# Initialize an MLflow Client
client = MlflowClient()


def assign_alias_to_stage(model_name, stage, alias):
    """
    Assign an alias to the latest version of a registered model within a specified stage.

    :param model_name: The name of the registered model.
    :param stage: The stage of the model version for which the alias is to be assigned. Can be
                "Production", "Staging", "Archived", or "None".
    :param alias: The alias to assign to the model version.
    :return: None
    """
    latest_mv = client.get_latest_versions(model_name, stages=[stage])[0]
    client.set_registered_model_alias(model_name, alias, latest_mv.version)
模型状态
使用模型版本标签来表示和传达模型版本的状态。
- 在模型版本上设置标签以指示模型的状态。
- 例如,要指示模型版本的审查状态,您可以设置一个键为
validation_status、值为pending或passed的标签。