使用 MLflow 追踪服务器进行远程实验追踪
在本教程中,您将学习如何使用 MLflow Tracking Server 为团队开发设置 MLflow Tracking 环境。
利用 MLflow Tracking Server 进行远程实验跟踪有很多好处
- 协作:多个用户可以向同一个端点记录运行,并查询其他用户记录的运行和模型。
- 共享结果:跟踪服务器还提供了一个 Tracking UI 端点,团队成员可以在其中轻松地探索彼此的结果。
- 集中访问:跟踪服务器可以作为远程访问元数据和工件的代理运行,从而更轻松地保护和审计对数据的访问。
它是如何工作的?
下图描绘了使用带有 PostgreSQL 和 S3 的远程 MLflow Tracking Server 的架构
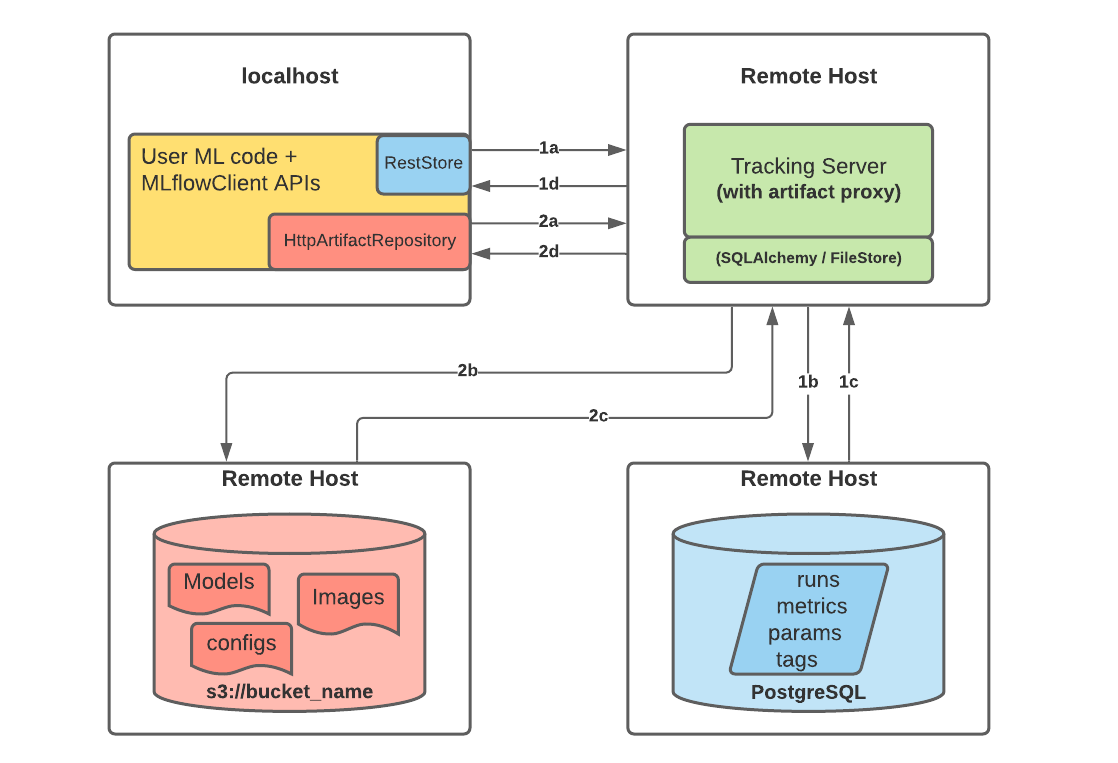
当您开始向 MLflow Tracking Server 记录运行时,会发生以下情况
-
第一部分 a 和 b:
- MLflow 客户端创建一个 RestStore 实例,并发送 REST API 请求来记录 MLflow 实体
- 跟踪服务器创建一个 SQLAlchemyStore 实例,并连接到远程主机,以便将跟踪信息(即指标、参数、标签等)插入数据库。
-
第一部分 c 和 d:
- 客户端的检索请求会返回配置的 SQLAlchemyStore 表中的信息
-
第二部分 a 和 b:
- 客户端通过
HttpArtifactRepository发送工件的日志记录事件,将文件写入 MLflow Tracking Server - 然后,跟踪服务器会将这些文件写入配置的对象存储位置,并进行假定的角色身份验证
- 客户端通过
-
第二部分 c 和 d:
- 从配置的后端存储中检索工件以响应用户请求,是通过在服务器启动时配置的相同授权身份验证完成的
- 工件通过
HttpArtifactRepository接口通过跟踪服务器传递给最终用户
开始使用
前言
在实际的生产部署环境中,您将拥有多个远程主机来运行跟踪服务器和数据库,如上图所示。但是,在本教程中,我们将只使用一台具有在不同端口上运行的多个 Docker 容器的机器,通过一个更易于评估的教程设置来模拟远程环境。我们还将使用 MinIO,一个 S3 兼容的对象存储,作为工件存储,这样您就不需要拥有 AWS 账户来运行本教程。
步骤 1 - 获取 MLflow 和其他依赖项
MLflow 可在 PyPI 上获得。此外,要使用 Python 访问 PostgreSQL 和 S3,还需要 pyscopg2 和 boto3。如果您尚未在系统上安装它们,则可以使用以下命令进行安装:
pip install mlflow psycopg2 boto3
步骤 2 - 设置远程数据存储
MLflow Tracking Server 可以与各种数据存储进行交互,以存储实验和运行数据以及工件。在本教程中,我们将使用 Docker Compose 启动两个容器,每个容器模拟实际环境中的远程服务器。
- 作为后端存储的 PostgreSQL 数据库。
- 作为工件存储的 MinIO 服务器。
安装 docker 和 docker-compose
这些 Docker 步骤仅出于教程目的而需要。MLflow 本身根本不依赖于 Docker。
请按照官方说明安装 Docker 和 Docker Compose。然后,运行 docker --version 和 docker-compose --version 以确保它们已正确安装。
创建 compose.yaml
创建一个名为 compose.yaml 的文件,其中包含以下内容:
version: "3.7"
services:
  # PostgreSQL database
  postgres:
    image: postgres:latest
    environment:
      POSTGRES_USER: user
      POSTGRES_PASSWORD: password
      POSTGRES_DB: mlflowdb
    ports:
      - 5432:5432
    volumes:
      - ./postgres-data:/var/lib/postgresql

  # MinIO server
  minio:
    image: minio/minio
    expose:
      - "9000"
    ports:
      - "9000:9000"
      # MinIO Console is available at https://:9001
      - "9001:9001"
    environment:
      MINIO_ROOT_USER: "minio_user"
      MINIO_ROOT_PASSWORD: "minio_password"
    healthcheck:
      test: timeout 5s bash -c ':> /dev/tcp/127.0.0.1/9000' || exit 1
      interval: 1s
      timeout: 10s
      retries: 5
    command: server /data --console-address ":9001"
  # Create a bucket named "bucket" if it doesn't exist
  minio-create-bucket:
    image: minio/mc
    depends_on:
      minio:
        condition: service_healthy
    entrypoint: >
      bash -c "
      mc alias set minio http://minio:9000 minio_user minio_password &&
      if ! mc ls minio/bucket; then
        mc mb minio/bucket
      else
        echo 'bucket already exists'
      fi
      "
启动容器
从 compose.yaml 文件所在的同一目录运行以下命令来启动容器。这将使 PostgreSQL 和 Minio 服务器的容器在后台运行,并会在 Minio 中创建一个名为“bucket”的新存储桶。
docker compose up -d
步骤 3 - 启动跟踪服务器
在实际环境中,您将有一个远程主机来运行跟踪服务器,但在本教程中,我们将只使用我们的本地机器作为远程机器的模拟替代品。
配置访问
为了让跟踪服务器能够访问远程存储,它需要配置必要的凭据。
export MLFLOW_S3_ENDPOINT_URL=https://:9000 # Replace this with remote storage endpoint e.g. s3://my-bucket in real use cases
export AWS_ACCESS_KEY_ID=minio_user
export AWS_SECRET_ACCESS_KEY=minio_password
您可以在 支持的存储 中找到有关如何为其他存储配置凭据的说明。
启动跟踪服务器
要指定后端存储和工件存储,您可以使用 --backend-store-uri 和 --artifacts-store-uri 选项。
mlflow server \
  --backend-store-uri postgresql://user:password@localhost:5432/mlflowdb \
  --artifacts-destination s3://bucket \
  --host 0.0.0.0 \
  --port 5000
在实际环境中,请将 localhost 替换为您的数据库服务器的远程主机名或 IP 地址。
步骤 4:记录到跟踪服务器
一旦跟踪服务器正在运行,您就可以通过将 MLflow Tracking URI 设置为跟踪服务器的 URI 来将运行记录到其中。或者,您可以使用 mlflow.set_tracking_uri() API 来设置跟踪 URI。
export MLFLOW_TRACKING_URI=http://127.0.0.1:5000 # Replace with remote host name or IP address in an actual environment
然后像往常一样使用 MLflow 跟踪 API 运行您的代码。以下代码使用 diabetes 数据集对 scikit-learn RandomForest 模型进行训练。
import mlflow

from sklearn.model_selection import train_test_split
from sklearn.datasets import load_diabetes
from sklearn.ensemble import RandomForestRegressor

mlflow.autolog()

db = load_diabetes()
X_train, X_test, y_train, y_test = train_test_split(db.data, db.target)

# Create and train models.
rf = RandomForestRegressor(n_estimators=100, max_depth=6, max_features=3)
rf.fit(X_train, y_train)

# Use the model to make predictions on the test dataset.
predictions = rf.predict(X_test)
步骤 5:在跟踪 UI 中查看已记录的运行
我们的伪远程 MLflow Tracking Server 还在同一端点上托管 Tracking UI。在具有远程跟踪服务器的实际部署环境中,也是如此。您可以通过在浏览器中导航到 http://127.0.0.1:5000(在实际环境中替换为远程主机名或 IP 地址)来访问 UI。
步骤 6:下载工件
MLflow Tracking Server 还充当工件访问的代理主机。工件访问通过代理 URI(如 models:/、mlflow-artifacts:/)启用,使用户无需管理直接访问的凭据或权限即可访问此位置。
import mlflow

model_id = "YOUR_MODEL_ID"  # You can find model ID in the Tracking UI

# Download artifact via the tracking server
mlflow_artifact_uri = f"models:/{model_id}"
local_path = mlflow.artifacts.download_artifacts(mlflow_artifact_uri)

# Load the model
model = mlflow.sklearn.load_model(local_path)
下一步是什么?
现在您已经学会了如何为远程实验跟踪设置 MLflow Tracking Server!还有一些更高级的主题您可以进一步探索