使用 mlflow.pyfunc 的自定义 MLflow 模型

如果您希望了解 MLflow 自定义模型的所有灵活性和可定制性,本博客将帮助您深入了解如何利用这种强大且高度可定制的模型存储格式。

MLflow 提供了内置方法来记录和处理来自许多流行机器学习和生成式 AI 框架及模型提供商的模型,例如 scikit-learn、PyTorch、HuggingFace transformers 和 LangChain。例如,mlflow.sklearn.log_model 会将 scikit-learn 模型记录为 MLflow 工件,而无需您定义自定义预测或处理工件的方法。
然而,在某些情况下,您可能正在使用 MLflow 没有内置方法的框架,或者您可能想要不同于模型默认预测输出的内容。在这些情况下,MLflow 允许您创建自定义模型,以处理几乎任何框架,并集成现有支持框架的自定义逻辑。
最简单的形式是,只需定义一个自定义的 predict 方法并记录模型即可。以下示例定义了一个简单的 pyfunc 模型,它只返回输入值的平方。
import mlflow

# Define a custom model
class MyModel(mlflow.pyfunc.PythonModel):
    def predict(self, context, model_input):
        # Directly return the square of the input
        return model_input**2


# Save the model
with mlflow.start_run():
    model_info = mlflow.pyfunc.log_model(
        artifact_path="model",
        python_model=MyModel()
    )

# Load the model
loaded_model = mlflow.pyfunc.load_model(
    model_uri=model_info.model_uri
)

# Predict
loaded_model.predict(2)
让我们深入了解它是如何工作的,从一些基本概念开始。
模型和模型风味 (Model Flavors)
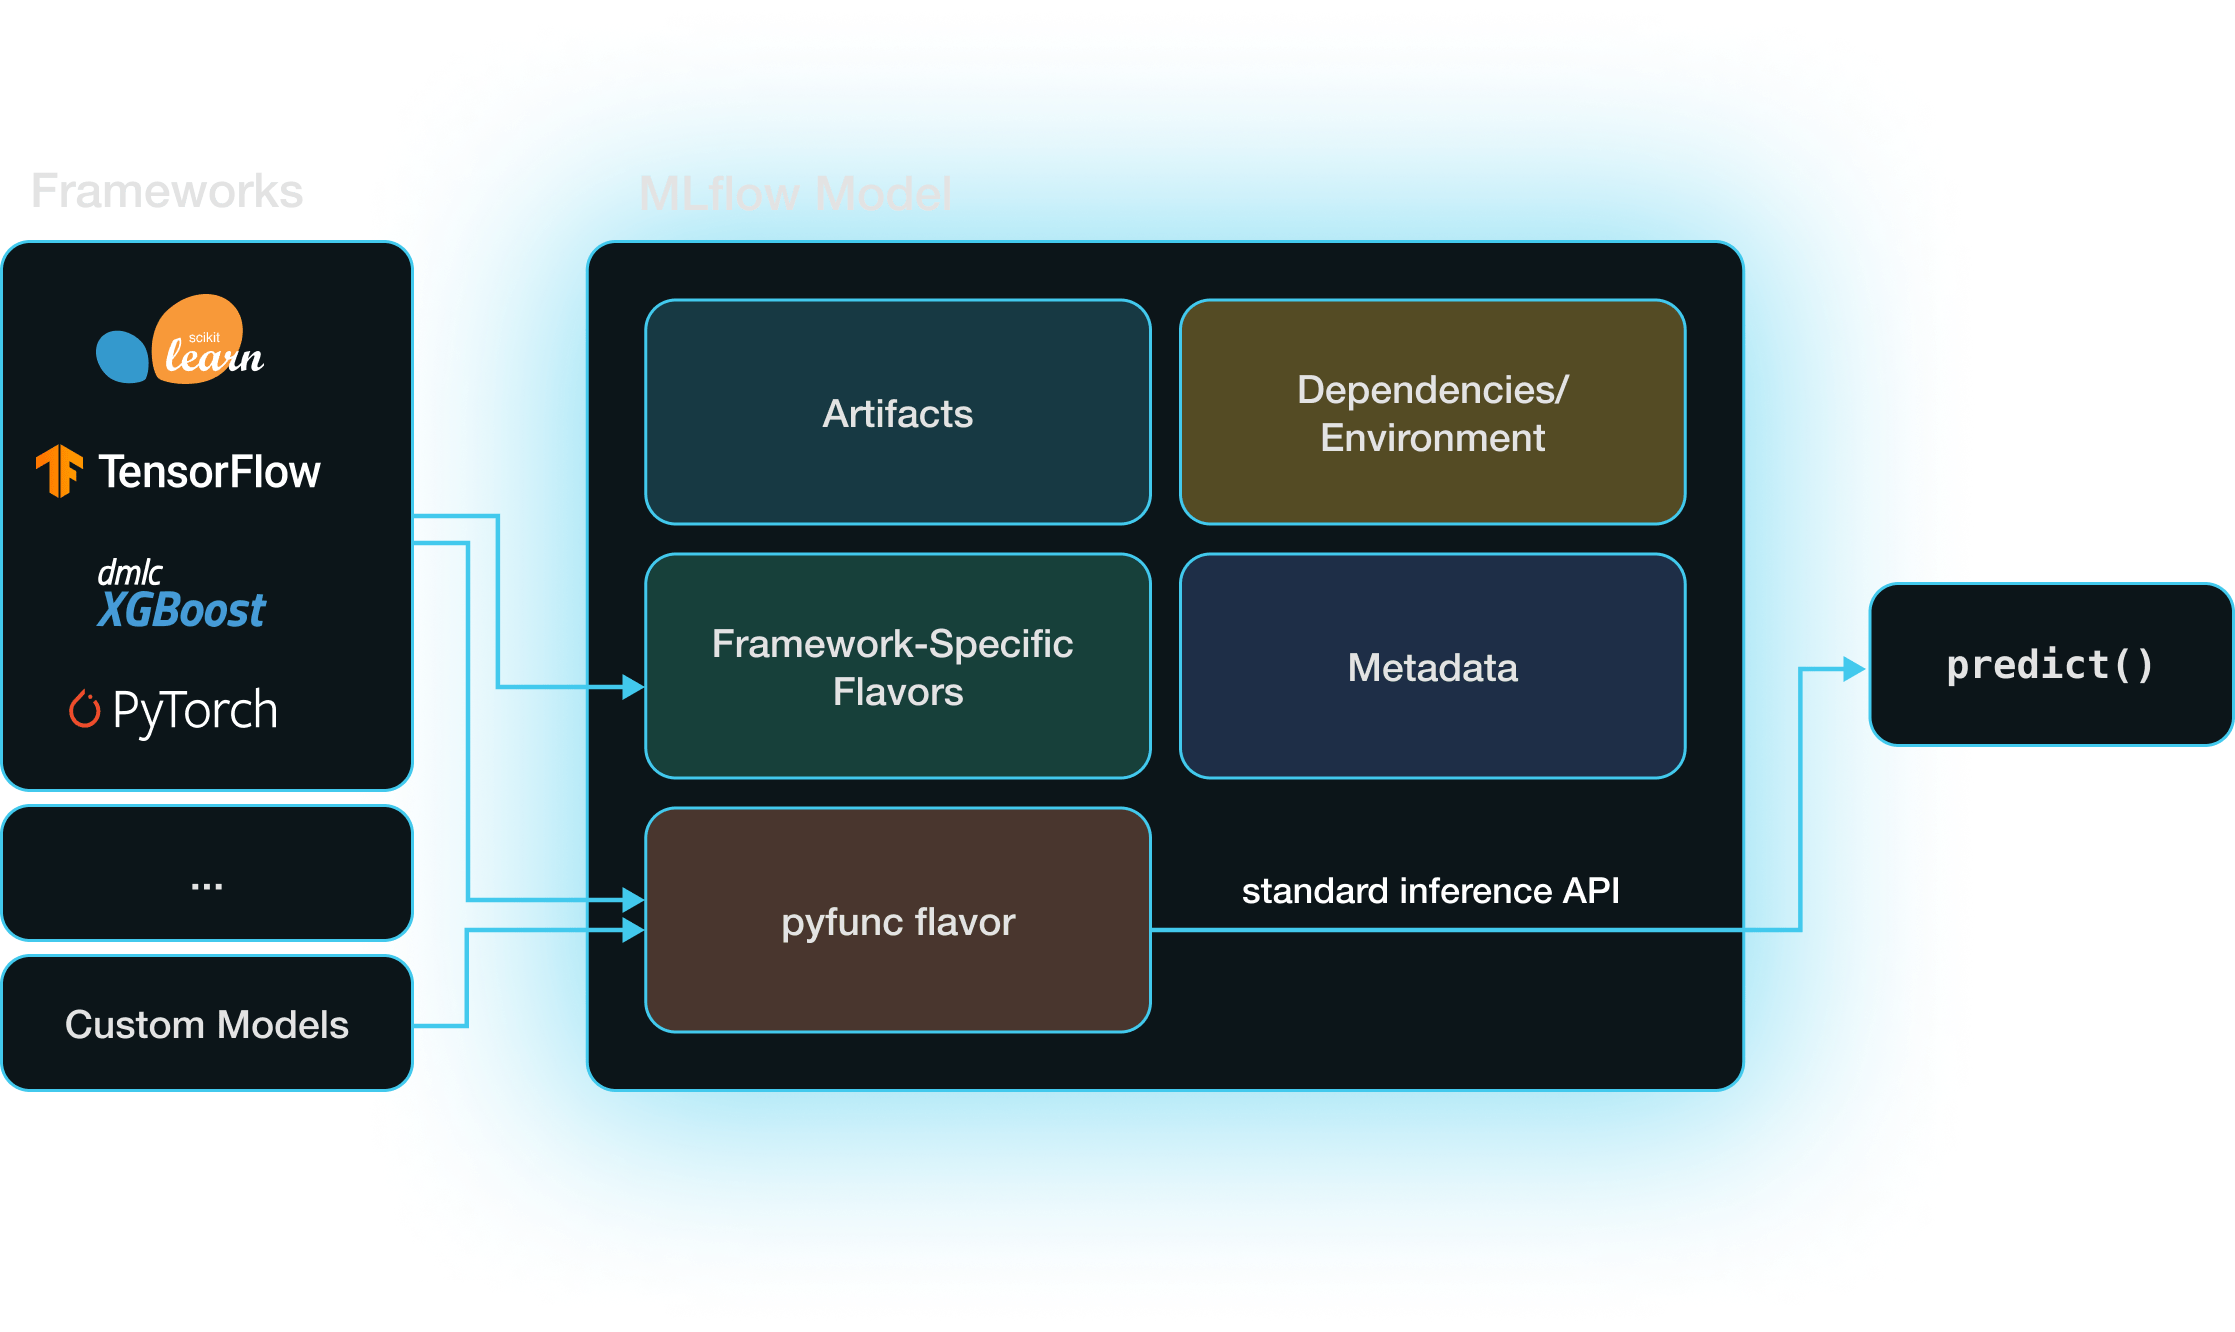
MLflow 模型是一个目录,其中包含在不同环境中复现机器学习模型所需的一切。除了存储的模型本身,最重要的组件是 MLmodel YAML 文件,它指定了模型支持的模型风味。 模型风味是一组规则,规定 MLflow 如何与模型交互(即保存、加载和获取其预测)。
当您在 MLflow 中创建自定义模型时,它具有 python_function 或 pyfunc 模型风味,这是一种跨 MLflow 格式的“通用翻译器”。当您使用内置模型风味在 MLflow 中保存模型时,例如使用 mlflow.sklearn.log_model,该模型除了其特定于框架的风味外,还具有 pyfunc 模型风味。同时拥有特定于框架和 pyfunc 模型风味,可以让您通过该框架的本机 API(例如 scikit-learn)或通过 pyfunc 风味的框架无关的推理 API 来使用模型。
具有 pyfunc 风度的模型会加载为 mlflow.pyfunc.PyfuncModel 类的实例,该类公开了标准化的 predict 方法。这使得无论底层模型的实现细节如何,都可以通过单个函数调用进行直接推理。
定义自定义 MLflow Pyfunc 模型
将任何受支持的机器学习框架的模型保存为 MLflow 模型,都会创建一个 pyfunc 模型风味,该风味提供了一个框架无关的接口来管理和使用该模型。但是,如果您使用的框架没有 MLflow 集成,或者您想从模型中获得一些自定义行为呢? 自定义 pyfunc 模型允许您处理几乎任何框架并集成自定义逻辑。
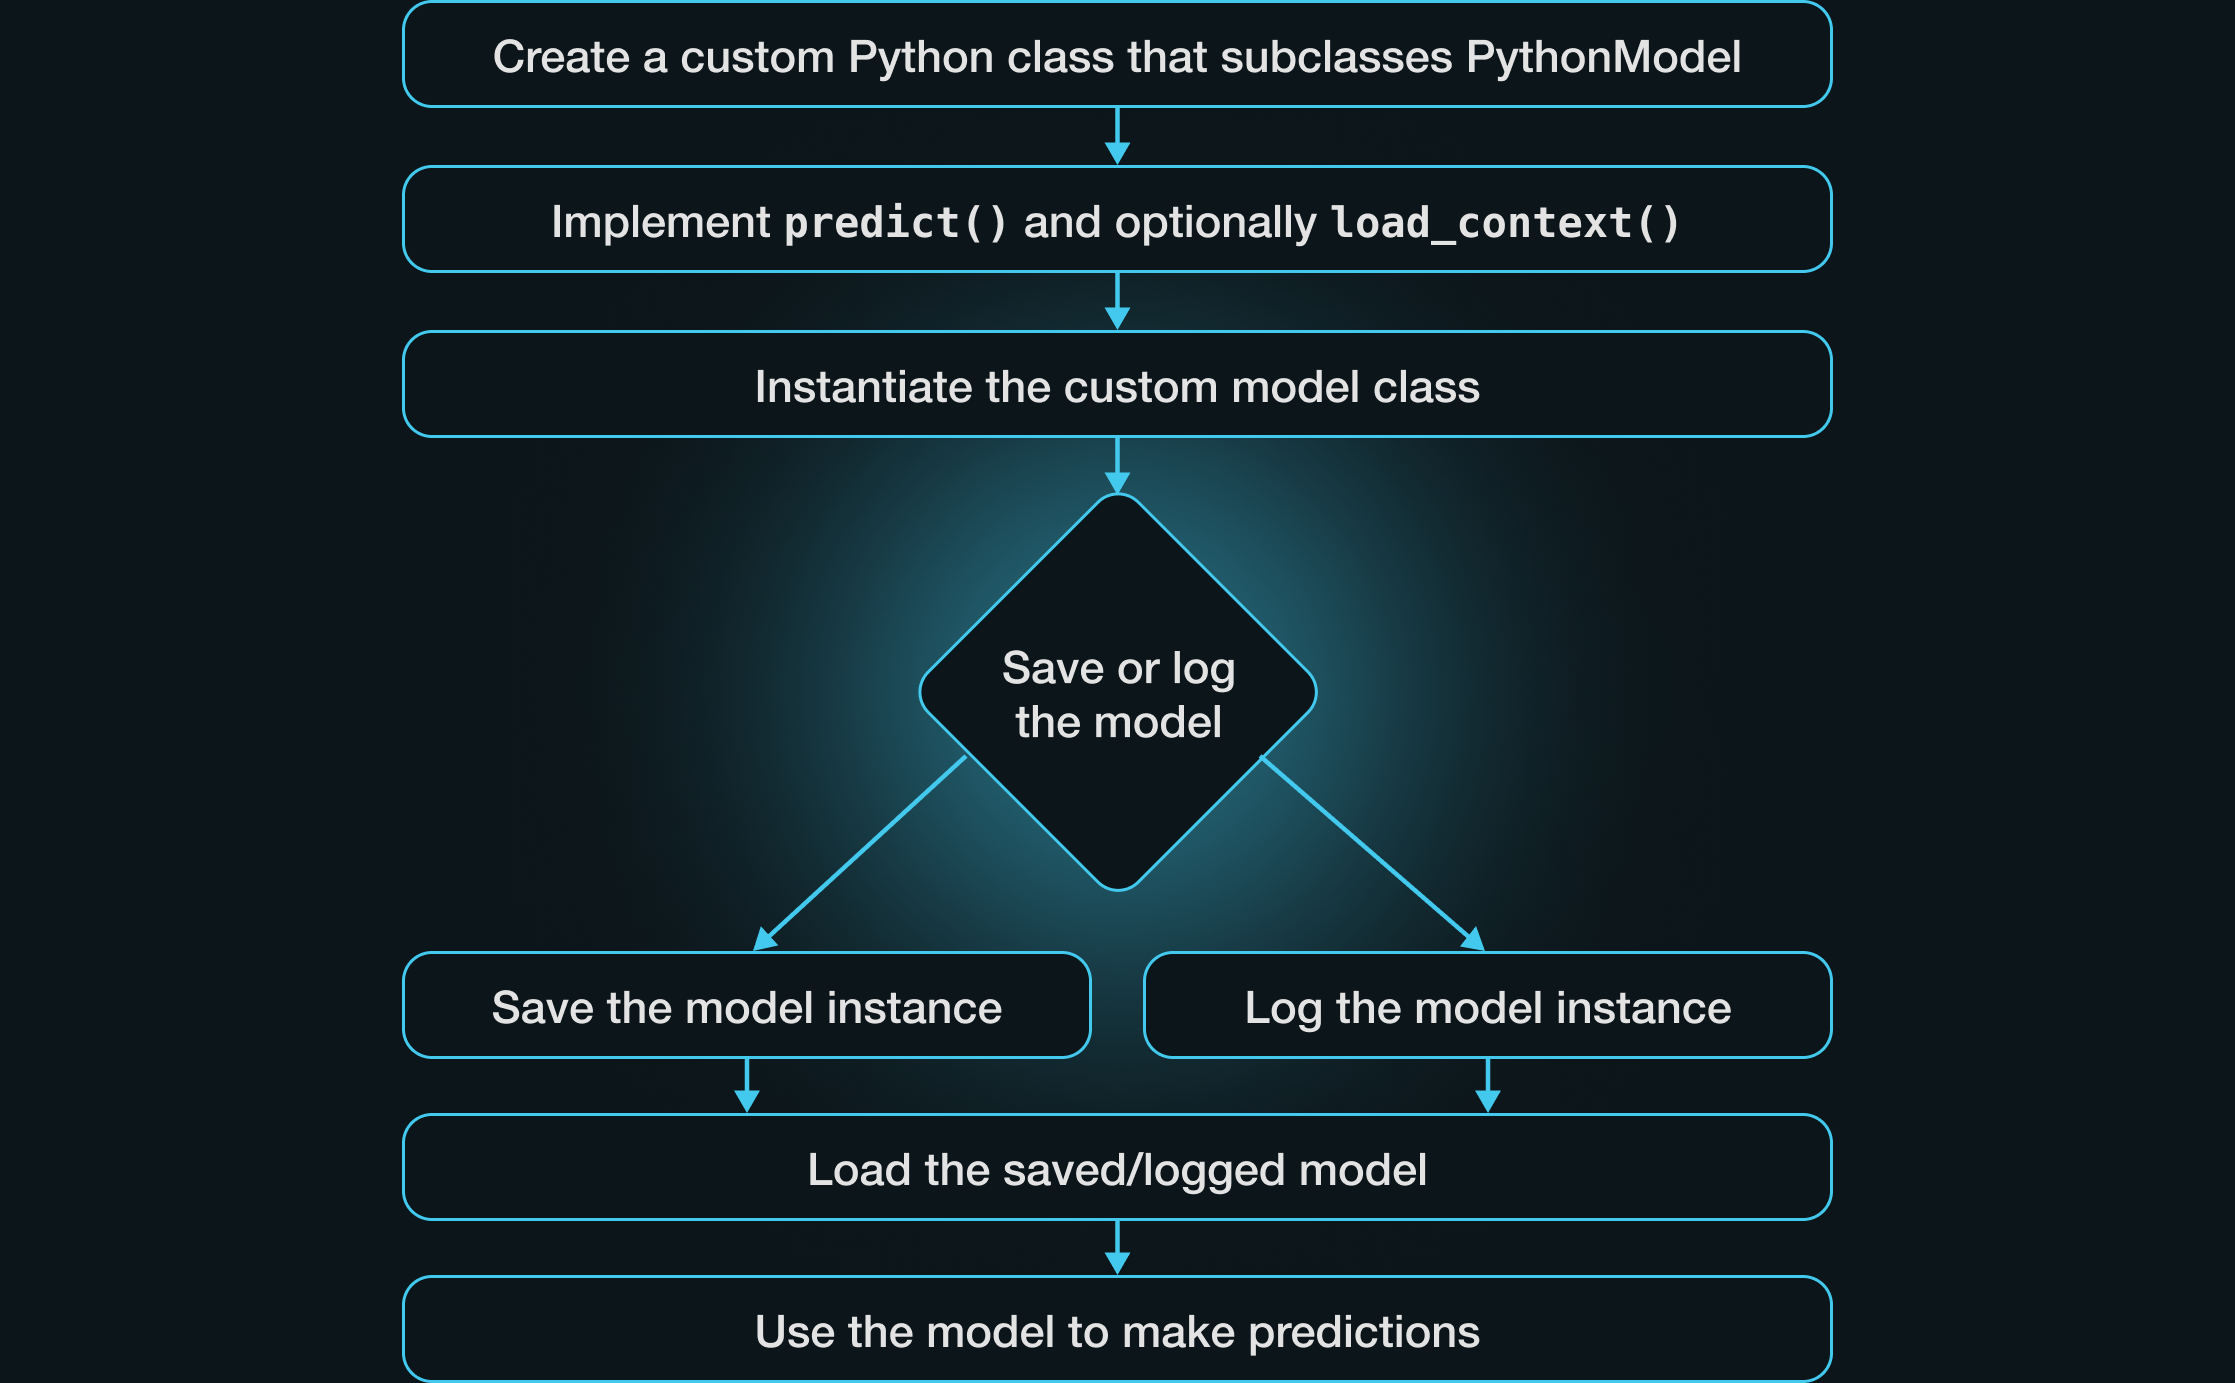
要实现自定义 pyfunc 模型,请定义一个继承自 PythonModel 的新 Python 类并实现必要的方法。最少,这需要实现一个自定义的 predict 方法。接下来,创建模型的实例并记录或保存模型。一旦加载了保存或记录的模型,就可以使用它进行预测。
让我们通过几个例子来学习,每个例子都增加了一点复杂性,并突出了定义自定义 pyfunc 模型的一些不同方面。我们将介绍实现 pyfunc 模型中自定义行为的四种主要技术。
- 实现自定义
predict方法 - 实现自定义
__init__方法 - 实现自定义
load_context方法 - 实现用户定义的自定义方法
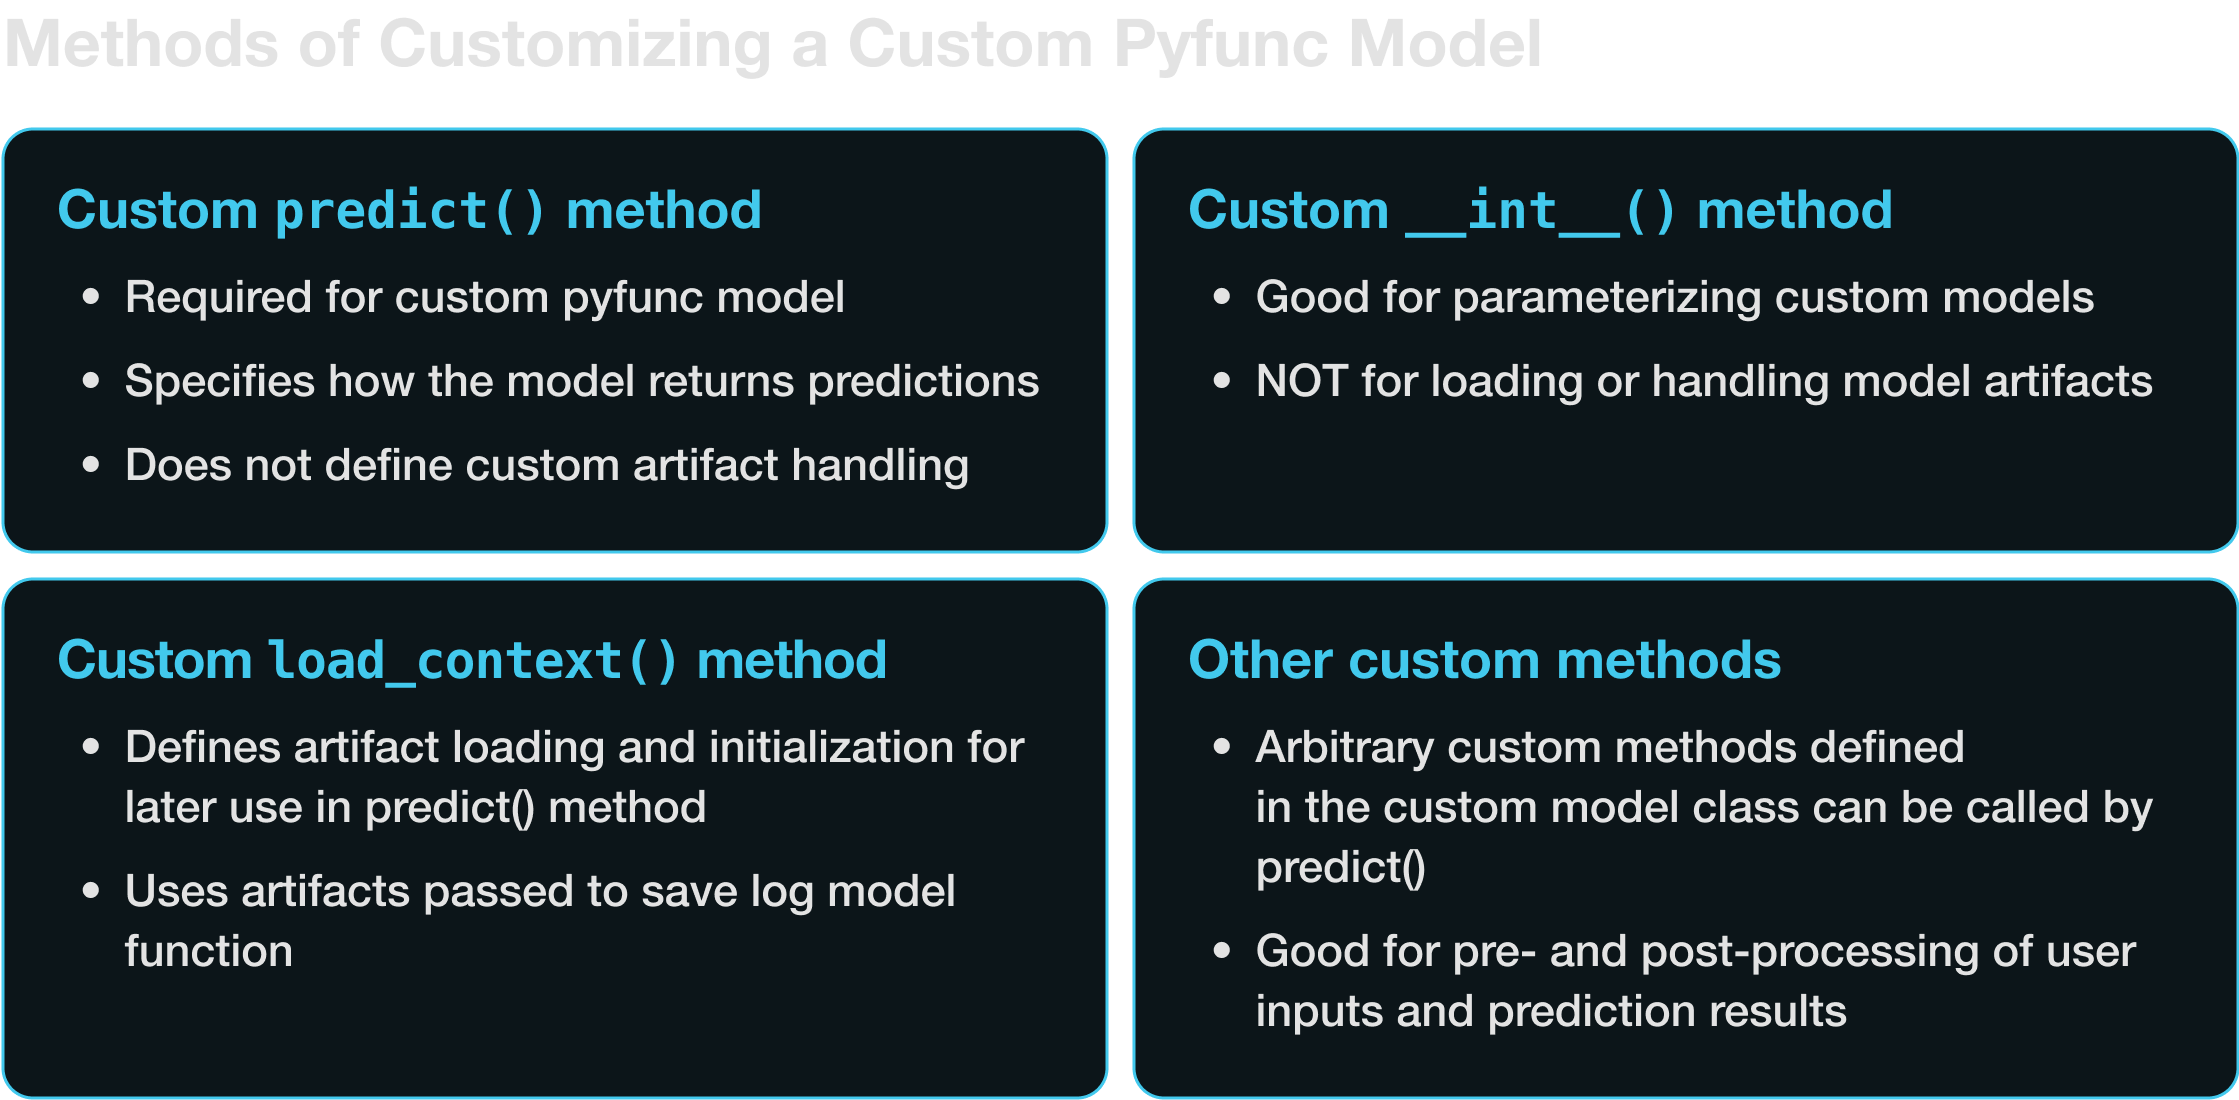
定义自定义 predict 方法
最少,pyfunc 模型应指定一个自定义的 predict 方法,该方法定义了调用 model.predict 时会发生什么。以下是一个自定义模型的示例,该模型对模型输入应用简单的线性变换,将每个输入乘以二并加上三。
import pandas as pd
import mlflow
from mlflow.pyfunc import PythonModel


# Custom PythonModel class
class SimpleLinearModel(PythonModel):
    def predict(self, context, model_input):
        """
        Applies a simple linear transformation
        to the input data. For example, y = 2x + 3.
        """
        # Assuming model_input is a pandas DataFrame with one column
        return pd.DataFrame(2 * model_input + 3)


with mlflow.start_run():
    model_info = mlflow.pyfunc.log_model(
        artifact_path="linear_model",
        python_model=SimpleLinearModel(),
        input_example=pd.DataFrame([10, 20, 30]),
    )
请注意,您也可以(并且应该)在保存/记录模型时包含 签名和 输入示例。如果您传入输入示例,签名将自动推断。模型签名提供了一种 MLflow 来强制执行模型正确使用的方法。
一旦我们定义了模型路径并保存了模型的实例,我们就可以加载保存的模型并使用它来生成预测。
# Now the model can be loaded and used for predictions
loaded_model = mlflow.pyfunc.load_model(model_uri=model_info.model_uri)
model_input = pd.DataFrame([1, 2, 3])  # Example input data
print(loaded_model.predict(model_input))  # Outputs transformed data
这将返回
:    0
: 0  5
: 1  7
: 2  9
请注意,如果自定义 predict 方法是您所需要的全部——也就是说,如果您的模型没有任何需要特殊处理的工件——您可以直接保存或记录 predict 方法,而无需将其包装在 Python 类中。
import mlflow
import pandas as pd


def predict(model_input):
    """
    Applies a simple linear transformation
    to the input data. For example, y = 2x + 3.
    """
    # Assuming model_input is a pandas DataFrame with one column
    return pd.DataFrame(2 * model_input + 3)


# Pass predict method as python_model argument to save/log model
with mlflow.start_run():
    model_info = mlflow.pyfunc.log_model(
        artifact_path="simple_function",
        python_model=predict,
        input_example=pd.DataFrame([10, 20, 30]),
    )
请注意,使用此方法,我们必须包含一个输入示例以及自定义的 predict 方法。我们还必须修改 predict 方法,使其只接受一个输入(即,没有 self 或 context)。运行此示例,然后使用与前面代码块相同的代码加载,将保留与使用类定义的示例相同的输出。
参数化自定义模型
现在假设我们想参数化自定义线性函数模型,以便它可以使用不同的斜率和截距。我们可以定义 __init__ 方法来设置自定义参数,如以下示例所示。请注意,自定义模型类的 __init__ 方法不应用于加载外部资源,如数据文件或预训练模型;这些将在 load_context 方法中处理,我们稍后将讨论。
import pandas as pd
import mlflow
from mlflow.pyfunc import PythonModel


# Custom PythonModel class
class ParameterizedLinearModel(PythonModel):
    def __init__(self, slope, intercept):
        """
        Initialize the parameters of the model. Note that we are not loading
        any external resources here, just setting up the parameters.
        """
        self.slope = slope
        self.intercept = intercept

    def predict(self, context, model_input):
        """
        Applies a simple linear transformation
        to the input data. For example, y = 2x + 3.
        """
        # Assuming model_input is a pandas DataFrame with one column
        return pd.DataFrame(self.slope * model_input + self.intercept)


linear_model = ParameterizedLinearModel(10, 20)

# Saving the model with mlflow
with mlflow.start_run():
    model_info = mlflow.pyfunc.log_model(
        artifact_path="parameter_model",
        python_model=linear_model,
        input_example=pd.DataFrame([10, 20, 30]),
    )
同样,我们可以加载此模型并进行一些预测。
loaded_model = mlflow.pyfunc.load_model(model_uri=model_info.model_uri)
model_input = pd.DataFrame([1, 2, 3])  # Example input data
print(loaded_model.predict(model_input))  # Outputs transformed data
:     0
: 0  30
: 1  40
: 2  50
在许多情况下,我们可能希望以这种方式参数化模型。我们可以在 __init__ 方法中定义变量来:
- 设置模型超参数。
- A/B 测试具有不同参数集的模型。
- 设置用户特定的自定义。
- 切换功能。
- 设置,例如,访问外部 API 的模型的访问凭证和端点。
在某些情况下,我们可能希望在推理时而不是在初始化模型时传递参数。这可以通过 模型推理参数来实现。要使用推理参数,我们必须传递一个有效的模型签名,其中包含 params。以下是如何调整前面的示例以使用推理参数:
import pandas as pd
import mlflow
from mlflow.models import infer_signature
from mlflow.pyfunc import PythonModel


# Custom PythonModel class
class LinearFunctionInferenceParams(PythonModel):
    def predict(self, context, model_input, params):
        """
        Applies a simple linear transformation
        to the input data. For example, y = 2x + 3.
        """
        slope = params["slope"]
        # Assuming model_input is a pandas DataFrame with one column
        return pd.DataFrame(slope * model_input + params["intercept"])


# Set default params
params = {"slope": 2, "intercept": 3}

# Define model signature
signature = infer_signature(model_input=pd.DataFrame([10, 20, 30]), params=params)

# Save the model with mlflow
with mlflow.start_run():
    model_info = mlflow.pyfunc.log_model(
        artifact_path="model_with_params",
        python_model=LinearFunctionInferenceParams(),
        signature=signature,
    )
像以前一样加载模型后,您现在可以将 params 参数传递给 predict 方法,从而可以使用相同的加载模型来处理不同的参数组合。
loaded_model = mlflow.pyfunc.load_model(model_uri=model_info.model_uri)

parameterized_predictions = loaded_model.predict(
    pd.DataFrame([10, 20, 30]), params={"slope": 2, "intercept": 10}
)
print(parameterized_predictions)
:     0
: 0  30
: 1  50
: 2  70
使用 load_context 加载外部资源
自定义模型通常需要外部文件,例如模型权重,才能执行推理。这些文件或工件必须小心处理,以避免不必要地将文件加载到内存中或在模型序列化过程中出现错误。在构建自定义 pyfunc 模型时,您可以使用 load_context 方法来正确处理模型工件。
load_context 方法接收一个 context 对象,其中包含模型在推理过程中可以使用的工件。您可以使用保存或记录模型的 artifacts 参数来指定这些工件,使它们可以通过 context.artifacts 字典在 load_context 方法中访问。
实际上,load_context 方法通常通过处理模型工件的加载来初始化 predict 方法所调用的模型。
这引出了一个重要问题:为什么我们在 load_context 方法中加载工件并定义模型,而不是在 __init__ 或直接在 predict 中?正确使用 load_context 对于 MLflow pyfunc 模型的可维护性、效率、可扩展性和可移植性至关重要。这是因为:
load_context方法在通过mlflow.pyfunc.load_model加载模型时执行一次。此设置可确保在此方法中定义的资源密集型进程(如加载大型模型文件)不会不必要地重复。如果工件加载是在 predict 方法中完成的,那么每次进行预测时都会发生。对于资源密集型模型来说,这是非常低效的。- 保存或记录 MLflow
pyfunc模型涉及对 Python 模型类(您创建的mlflow.pyfunc.PythonModel的子类)及其属性进行序列化。复杂的 ML 模型并非总是与用于序列化 Python 对象的方法兼容,如果它们被创建为 Python 对象的属性,则可能导致错误。
例如,假设我们想加载一个 gguf 模型格式(一种用于存储用于推理的模型的文件格式)的大型语言模型 (LLM),并使用 ctransformers 库运行它。在撰写本文时,没有内置的模型风味允许我们使用 gguf 模型进行推理,因此我们将创建一个自定义 pyfunc 模型,该模型在 load_context 方法中加载所需的库和模型文件。具体来说,我们将加载一个量化版本的 Mistral 7B 模型 AWQ 版本。
首先,我们将使用 huggingface hub cli 下载模型快照。
huggingface-cli download TheBloke/Mistral-7B-v0.1-GGUF \
                mistral-7b-v0.1.Q4_K_M.gguf \
                --local-dir /path/to/mistralfiles/ \
                --local-dir-use-symlinks False
然后我们将定义我们的自定义 pyfunc 模型。请注意添加了 load_context 方法。
import ctransformers
from mlflow.pyfunc import PythonModel


class CTransformersModel(PythonModel):
    def __init__(self, gpu_layers):
        """
        Initialize with GPU layer configuration.
        """
        self.gpu_layers = gpu_layers
        self.model = None

    def load_context(self, context):
        """
        Load the model from the specified artifacts directory.
        """
        model_file_path = context.artifacts["model_file"]

        # Load the model
        self.model = ctransformers.AutoModelForCausalLM.from_pretrained(
            model_path_or_repo_id=model_file_path,
            gpu_layers=self.gpu_layers,
        )

    def predict(self, context, model_input):
        """
        Perform prediction using the loaded model.
        """
        if self.model is None:
            raise ValueError(
                "The model has not been loaded. "
                "Ensure that 'load_context' is properly executed."
            )
        return self.model(model_input)
这里有很多内容,让我们来分解一下。以下是关键点:
- 与以前一样,我们使用
__init__方法来参数化模型(在本例中,是为了设置模型的gpu_layers参数)。 load_context方法的目的是加载predict方法中使用的工件。在这种情况下,我们需要加载模型及其权重。- 您会注意到我们引用了
context.artifacts["model_file"]。这来自mlflow.pyfunc.save_model或mlflow.pyfunc.load_model的artifacts参数,如下面的代码片段所示。这是使用pyfunc模型的重要部分。predict和load_context方法可以通过context.artifacts对象访问save_model或log_model方法的artifacts参数中定义的工件。load_context在通过load_model加载模型时执行;如前所述,这提供了一种方法来确保模型可能耗时的初始化不会在每次使用模型进行预测时都发生。
现在我们可以初始化并保存模型的实例。请注意 save_model 函数的 artifacts 参数。
# Create an instance of the model
mistral_model = CTransformersModel(gpu_layers=50)

# Log the model using mlflow with the model file as an artifact
with mlflow.start_run():
    model_info = mlflow.pyfunc.log_model(
        artifact_path="mistral_model",
        python_model=mistral_model,
        artifacts={"model_file": model_file_path},
        pip_requirements=[
            "ctransformers==0.2.27",
        ],
    )

# Load the saved model
loaded_model = mlflow.pyfunc.load_model(model_info.model_uri)

# Make a prediction with the model
loaded_model.predict("Question: What is the MLflow Pyfunc model flavor?")
总而言之:正确使用 load_context 方法有助于确保模型工件的高效处理,并防止由于尝试将工件定义为模型属性而导致的序列化错误。
定义自定义方法
您可以在自定义 pyfunc 模型中定义自己的方法来处理诸如预处理输入或后处理输出等任务。然后,这些自定义方法可以被 predict 方法调用。请记住,这些自定义方法,就像 __init__ 和 predict 一样,不应用于加载工件。加载工件是 load_context 方法的唯一职责。
例如,我们可以修改 CTransformersModel 来纳入一些提示格式化,如下所示:
import ctransformers
from mlflow.pyfunc import PythonModel


class CTransformersModel(PythonModel):
    def __init__(self, gpu_layers):
        """
        Initialize with GPU layer configuration.
        """
        self.gpu_layers = gpu_layers
        self.model = None

    def load_context(self, context):
        """
        Load the model from the specified artifacts directory.
        """
        model_file_path = context.artifacts["model_file"]

        # Load the model
        self.model = ctransformers.AutoModelForCausalLM.from_pretrained(
            model_path_or_repo_id=model_file_path,
            gpu_layers=self.gpu_layers,
        )

    @staticmethod
    def _format_prompt(prompt):
        """
        Formats the user's prompt
        """
        formatted_prompt = (
            "Question: What is an MLflow Model?\n\n"
            "Answer: An MLflow Model is a directory that includes "
            "everything that is needed to reproduce a machine "
            "learning model across different environments. "
            "It is essentially a container holding the trained model "
            "files, dependencies, environment details, input examples, "
            "and additional metadata. The directory also includes an "
            "MLmodel YAML file, which describes the different "
            f"flavors of the model.\n\nQuestion: {prompt}\nAnswer: "
        )

        return formatted_prompt

    def predict(self, context, model_input):
        """
        Perform prediction using the loaded model.
        """
        if self.model is None:
            raise ValueError(
                "Model was not loaded. Ensure that 'load_context' "
                "is properly executed."
            )
        return self.model(self._format_prompt(model_input))
现在 predict 方法可以访问私有的 _format_prompt 静态方法来对提示应用自定义格式。
依赖项和源代码
上面定义的自定义 CTransformersModel 使用了 ctransformers 库。有几种方法可以确保此库(以及任何其他源代码,包括来自本地设备的代码)能与您的模型一起正确加载。正确指定依赖项对于确保自定义模型在不同环境中按预期工作至关重要。
有三种主要方法需要注意,用于指定依赖项:
- 使用
save_model或log_model的pip_requirements参数显式定义 pip 要求。 - 使用
save_model或log_model的extra_pip_requirements参数向自动生成的依赖项集添加额外的 pip 要求。 - 使用
save_model或log_model的conda_env参数定义 Conda 环境。
前面,我们使用第一种方法指定了需要 ctransformers 库。
# Log the model using mlflow with the model file as an artifact
with mlflow.start_run():
    model_info = mlflow.pyfunc.save_model(
        artifact_path="mistralmodel",
        python_model=mistral_model,
        artifacts={"model_file": "path/to/mistral/model/on/local/filesystem"},
        pip_requirements=[
            "ctransformers==0.2.27",
        ],
    )
如果您不显式指定依赖项,MLflow 将尝试推断正确的依赖项集和环境详细信息。为了提高准确性,强烈建议在保存或记录模型时包含 input_example,因为会内部执行一个示例推理步骤,该步骤将捕获与推理执行相关的任何加载的库引用,从而提高记录正确依赖项的概率。
您还可以使用 code_path 参数来处理本地文件系统上的自定义代码。code_path 接受指向 Python 文件依赖项的路径列表,并在加载模型之前将它们添加到系统路径的前面,因此自定义 pyfunc 模型可以从这些模块导入。
有关 pip、Conda 和本地代码要求的接受格式的更多详细信息,请参阅 log_model 和 save_model 函数的文档。
总结:MLflow 中的自定义 Pyfunc 模型
MLflow 提供了内置方法来处理来自许多流行机器学习框架的模型,例如 scikit-learn、PyTorch 和 Transformers。当您想处理尚无内置模型风味模型时,或者当您想为具有内置模型风味的模型的自定义预测方法实现自定义方法时,可以定义自己的自定义 mlflow.pyfunc 模型。
有几种方法可以自定义 pyfunc 模型以获得所需的行为。最少,您可以实现自定义的 predict 方法。如果您的模型需要保存或加载工件,您还应该实现 load_context 方法。为了进一步自定义,您可以使用 __init__ 方法来设置自定义属性,并定义自己的自定义方法来进行预处理和后处理。结合这些方法,您就可以灵活地为机器学习模型定义自定义逻辑。
深入学习
有兴趣了解更多关于自定义 pyfunc 实现的信息吗?您可以访问: