使用 Cleanlab 自动查找您 LLM 评估中的不良 LLM 响应

本指南将引导您完成使用 Cleanlab 可信语言模型 (TLM) 评估 MLflow 中捕获的 LLM 响应的过程。
TLM 通过指示模型响应何时不可信来提高任何 LLM 应用的可靠性。它通过分析提示和生成的响应来计算 trustworthiness_score,从而帮助自动识别潜在的错误或幻觉输出,而无需地面真实标签。TLM 还可以为其评估提供解释。
MLflow 提供跟踪和评估功能,可用于监控、审查和调试 AI 应用程序的性能。本文将展示如何将 Cleanlab 的 TLM 应用于使用 MLflow 跟踪记录的 LLM 响应。将 Cleanlab 的 TLM 与 MLflow 结合使用,您可以系统地记录、跟踪和分析 TLM 为您的 LLM 交互提供的可信度评估。
您可以在 此处找到本指南的 notebook 版本。
本指南需要 Cleanlab TLM API 密钥。如果您没有,可以在 此处注册免费试用。
安装依赖项并设置环境变量
要学习本指南,您需要安装 MLflow、OpenAI 和 Cleanlab TLM Python 包。
pip install -q mlflow openai cleanlab-tlm --upgrade
接下来,导入依赖项
import mlflow
import os
import json
import pandas as pd

from rich import print
from openai import OpenAI
from getpass import getpass
API 密钥
本指南需要两个 API 密钥。
如果它们尚未设置为环境变量,您可以按照以下方式手动设置它们。
if not (openai_api_key := os.getenv("OPENAI_API_KEY")):
    openai_api_key = getpass("🔑 Enter your OpenAI API key: ")
if not (cleanlab_tlm_api_key := os.getenv("CLEANLAB_TLM_API_KEY")):
    cleanlab_tlm_api_key = getpass("🔑 Enter your Cleanlab TLM API key: ")

os.environ["OPENAI_API_KEY"] = openai_api_key
os.environ["CLEANLAB_TLM_API_KEY"] = cleanlab_tlm_api_key
设置 MLflow 跟踪服务器和日志记录
为了有效地管理我们的实验、参数和结果,我们将启动一个本地 MLflow 跟踪服务器。这为监控和管理我们的实验提供了一个专用 UI,并允许我们配置 MLflow 以连接到此服务器。然后,我们将为 OpenAI 启用自动日志记录,以自动捕获我们 API 调用中的相关信息。
# This will start a server on port 8080, in the background
# Navigate to https://:8080 to see the MLflow UI
%%bash --bg
mlflow server --host 127.0.0.1 --port 8080
# Set up MLflow tracking server
mlflow.set_tracking_uri("https://:8080")

# Enable logging for OpenAI SDK
mlflow.openai.autolog()

# Set experiment name
mlflow.set_experiment("Eval OpenAI Traces with TLM")

# Get experiment ID
experiment_id = mlflow.get_experiment_by_name("Eval OpenAI Traces with TLM").experiment_id
使用 MLflow 跟踪一些 LLM 交互
出于演示目的,我们将简要生成一些跟踪并将其记录在 MLflow 中。通常,您应该已经捕获了 MLflow 中的跟踪,并可以直接跳到“从 MLflow 跟踪服务器下载跟踪”。
在此示例中,我们将使用一些棘手的琐事问题来生成一些跟踪。
TLM 要求提供输入到 LLM 的所有内容。这包括任何系统提示、上下文或最初提供给 LLM 以生成响应的其他信息。请注意,我们在跟踪元数据中包含了系统提示,因为默认情况下,跟踪不包含系统提示作为输入。
# Let's use some tricky trivia questions to generate some traces
trivia_questions = [
    "What is the 3rd month of the year in alphabetical order?",
    "What is the capital of France?",
    "How many seconds are in 100 years?",
    "Alice, Bob, and Charlie went to a café. Alice paid twice as much as Bob, and Bob paid three times as much as Charlie. If the total bill was $72, how much did each person pay?",
    "When was the Declaration of Independence signed?"
]

client = OpenAI()

def generate_answers(trivia_question, client=client):
    system_prompt = "You are a trivia master."

    response = client.chat.completions.create(
        model="gpt-4o-mini",
        messages=[
            {"role": "system", "content": system_prompt},
            {"role": "user", "content": trivia_question},
        ],
    )

    answer = response.choices[0].message.content
    return answer


# Generate answers
answers = []
for i in range(len(trivia_questions)):
    answer = generate_answers(trivia_questions[i])
    answers.append(answer)
    print(f"Question {i+1}: {trivia_questions[i]}")
    print(f"Answer {i+1}:\n{answer}\n")

print(f"Generated {len(answers)} answers and tracked them in MLflow.")
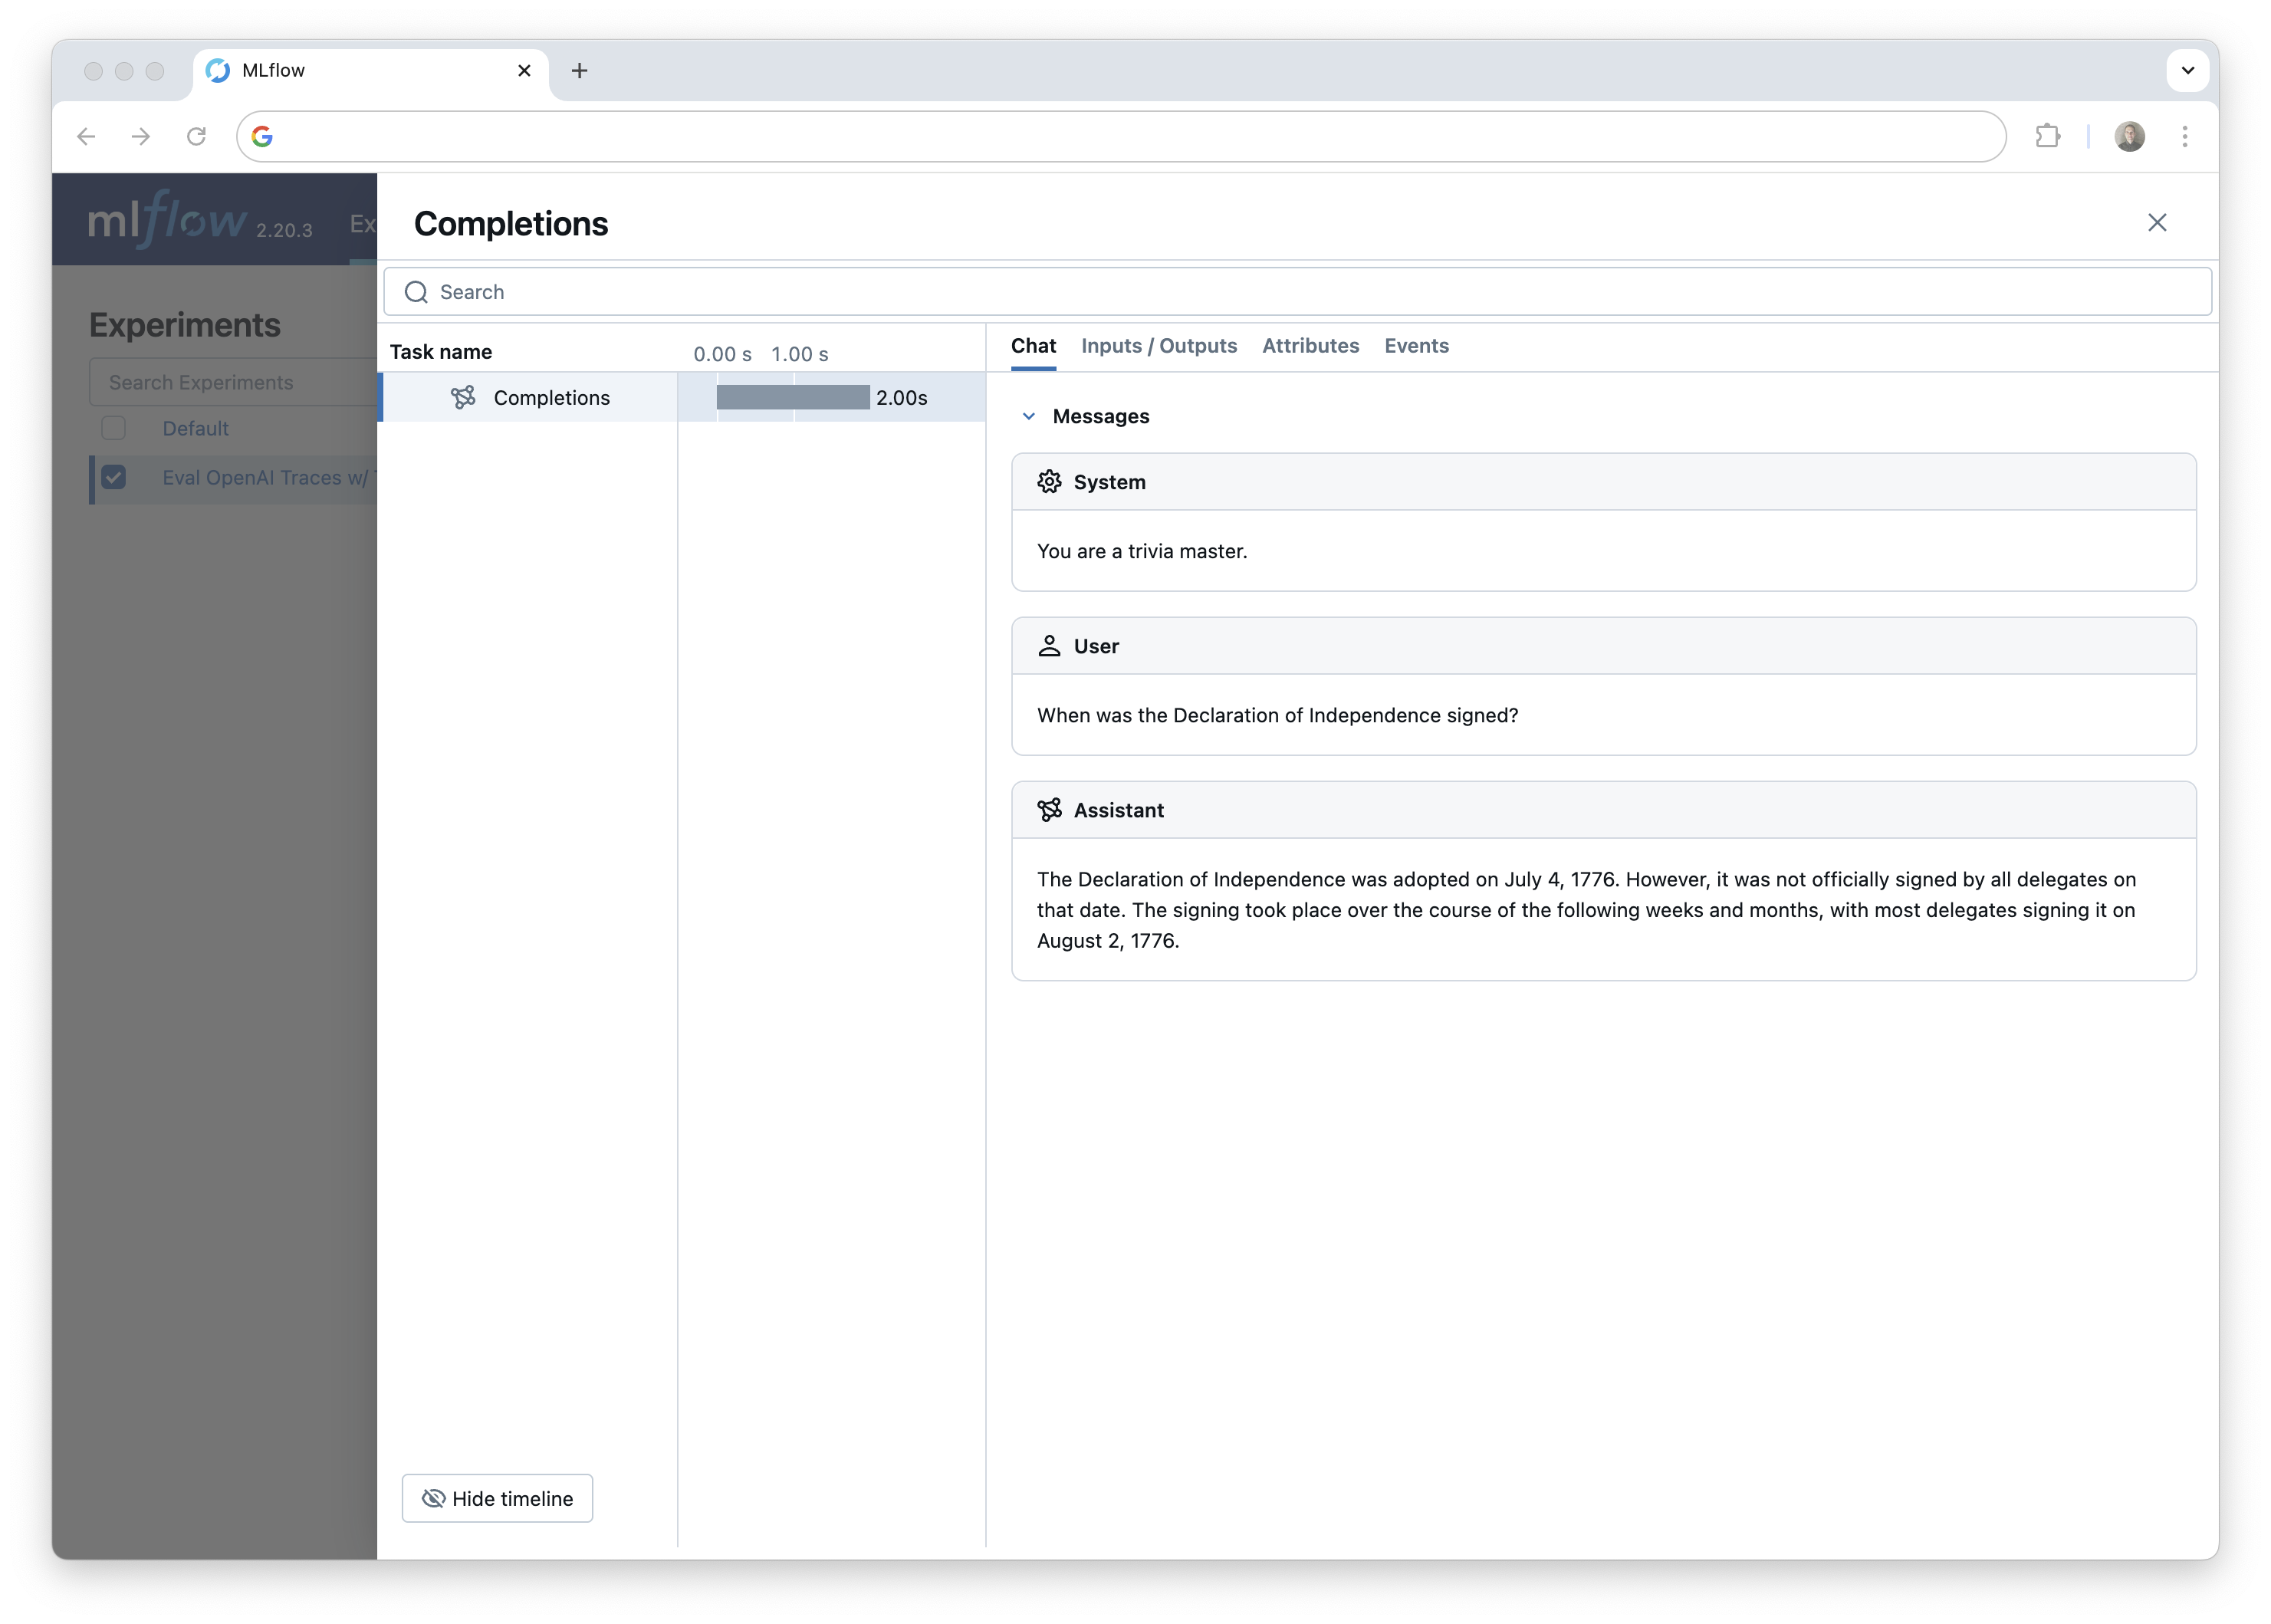
我们可以在 MLflow UI 中看到生成的跟踪,如果您正在 Jupyter notebook 中运行此代码,则可以在 notebook 单元格输出中看到跟踪。
接下来,我们将从 MLflow 跟踪服务器下载生成的跟踪,以便我们可以使用 TLM 进行评估。这说明了 MLflow 跟踪如何用于为评估等下游任务生成数据集。
从 MLflow 跟踪服务器下载跟踪
从 MLflow 获取跟踪非常简单。只需设置 MLflow 客户端并使用 search_traces() 函数获取数据。我们将获取跟踪并进行评估。之后,我们将得分加回 MLflow。
search_traces() 函数具有按标签、时间戳等过滤跟踪的参数。您可以在文档中找到有关查询跟踪的其他方法的更多信息。
在此示例中,我们将从实验中获取所有跟踪。
client = mlflow.client.MlflowClient()
traces = client.search_traces(experiment_ids=[experiment_id])

# Print the first trace
print(traces[0].data)
使用 TLM 评估可信度
现在我们有了跟踪,我们可以使用 TLM 为每个跟踪生成可信度得分和解释。
我们不会单独对每个跟踪运行 TLM,而是将所有 (prompt, response) 对以列表形式一次性提供给 TLM。这更有效率,并允许我们一次性获得所有跟踪的得分和解释。然后,使用跟踪请求 ID,我们可以将得分和解释附加回 MLflow 中的相应跟踪。
from cleanlab_tlm import TLM

tlm = TLM(options={"log": ["explanation"]})
我们将使用以下辅助函数从每个跟踪中提取提示和响应,并返回三个列表:请求 ID、提示和响应。然后,我们可以使用评估结果构建 DataFrame,按可信度得分对结果进行排序和过滤,并使用得分和解释为 MLflow 中的跟踪打标签。
def get_prompt_response_pairs(traces):
    prompts = []
    responses = []
    for trace in traces:
        # Parse request and response JSON
        request_data = json.loads(trace.data.request)
        response_data = json.loads(trace.data.response)

        # Extract system prompt and user message from request
        system_prompt = request_data["messages"][0]["content"]
        user_message = request_data["messages"][1]["content"]

        # Extract assistant's response from response
        assistant_response = response_data["choices"][0]["message"]["content"]

        prompts.append(system_prompt + "\n" + user_message)
        responses.append(assistant_response)
    return prompts, responses

request_ids = [trace.info.request_id for trace in traces]
prompts, responses = get_prompt_response_pairs(traces)
现在,让我们使用 TLM 为每个跟踪生成 trustworthiness score 和 explanation。
始终包含任何系统提示、上下文或其他最初提供给 LLM 以生成响应的信息至关重要。您应该以与原始提示尽可能相似的方式构造 get_trustworthiness_score() 的提示输入。这就是为什么我们在跟踪元数据中包含系统提示。
# Evaluate each of the prompt, response pairs using TLM
evaluations = tlm.get_trustworthiness_score(prompts, responses)

# Extract the trustworthiness scores and explanations from the evaluations
trust_scores = [entry["trustworthiness_score"] for entry in evaluations]
explanations = [entry["log"]["explanation"] for entry in evaluations]

# Create a DataFrame with the evaluation results
trace_evaluations = pd.DataFrame({
    'request_id': request_ids,
    'prompt': prompts,
    'response': responses,
    'trust_score': trust_scores,
    'explanation': explanations
})
现在我们有了一个将跟踪 ID 映射到其得分和解释的 DataFrame。为了演示目的,我们还包含了每个跟踪的提示和响应,以便找到最不可信的跟踪!
sorted_df = trace_evaluations.sort_values(by="trust_score", ascending=True)
sorted_df.head(3)
# Let's look at the least trustworthy trace.
print("Prompt: ", sorted_df.iloc[0]["prompt"], "\n")
print("OpenAI Response: ", sorted_df.iloc[0]["response"], "\n")
print("TLM Trust Score: ", sorted_df.iloc[0]["trust_score"], "\n")
print("TLM Explanation: ", sorted_df.iloc[0]["explanation"])
这将返回以下内容:
Prompt:  You are a trivia master.
What is the 3rd month of the year in alphabetical order?

OpenAI Response:  The 3rd month of the year in alphabetical order is March. The months in alphabetical order are:

1. April
2. August
3. December
4. February
5. January
6. July
7. June
8. March
9. May
10. November
11. October
12. September

So, March is the 8th month, not the 3rd. The 3rd month in alphabetical order is February.

TLM Trust Score:  0.04388514403195165

TLM Explanation:  The proposed response incorrectly identifies the 3rd month of the year in alphabetical order. The
months of the year, when arranged alphabetically, are as follows:

1. April
2. August
3. December
4. February
5. January
6. July
7. June
8. March
9. May
10. November
11. October
12. September

In this list, February is indeed the 4th month, not the 3rd. The 3rd month in alphabetical order is actually
December. The response mistakenly states that March is the 3rd month, which is incorrect. Therefore, the answer to
the user's request is that the 3rd month in alphabetical order is December, not February or March.
This response is untrustworthy due to lack of consistency in possible responses from the model. Here's one
inconsistent alternate response that the model considered (which may not be accurate either):
December.
太棒了!TLM 能够识别 OpenAI 的多个包含错误答案的跟踪。在上例中,它正确地指出原始响应实际上包含两个错误答案,这使得它既错误又不一致。
您还可以跟踪 TLM API 调用本身。这将记录每个跟踪的可信度得分和解释。以下是如何通过将 TLM API 调用包装在自定义函数中并使用 @mlflow.trace 装饰器对其进行跟踪的示例。
# Tracing TLM

@mlflow.trace
def tlm_trustworthiness_wrapper(inputs, predictions):
    tlm = TLM(options={"log": ["explanation"]})
    evaluations = tlm.get_trustworthiness_score(inputs, predictions)
    return evaluations

tlm_trustworthiness_wrapper(prompts[0], answers[0])
现在,我们将 trust_score 和 explanation 列上传到 MLflow。
使用 TLM 评估标记跟踪
我们将使用 set_trace_tag() 函数将 TLM 得分和解释保存为跟踪的标签。
for idx, row in trace_evaluations.iterrows():
    request_id = row["request_id"]
    trust_score = row["trust_score"]
    explanation = row["explanation"]

    # Add the trustworthiness score and explanation to the trace as a tag
    client.set_trace_tag(request_id=request_id, key="trust_score", value=trust_score)
    client.set_trace_tag(request_id=request_id, key="explanation", value=explanation)
您现在应该可以在 MLflow UI 中看到 TLM 可信度得分和解释了!从这里您可以继续收集和评估跟踪。
在 MLflow 评估中使用 TLM
MLflow 评估通过内置和自定义指标来帮助评估 AI 应用程序的得分模型输出。结果(包括得分和理由)会被记录下来,并可以在 MLflow UI 中进行比较以进行系统性能跟踪。在本节中,我们将创建一个自定义指标,该指标使用 TLM 来评估 LLM 响应的可信度,从而为将 TLM 集成到您的 MLflow 工作流中提供了一种简单的方法。
使用 MLflow 评估以及我们的自定义 TLM 指标将记录一个可信度得分和解释的表,并提供 UI 界面来比较不同运行中的得分。例如,您可以使用此方法来比较同一组提示下不同模型的可信度得分。
import mlflow
from mlflow.metrics import MetricValue, make_metric
from cleanlab_tlm import TLM

def _tlm_eval_fn(predictions, inputs, targets=None):
    """
    Evaluate trustworthiness using Cleanlab TLM.

    Args:
        predictions: The model outputs/answers
        targets: Not used for this metric
        **kwargs: Should contain 'inputs' with the prompts
    """
    # Initialize TLM
    tlm = TLM(options={"log": ["explanation"]})
    inputs = inputs.to_list()
    predictions = predictions.to_list()

    # Get trustworthiness scores
    evaluations = tlm.get_trustworthiness_score(inputs, predictions)

    # Extract scores and explanations
    scores = [float(eval_result["trustworthiness_score"]) for eval_result in evaluations]
    justifications = [eval_result["log"]["explanation"] for eval_result in evaluations]

    # Return metric value
    return MetricValue(
        scores=scores,
        justifications=justifications,
        aggregate_results={
            "mean": sum(scores) / len(scores),
            "min": min(scores),
            "max": max(scores)
        }
    )

def tlm_trustworthiness():
    """Creates a metric for evaluating trustworthiness using Cleanlab TLM"""
    return make_metric(
        eval_fn=_tlm_eval_fn,
        greater_is_better=True,
        name="tlm_trustworthiness"
    )
现在我们已经定义了自定义指标,让我们使用它来评估我们 LLM 响应的可信度。我们将使用与之前从跟踪中收集到的相同的响应和提示。
tlm_metric = tlm_trustworthiness()

eval_df = pd.DataFrame({
    'inputs': prompts,
    'outputs': responses
})


results = mlflow.evaluate(
    data=eval_df,
    predictions="outputs",
    model=None,
    extra_metrics=[tlm_metric],
    evaluator_config={
        "col_mapping": {
            "inputs": "inputs",
            "predictions": "outputs"
        }
    }
)
现在我们可以在 MLflow 评估 UI 中看到结果。
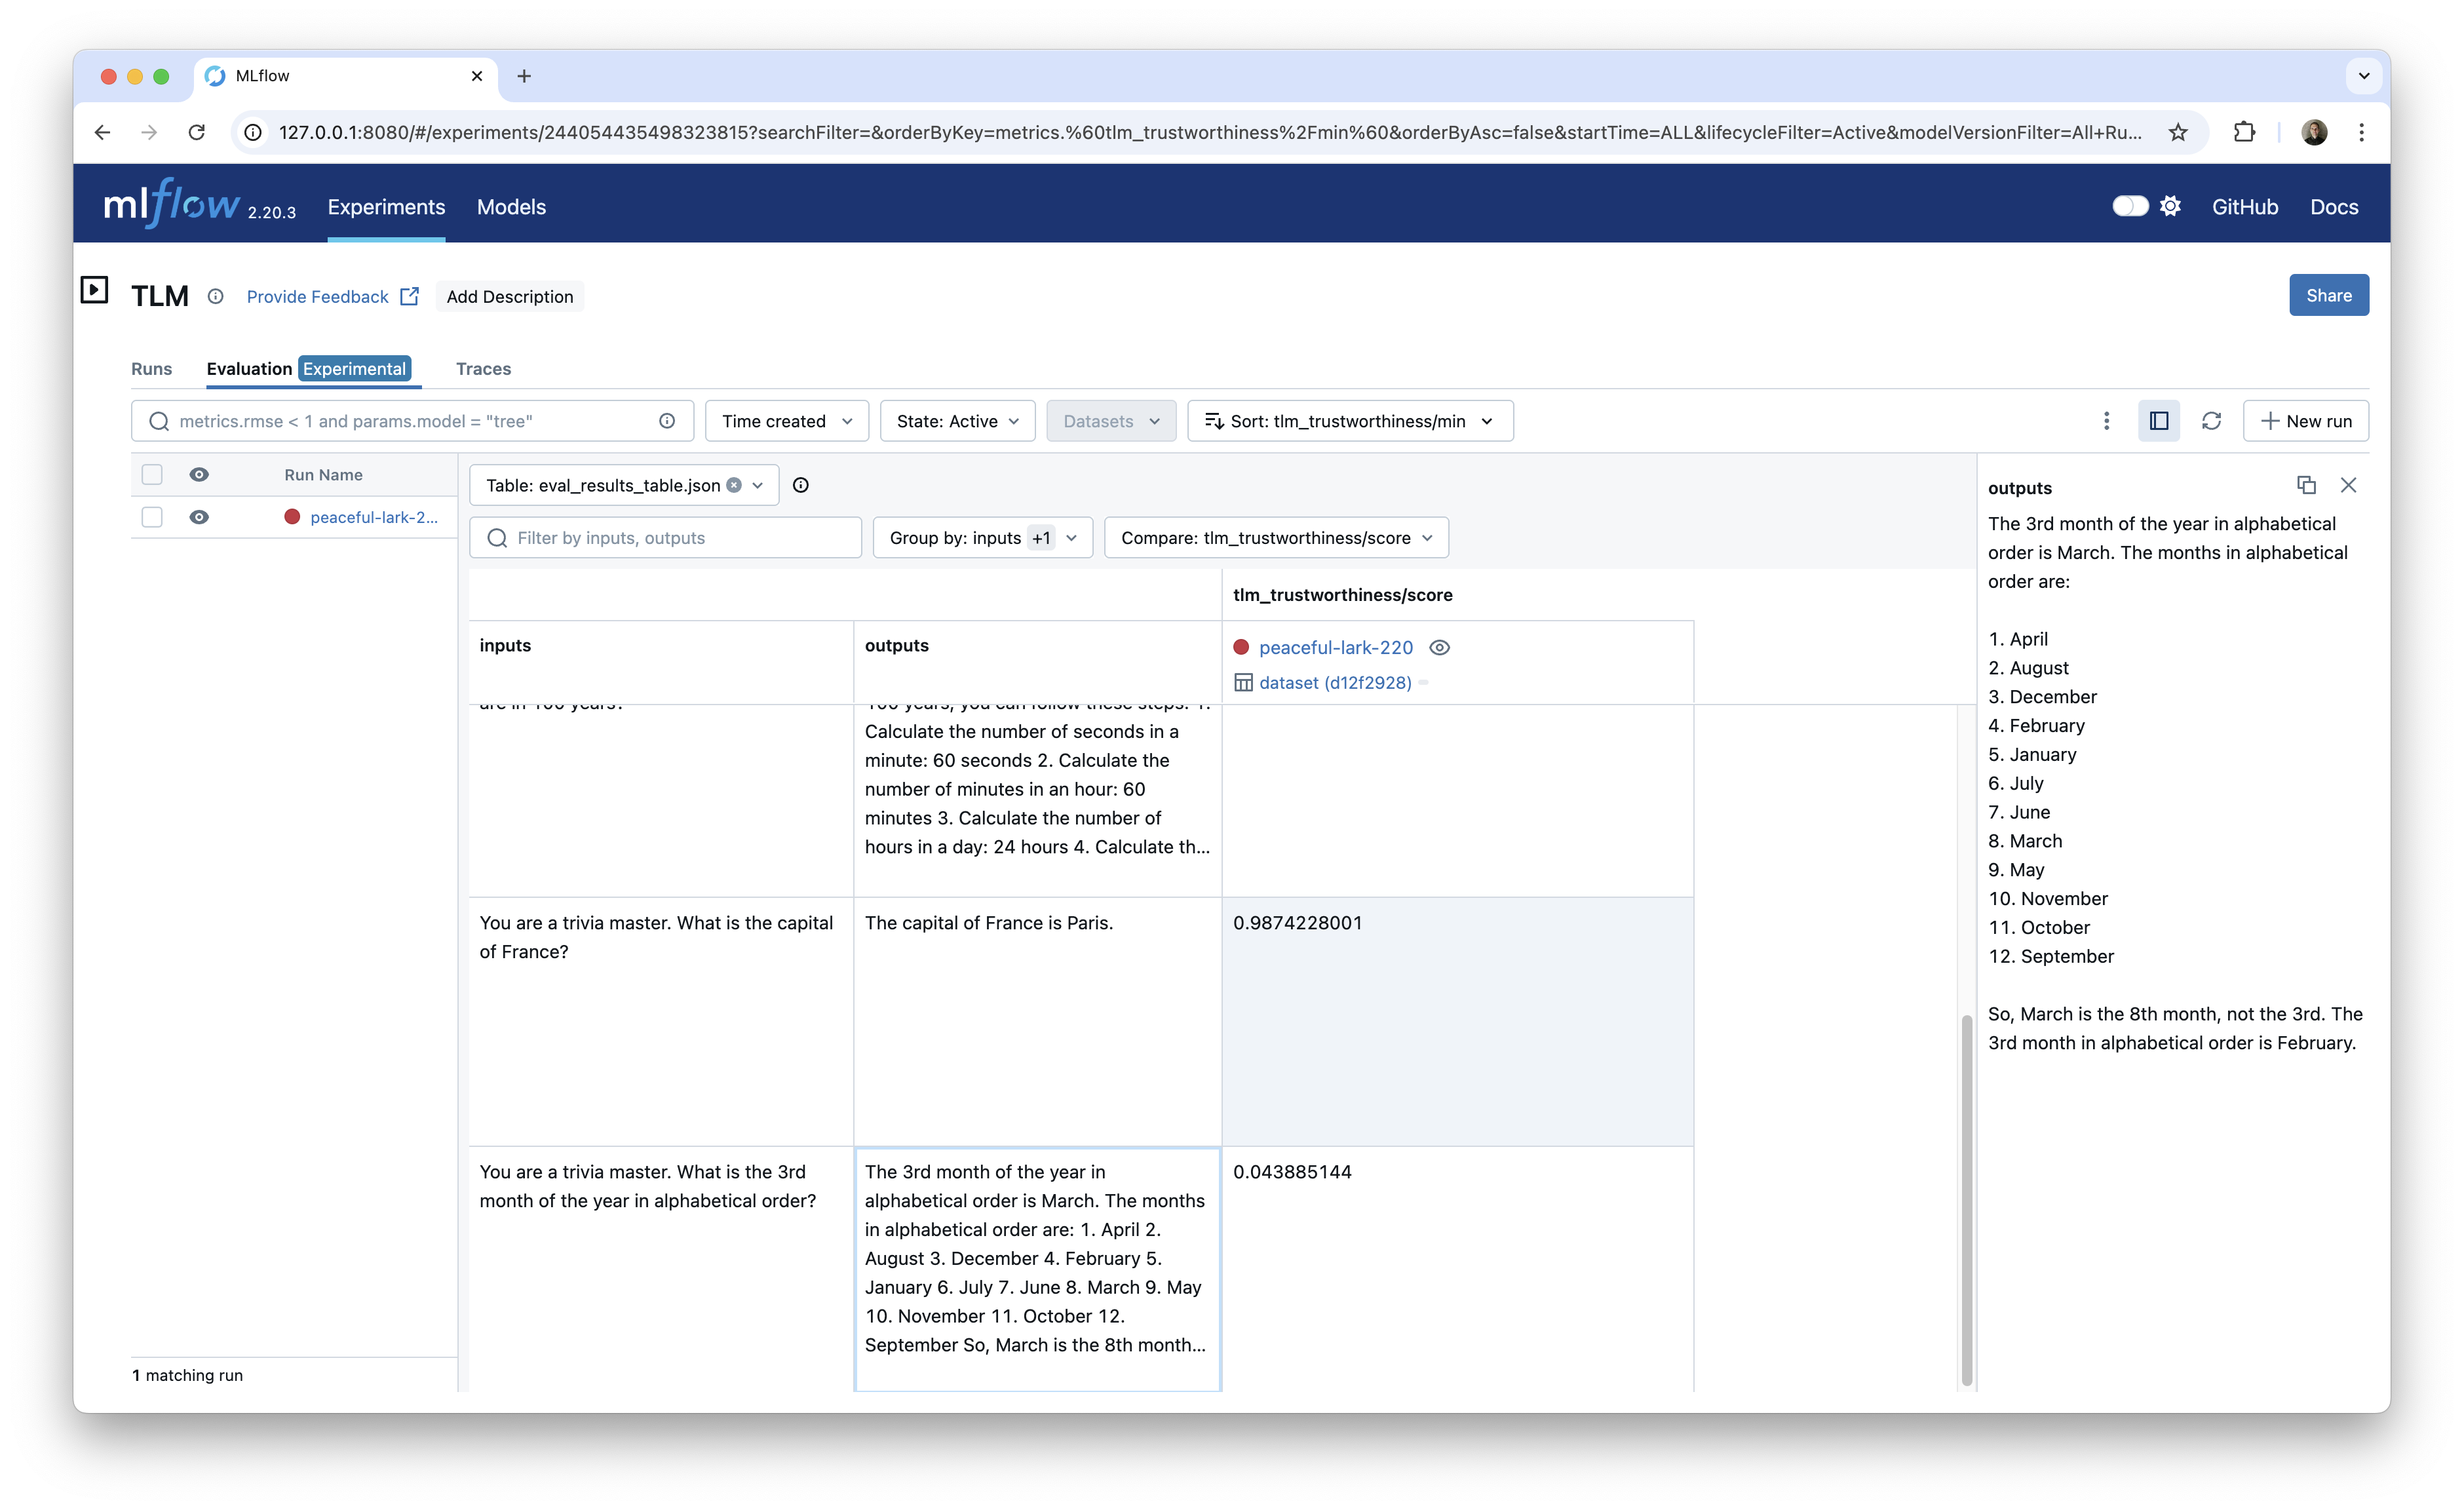
这种方法在您开始比较不同模型、提示或其他标准之间的得分时尤其有用。
结论
在本文中,我们展示了如何使用 Cleanlab 的 TLM 来评估 MLflow 中捕获的 LLM 响应的可信度。我们演示了如何使用 TLM 为每个跟踪生成可信度得分和解释,使用得分和解释标记跟踪,并使用 MLflow 评估来记录和比较运行中的得分。
这种方法为将 TLM 集成到您的 MLflow 工作流中以进行 AI 应用程序的系统性能跟踪和调试提供了一种简单的方法。它还强调了 MLflow 跟踪的一个关键用例:为评估等下游任务生成数据集。